background image

Echo 2 User Guide 


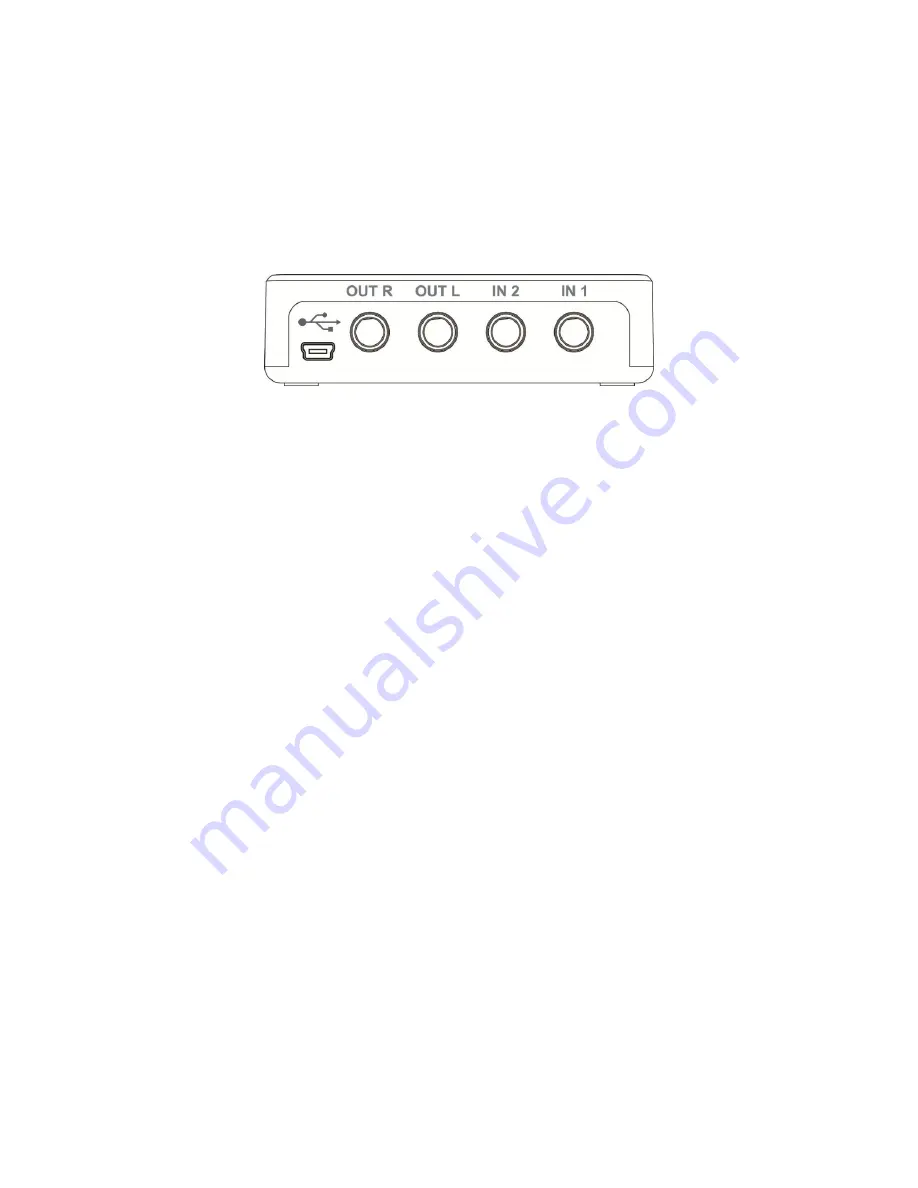
Echo 2 Connections


Audio connections are made using the four jacks on the rear of the Echo

 2: 


Inputs 


The Echo 2 has two ¼” TRS (

T

ip-

R

ing-

S

hield) balanced input jacks labeled 

“IN1” and “IN2”.  You can connect virtually any type of analog signal to 
these jacks, such as guitars, keyboards, microphones, line level signals, or 
mixer boards.  Each input has a built-in acoustically transparent, quiet, 
studio-grade preamp.   
 
You can plug a microphone directly into the Echo 2 without using an 
external preamp.  The Echo 2 can provide phantom power.  If your 
microphone has an XLR connector, you can use the included adapter 
cable.   
 
You can also connect guitars, keyboards, or other equipment using 
¼”cables.  Whenever possible, use balanced, shielded cables to limit 
external interference.  Unbalanced signals such as those from RCA 
connectors and guitars should be connected using cables with mono plugs.   
 
Once you have connected the inputs, set the appropriate mode for the 
input using the touch panel.  This will set up the internal preamp to match 
the incoming signal. 
 
If you prefer to use an external preamp, simply connect the preamp directly 
to the Echo 2’s input, and set it for line level with unity gain.  This will 
preserve any unique sonic coloration or nuance. 

Содержание Echo 2

Страница 1: ...User Guide ...

Страница 2: ...ny heat sources such as heaters stoves or amplifiers Protect the power cord from being damaged in any way Only use attachments accessories specified by Echo Unplug the Echo 2 during lightning storms and when not being used for long periods of time If the Echo 2 requires servicing for any reason please contact Echo customer service Please protect your hearing by avoiding excessive volume from the h...

Страница 3: ...AGE CONTENTS 4 ECHO 2 CONNECTIONS 5 INPUTS 5 MAIN OUTPUTS 7 HEADPHONE OUTPUT 7 POWER 8 USB 8 TOUCH PANEL 9 INPUT SELECTION 10 PHANTOM POWER 10 INPUT SET UP 11 LEVELS 12 MAIN MUTE 13 EZ TRIM 14 INPUT MONITORING 14 SAVING SETTINGS 15 SPECIFICATIONS 16 ...

Страница 4: ...et the most of what it has to offer We encourage you to register your product online at http www echoaudio com support register php Registering gives us key information so that we may handle problems faster and inform you about upgrades and other news Thank you in advance for registering We hope you enjoy your Echo 2 Package Contents When you opened the box you should have found the following The ...

Страница 5: ...ovide phantom power If your microphone has an XLR connector you can use the included adapter cable You can also connect guitars keyboards or other equipment using cables Whenever possible use balanced shielded cables to limit external interference Unbalanced signals such as those from RCA connectors and guitars should be connected using cables with mono plugs Once you have connected the inputs set...

Страница 6: ...Echo 2 User Guide 6 ...

Страница 7: ...lanced outputs that can be connected directly to a mixer board or powered speaker Headphone Output A high quality stereo headphone output is provided by the front jack You can set the headphone volume using the touch panel For more information on operating the touch panel please refer to that section of this user guide ...

Страница 8: ...or PCs with USB 3 0 ports may provide more power Echo recommends using the external AC adapter whenever phantom power is switched on USB power can be noisy resulting in audible ground hum or decreased audio performance If you are experiencing these problems try using the external power adapter USB When used for digital audio recording and playback the Echo 2 connects to a computer using the USB mi...

Страница 9: ...the center of the rounded gray rectangle to the right of the LED indicator For the slider the active area is directly beneath the horizontal gray lines To avoid accidental activation each control must be touched for approximately half a second before the touch will be recognized Some functions such as EZ trim are activated by a long touch of approximately two seconds The front panel is very scratc...

Страница 10: ...ntom Power Phantom power 48V can be turned on when one of the inputs is set to MIC If there are two microphones connected phantom power will be provided to both simultaneously To protect external equipment this phantom power is disabled whenever an input is set to LINE or GUITAR In addition phantom power will be turned off when the Echo 2 first powers up Please note that the use of phantom power m...

Страница 11: ... refer to the following table Signal source Echo 2 input mode 48V Dynamic microphone MIC Off Condenser microphone MIC On Keyboard LINE Off Mixer board LINE Off MP3 player iPod LINE Off Guitar with passive pickups GUITAR Off Guitar with active pickups LINE Off External preamp LINE Off ...

Страница 12: ...ut 1 gain Input 2 gain Monitor volume Main output volume Headphone volume Touching one of these buttons changes the slider control to show the current setting for that selection The LED indicators on the left side of the slider show the current position To change it place your finger over the horizontal gray bar next to the topmost lit LED and slide it up or down Moving too fast may cause the leve...

Страница 13: ...ending on your selection The various ranges for the slider are shown below Input Gain dB Output Attenuation dB Line Guitar Mic 63 69 75 0 53 59 65 6 42 48 54 12 32 38 44 21 21 27 33 30 11 17 23 40 0 6 12 MUTE Main Mute Pressing the mute button will mute the main outputs ...

Страница 14: ...el set to its optimum value simply press the input button again or wait 12 seconds from when the indicator started to flash Pressing any other button cancels EZ Trim and the input level will be left untouched Upon exiting EZ Trim the input level will be set so that the loudest signal it received will register 2dB below full scale or clipping This extra headroom can be useful if you happen to play ...

Страница 15: ... mode preass and hold the headphone button for two seconds until the LED starts to flashy To return to normal operation press and hold the headphone button for two seconds again Steady LED Headphones are output channels 3 and 4 Flashing LED Headphones are output channels 1and 2 Saving Settings Settings are automatically saved The Echo 2 will wait 30 seconds after your last change and then save you...

Страница 16: ...Echo 2 User Guide 16 Computer Operation ...

Страница 17: ...nimum 12 dBu 3 1Vrms or 8 8V p p Slider gain range 6 dB to 69 dB Mic Differential input impedance 1 8K ohms 900 ohms to ground per leg 0dB input level gain slider at minimum 6 dBu 1 6Vrms or 4 4V p p Slider gain range 12 dB to 75 dB EIN Equivalent Input Noise 129 dBu When monitoring input to output latency is XXms FIXME Analog outputs The main output and headphone volumes are set using the touch p...

Страница 18: ...Echo 2 User Guide 18 Warranty ...

Страница 19: ...asures 1 Re orient or relocate the receiving antenna 2 Increase the separation between the equipment and receiver 3 Connect the equipment into an outlet on a different circuit from that to which the receiver is connected CAUTION Changes or modifications not expressly approved by the Echo Digital Audio could void the user s authority to operate the equipment under FCC rules Canada This device compl...

Страница 20: ...ich refer to RoHS namely sections 25214 10 25214 10 2 and 58012 Health and Safety Code Section 42475 2 Public Resources Code REACh This product is compliant with the European Union Directive EC1907 206 for the Registration Evaluation Authorization and Restriction of chemicals REACh and contains none or less than 0 1 of the chemicals listed as hazardous chemicals in the REACh regulation WEEE As wit...

Отзывы: