background image


15 


Storage 


Gasoline  fumes  are  highly  flammable, 
explosive,  and  dangerous  if  inhaled.  If  you 
store  the  product  in  an  area  with  an  open 
fame,  the  gasoline  fumes  may  ignite  and 
cause an explosion. 
Do  not  store  the  machine  in  a  house  (living 
area),  basement,  or  any  other  area  where 
ignition sources may be present, such as hot 
water  and  space  heaters,  clothes  dryers, 
furnaces, and other like appliances. 
Do  not  store  the  machine  with  its  handle 
tipped down onto the ground, because oil will 
leak  into  the  engine  cylinder  and  onto  the 
ground, and the machine will not start or run. 

1. 

On the last refueling of the season, add fuel 
stabilizer  to  fresh  fuel  as  directed  by  the 
engine manufacturer. 

2. 

Run  the  engine  for  10  minutes  to  distribute 
the conditioned fuel through the fuel system. 

3. 

Change the engine oil while the engine is still 
warm. Refer to ―Changing the Engine Oil.‖ 

4. 

Drain  the  fuel  from  the  tank  and  carburetor 
by performing the following steps: 

A. 

Loosen the fuel tank cap. 

B. 

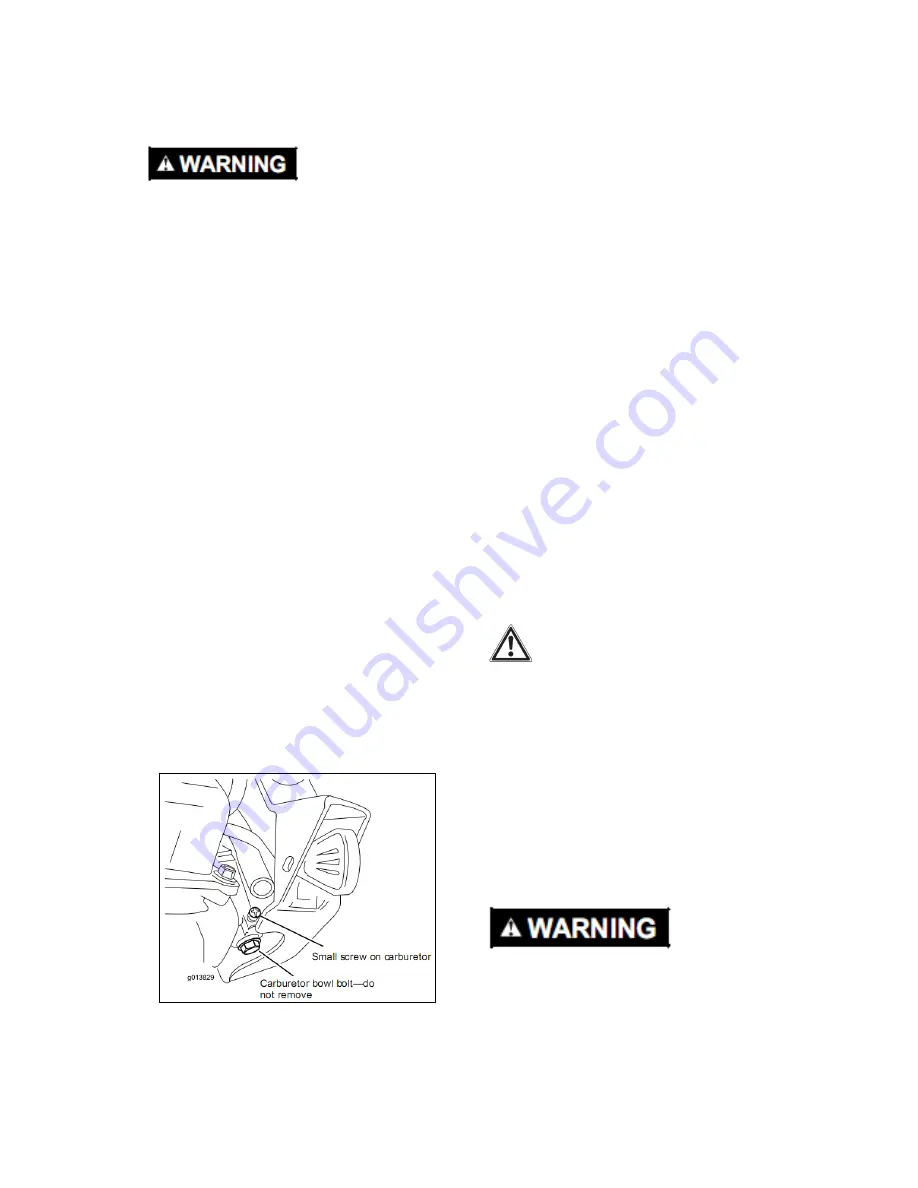
Unscrew,  but  do  not  remove,  the  small 
screw on the side of the carburetor fuel 
bowl (Figure 25) until the fuel begins to 
drain from the carburetor. Drain the fuel 
into an approved fuel container. 

Important:  Do  not  remove  the 
carburetor bowl bolt on the bottom of 

the carburetor. 

C. 

Wait for a few minutes until the fuel has 
drained,  then  install  the  fuel  cap  and 
tighten the small screw on the carburetor. 


5. 

Dispose  of  unused  fuel  properly.  Recycle  it 
according  to  local  codes,  or  use  it  in  your 
automobile. 

6. 

Remove the spark plug. 

7. 

Squirt 2 teaspoons of oil into the spark plug 
hole. 

8. 

Install  the  spark  plug  by  hand  and  then 
torque it to 20–22ft-lb (27–30 N-m). 

9. 

With the ignition key in the ―Off‖ position, pull 
the recoil starter slowly to distribute the oil on 
the inside of the cylinder. 

10. 

Disconnect the ignition key from the lanyard 
and store the ignition key in a safe place. 

11. 

Clean the machine. 

12. 

Touch  up  chipped  surfaces  with  paint 
available from an Authorized Service Dealer. 
Sand  affected  areas  before  painting,  and 
use a rust preventative to prevent the metal 
parts from rusting. 

13. 

Tighten  any  loose  fasteners.  Repair  or 
replace any damaged parts. 

14. 

Cover the machine and store it in a clean, dry 
place  out  of  the  reach  of  children. Allow  the 
engine to cool before storing it in any enclosure. 


Residual Risks 

Even when the machine is used as prescribed 
it is not possible to eliminate all residual risk 
factors.  The  following  hazards  may  arise  in 
connection  with  the  machine’s  construction 
and design: 

1. 

Damage to lungs

 if an effective dust mask 

is not worn. 

2. 

Damage  to  hearing

  if  effective  hearing 

protection is not worn. 

3. 

Damages to health

 resulting from vibration 

emission if the power tool is being used over 
longer  period  of  time  or  not  adequately 
managed and properly maintained. 


This  machine  produces  an  electromagnetic 
field  during  operation.  This  field  may  under 
some  circumstances  interfere  with  active  or 
passive medical  implants. To reduce the risk 
of  serious  or  fatal  injury,  we  recommend 
persons  with  medical  implants  to  consult 
their  physician  and  the  medical  implant 
manufacturer before operating this machine. 

Figure 25


Содержание SNOW18

Страница 1: ...BEFORE ASSEMBLY OR USE Key Technical Parameters Working Width Max Throwing Distance Max Output Fuel Tank Cap Startup Mode Vibration Net Weight 18in 26ft 2 8HP 1 65KW 1 6L Manual 4 0m s2 24 5lbs BASEME...

Страница 2: ...ffect at the time of production Read and understand the contents of this manual before you start the engine This machine is capable of throwing objects and of injuring hands and feet Failure to observ...

Страница 3: ...may be thrown from the machine during operation or while performing an adjustment or repair Operation Do not put hands or feet near or under rotating parts Stay clear of the discharge opening at all t...

Страница 4: ...can injure fingers or hands Stay behind the handles and away from the discharge opening while operating the machine Keep your face hands feet and any other part of your body or clothing away from mov...

Страница 5: ...Push the primer two times to prime the engine 3 Push key in to switch the engine On 4 Pull key to switch the engine Off 5 Remove key to lock the engine 6 Read the engine s operator s manual before che...

Страница 6: ...ed for this procedure Oval head bolts Curved washers Handle knobs 2 2 2 Procedure 1 Position the ends of the upper handle on the inside of the lower handle and align the holes 2 Insert the oval head b...

Страница 7: ...rocedure 1 Move the machine to a level surface 2 Clean around the oil fill cap 3 Unscrew the oil fill cap and remove it 4 Slowly pour oil into the oil fill hole Wait 3 minutes and then check the oil l...

Страница 8: ...ing cover and unhook the spring from the adjuster link Figure 7 Pulling up on the adjuster link and cable may make unhooking the spring easier 2 Move the Z fitting to obtain a higher or lower hold on...

Страница 9: ...tarting poor engine performance and may cause internal engine damage Note For best results purchase only the quantity of gasoline that you expect to use in 30 days Otherwise you may add fuel stabilize...

Страница 10: ...lace or repair the damaged cord immediately Contact an Authorized Service Dealer for assistance Important Run the electric starter no more than 10 times at intervals of 5 seconds on and then 5 seconds...

Страница 11: ...Chute and Chute Defector 1 Adjust the control handle to change the direction of snow Figure 17 2 Pull the handle apart from the gear to adjust the angle of chute cap Figure 18 Clearing a Clogged Disc...

Страница 12: ...left and right to free it from any ice buildup With the ignition key in the Off position pull the recoil starter handle several times or connect the electrical cord to a power source and the machine a...

Страница 13: ...sion inspect the rotor blades for wear When a rotor blade edge has worn down to the wear indicator hole have an Authorized Service Dealer replace the rotor blades and the scraper Figure 20 Changing th...

Страница 14: ...is fixed by two small bolts one nut two tapping screws and a piece of reinforced plate 2 Remove the belt from the rotor pulley 3 Press down on the idler arm and remove the belt from between the tab o...

Страница 15: ...ur automobile 6 Remove the spark plug 7 Squirt 2 teaspoons of oil into the spark plug hole 8 Install the spark plug by hand and then torque it to 20 22ft lb 27 30 N m 9 With the ignition key in the Of...

Отзывы: