ECH2O Tec. 1000-BHL- 2 Скачать руководство пользователя страница 11

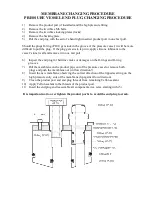
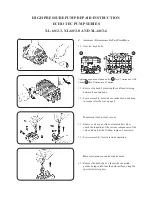
MEMBRANE CHANGING PROCEDURE 

PRESSURE VESSEL END PLUG CHANGING PROCEDURE 
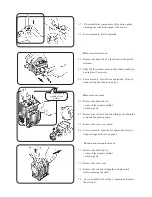
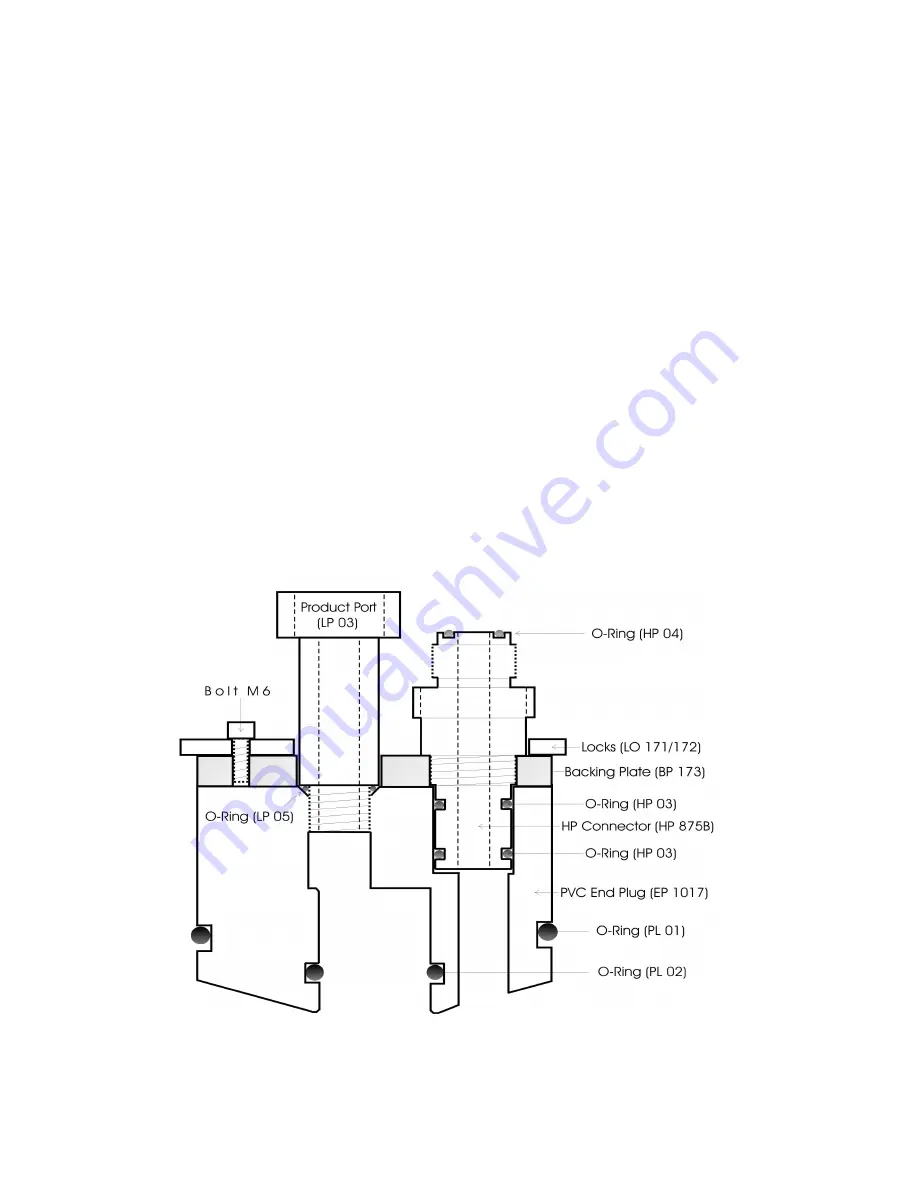


1)


Remove the product port (if installed) and the high pressure fitting. 

2)     Remove the two/three M6 bolts. 
3)     Remove the two/three locking plates (locks) 
4)     Remove the backing plate 
5)


Pull the end plug with the aid of a hand tight inserted product port in one fast pull.  

 
Should the plugs O-ring (PL01) get stuck in the groove of the pressure vessel, it will be more 
difficult to pull the plug.  If the plug gets stuck, tap it in, apply silicone lubricant to the 
vessel’s inner wall and remove it in one fast pull. 
 
6)


Inspect the end plug for hairline cracks or damages on the O-rings and O-ring 

        grooves. 
7)


Pull the membrane on the product pipe out of the pressure vessel or remove both 

         plugs and push the membrane out (in flow direction!) 
8)      Insert the new membrane observing the correct direction of the lipped seal ring on the 
         high pressure entry side of the membrane (lip against flow direction). 
9)      Clean the product port and end plug threads from remaining Teflon sealant. 
10)    Apply Teflon sealant to the threads of the product port. 
11)    Insert the end plug and reassemble all components visa versa starting with (5). 


It is important not to over tighten the product port/s to avoid the end plug to crack. 


Содержание 1000-BHL- 2

Страница 1: ...ES 5 6 INSTALLATION INSTRUCTIONS 7 8 OPERATION INSTRUCTIONS 9 MEMBRANE CLEANING PROCEDURE 10 MAINTENANCE TIMETABLE 11 PRESSURE VESSEL ENDPLUG CHANGING PROCEDURE 12 ELECTRICAL DIAGRAM 13 TROUBLESHOOTIN...

Страница 2: ...familiar with each component of your new ECHO Tec desalination system By understanding the function importance and normal operation of each part in the system the operator can readily diagnose proble...

Страница 3: ...FC Polyamide thin film composite spiral wound single pass reverse osmosis element SALT REJECTION min 99 5 SALINITY RANGE up to 33 000 ppm TDS NaCl PH RANGE 4 11 CHLORINE TOLERANCE 1000 ppm hours OPERA...

Страница 4: ...316SS glycerin filled Flow Meter Product discharge Conductivity Digital product water quality monitor ppm TDS The following automatic emergency shut off functions are provided Low feed water pressure...

Страница 5: ...cation inhibits growth of algae Connect the intake of the feed pump and the outlet of the priming reservoir with 3 4 PVC pipe or directly if possible Avoid elbows 90 degree fittings in your plumbing T...

Страница 6: ...rinated water from your storage tanks sucks back into the RO membranes Therefore lead the product water into the tanks above water level The Product water can be led to the storage tanks up to a heigh...

Страница 7: ...electrical control panel to the FEED position feed pump only and purge the system until all entrapped air has escaped 4 In the AUTO position press the START button until the pressure on the low press...

Страница 8: ...r for more than ten days growth of microorganism will degrade the RO membranes performance The RO membranes should be flushed with a biocide solution to preserve the membrane for long term storage of...

Страница 9: ...on label CAUTION Do not mix different cleaning chemicals together Do not use different cleaning chemicals together at the same time Mix the cleaning chemicals separately and use them separately Note...

Страница 10: ...6 months High pressure pump Change crankcase oil Change packings seals and O rings Initial change after 50 hrs Every 200 operating hours or 6 months Every 5000 hrs or 2 years R O membrane When produc...

Страница 11: ...s inner wall and remove it in one fast pull 6 Inspect the end plug for hairline cracks or damages on the O rings and O ring grooves 7 Pull the membrane on the product pipe out of the pressure vessel...

Страница 12: ...TRANS FORMER START SWITCH S1 PUSH BUTTON NO SELECTOR SWITCH S2 3 POSITION MAINT 4 CONTACTS NO T1 HIGH PRESS SWITCH S4 NC LOW PRESS SWITCH S5 NO TANK FULL SWITCH S6 NC EXTERNAL MAIN IN ELECTRICAL DIAG...

Страница 13: ...inlet lines for restrictions Check strainer and filter s Inability to Discharge valve chamber Allow more time to prime build up pressure has air trapped within it and ensure that there are no air suct...

Страница 14: ...wn on page 8 Inspection inlet outlet valves 2 1 Remove valve caps slide out inlet outlet valves check the sondition of the various components of the valve and well as the O Ring replace if necessary 2...

Страница 15: ...lacing oil seals 6 1 Remove the head See remove the ceramic pistons discharge oil 6 2 Remove the oil seals and the O Rings checking the seats and the piston guides 6 3 Remove the rear cover gasket 6 4...

Страница 16: ...ned to Echo Marine s Service Center The purchaser must pay any transportation or labor expenses incurred in removing and returning the product to the service center The limited warranty does not exten...

Страница 17: ...ranteed against iron fouling rust chemical attack extreme temperatures over 113 F under 33 F drying out or extreme pressures over 1000 psig CAUTION Use of parts not supplied directly by Echo Marine ge...

Отзывы: