background image

Technical and Safety Notices

Important Safety Instructions

1.

  Read these instructions.

2.

  Keep these instructions.

3.

  Heed all warnings.

4.

  Follow all instructions.

5.

  Do not use this apparatus near water.

6.

  Do not submerge the equipment in water or liquids. 

7.

    Do not use any aerosol spray, cleaner, disinfectant or 

fumigant on, near or into the equipment. 

8.

  Clean only with a dry cloth.

9.

    Do not block any ventilation opening. Install in accordance 

with the manufacturer’s instructions.

10.

   Do not install near any heat sources such as radiators, heat 

registers, stoves, or other apparatus (including amplifiers) that 
produce heat.

11.

   To reduce the risk of electrical shock, the power cord shall be 

connected to a mains socket outlet with a protective earthing 
connection.

12.

   Do not defeat the safety purpose of the polarized or 

grounding type plug. A polarized plug has two blades with 
one wider than the other. A grounding type plug has two 
blades and a third grounding prong. The wide blade or the 
third prong are provided for your safety. If the provided 
plug does not fit into your outlet, consult an electrician for 
replacement of the obsolete outlet.

13.

   Protect the power cord from being walked on or pinched 

particularly at plugs, convenience receptacles, and the point 
where they exit from the apparatus.

14.

   Do not unplug the unit by pulling on the cord, use the plug.

15.

   Only use attachments/accessories specified by the 

manufacturer.

16.

   Unplug this apparatus during lightning storms or when 

unused for long periods of time.

17.

   Refer all servicing to qualified service personnel. Servicing is 

required when the apparatus has been damaged in any way, 
such as power supply cord or plug is damaged, liquid has 
been spilled or objects have fallen into the apparatus, the 
apparatus has been exposed to rain or moisture, does not 
operate normally, or has been dropped.

18.

   The appliance coupler, or the AC Mains plug, is the AC mains 

disconnect device and shall remain readily accessible after 
installation. 

19.

  Adhere to all applicable, local codes.

20.

   Consult a licensed, professional engineer when any doubt or 

questions arise regarding a physical equipment installation.

Environmental Statement

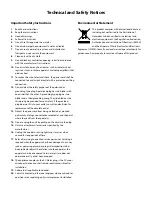
This product complies with international directives, 
including but not limited to the Restriction of 
Hazardous Substances (RoHS) in electrical and 
electronic equipment, the Registration, Evaluation, 
Authorization and restriction of Chemicals (REACH) 
and the disposal of Waste Electrical and Electronic 

Equipment (WEEE). Consult your local waste disposal authority for 
guidance on how properly to recycle or dispose of this product.

Содержание UXA4401

Страница 1: ...UXA4401 User Manual...

Страница 2: ...particularly at plugs convenience receptacles and the point where they exit from the apparatus 14 Do not unplug the unit by pulling on the cord use the plug 15 Only use attachments accessories specifi...

Страница 3: ...4 Installation 5 Configuration 6 Connections 7 Operation 8 Specifications 2 Amplifier Overview UXA4401 amplifiers are half rack width 1U format power amplifiers that can drive both conventional low i...

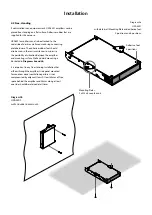
Страница 4: ...ers are primarily intended for installation in an equipment rack but can also be under desk or wall mounted or used free standing They are fan cooled and must be installed such that ventilation apertu...

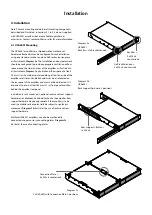
Страница 5: ...Overview Diagram 1A UXA4401 four channel amplifier dimensions Shaded area defines ventilation space 44 mm 1 7 in 220 mm 8 7 in 80 mm 3 1 in 319 mm 12 6 in 25 mm 1 0 in...

Страница 6: ...ifier at all times Ventilation apertures are also located on the rear panel of the amplifier and must not be obstructed It is important to retain at least 80 mm 3 1 in free space for airflow behind th...

Страница 7: ...using connecting plate hardware The adhesive rubber feet should also be used in these circumstances to minimise the possibility of vibration between the amplifier and mounting surface Wall and desk mo...

Страница 8: ...LAN IP address is 192 168 64 100 Configure the laptop or desktop computer for a fixed IP address in the same IP range eg 192 168 64 10 with Subnet mask of 255 255 255 0 or prefix 24 and set the Gatewa...

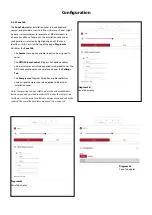
Страница 9: ...wn Note When adjusting input gain the input level display should remain green If it displays red the input gain should be reduced 5 3 Configuration Menus Opening a web browser that is network connecte...

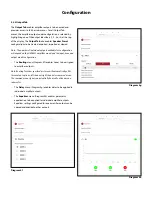
Страница 10: ...signed to zones The GPIO Volume Control Diagram 4d option enables external volume control to be applied to individual zones The GPIO configuration menu can be found under the Settings Tab The Compress...

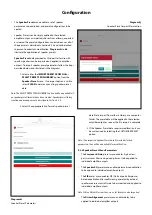
Страница 11: ...401 amplifier model and the input zone and output mode configuration The Routing menu Diagram 4f enables zones to be assigned to amplifier outputs Note Routing for zones specified as stereo will autom...

Страница 12: ...ion and management is described in Section 5 3 5 2 Select the appropriate zcp format speaker preset data file to import from either a Library or a computer folder The preset data will be applied to th...

Страница 13: ...well as adjusting global gain Diagram 4l Diagram 4l Preset Crossover Gain The Speaker EQ in the preset menu allows for configuring customized parametric EQ on the output level Diagram 4m Diagram 4m Pr...

Страница 14: ...audible increase the frequency setting one step at a time until the distortion is no longer audible Driver Alignment in the preset menu will allow for delay to be set between driver passbands Diagram...

Страница 15: ...nder the Device menu The Backup Restore menu enables amplifier configuration data to be downloaded to an external archive and enables previously saved configuration files to be uploaded and adopted by...

Страница 16: ...m Gain Trim Gain Trim Input Sensitivity Input Gain Input Gain Input Selection Input Setup Zone Setup Routing Output Setup Output 1 Output 2 Output 3 Output 4 Zone Adjustment Parameters Speaker Preset...

Страница 17: ...he zone to be configured The number of zones available and their channel format stereo or mono will depend on the amplifier model input setup and output mode Lo Z or Hi Z For example a two output ampl...

Страница 18: ...n 8 has a low output impedance and is able to supply a maximum current of 10mA Note GPIO Pin 1 and Pin 3 both offer ground connections Pin 1 is connected directly to the amplifier chassis Pin 3 is con...

Страница 19: ...Note Two output amplifier model connection sockets differ only in the deletion of channel 3 and channel 4 output connectors Digital Inputs UXA4401 amplifier S PDIF stereo digital audio input connectio...

Страница 20: ...ifiers to a TCP IP network is described in Section 5 of this manual Cable Gauge Table Lo Z installations 0 5dB attenuation 4 8 loads Cable Gauge Table 70V Hi Z installations 1 0dB attenuation 20 speak...

Страница 21: ...e exclamation point printed next to the output terminals of the amplifiers is in addition to the CLASS 2 WIRING text intended to alert users to the risk of hazardous voltages Output connectors that co...

Страница 22: ...Output Off No output signal present Green Signal present on one or more outputs Amber Signal limiting clipping on one or more outputs Red One or more channel pair is in overload protection mode Networ...

Страница 23: ...vel of performance and in good operating condition Any damage to or unsatisfactory performance from these amplifiers caused by inadequate or failed input or output ancillaries may invalidate support w...

Страница 24: ...2023 Eastern Acoustic Works All rights reserved Products are not drawn to scale All terms conditions and specifications subject to change without notice Eastern Acoustic Works One Main Street Whitinsv...

Отзывы: