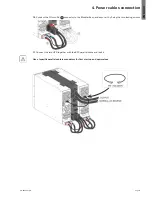
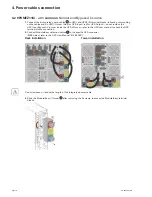
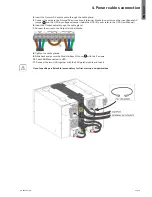
background image

Page 2

614-09354-01_EN

Special symbols

The following are examples of symbols used on the ModularEasy to alert you to important information:

RISK OF ELECTRIC SHOCK

 - Observe the warning associated with the risk of electric shock symbol.

Important instructions that must always be followed.

This symbol indicates that you should not discard waste electrical or electronic equipment (WEEE)  

in the trash. For proper disposal, contact your local recycling/reuse or hazardous waste center. 

Information, advice, help.

SAVE THESE INSTRUCTIONS. This manual contains important instructions
that should be followed during installation and maintenance of the ModularEasy and UPS.

The ModularEasy models that are covered in this manual are intended for installation in an environment 

within 0 to 40°C, free of conductive contaminant.
These limits are designed to provide reasonable protection against harmful interference when the 

equipment is operated in a commercial environment. This equipment generates, uses, and can radiate 

radio frequency energy and, if not installed and used in accordance with the instruction manual, may cause 

harmful interference to radio communications. Operation of this equipment in a residential area is likely 

to cause harmful interference in which case the user will be required to correct the interference at his own 

expense.

Certification standards (in use with UPS)

• 

Safety: IEC/EN 62040-1 / Ed.1: 2008.

• 

EMC: IEC/EN 62040-2 / Ed.2: 2006.

• 

Performance: IEC/EN 62040-3 / Ed.2.0: 2011.

• 

IEC 61000-4-2 (ESD): level 3.

•  IEC 61000-4-3 (Radiated field): level 3.
• 

IEC 61000-4-4 (EFT): level 4.

• 

IEC 61000-4-5 (Fast transients): level 4.

•  IEC 61000-4-6 (Electromagnetic field): level 3.
•  IEC 61000-4-8 (Conducted magnetic field): level 4.

SAFETY INSTRUCTIONS

Содержание ModularEasy 9PXMEZ11Ki

Страница 1: ...9PXMEZ6Ki 9PXMEZ11Ki Installation and user manual English Fran ais Deutsch Espa ol...

Страница 2: ......

Страница 3: ...ENGLISH ModularEasy 9PXMEZ6Ki 9PXMEZ11Ki Installation and user manual Copyright 2014 EATON All rights reserved Service and support Call your local service representative 614 09354 01_EN...

Страница 4: ...ment within 0 to 40 C free of conductive contaminant These limits are designed to provide reasonable protection against harmful interference when the equipment is operated in a commercial environment...

Страница 5: ...ble The unit can be disconnected from AC power source by opening this circuit breaker and if still connected to UPS by previously shutting down the UPS refer to the UPS User Manual Check that the indi...

Страница 6: ...th non included optional Rail Kit 9RK 10 3 6 Example of rack 19 setup with optional EBM 9PX EBM 240V 11 3 7 Example of battery integration system with non included optional Trollet Frame BINTSYS 11 3...

Страница 7: ...ing To improve waste treatment and facilitate recycling separate the various packing components The cardboard we use comprises over 50 of recycled cardboard Sacks and bags are made of polyethylene Pac...

Страница 8: ...ignal all in one patented connector ModularEasy 5 6kVA range make before break feature to allow full servicing electrical power continuity when switching from UPS position to Bypass and vice versa com...

Страница 9: ...nual Bypass switch of the ModularEasy is onTEST or BYPASS position The load is not protected On 9PXMEZ11Ki it is possible to Bypass the load on a separate Bypass AC source see 4 3 9PXMEZ11Ki with sepa...

Страница 10: ...ower display UPS2 power display 3 1UPS 1UPS redundant means the load power is less than the maximum power of one UPS 2UPS 0UPS redundant means the load power is more than the maximum power of one UPS...

Страница 11: ...iscard or recycle the packaging in a responsible manner or store it for future use Place the cabinet in a protected area that has adequate airflow and is free of humidity flammable gas and corrosion P...

Страница 12: ...Page 10 614 09354 01_EN 3 Installation 3 4Tower installation 3 5 Rack installation with non included optional Rail Kit 9RK...

Страница 13: ...14 09354 01_EN ENGLISH 3 Installation 3 6 Example of rack 19 setup with optional EBM 9PX EBM 240V 3 7 Example of battery integration system with non included optional Trollet Frame BINTSYS 9PXMEZ11Ki...

Страница 14: ...inimum input wire size rating Breaker D Curve 9PXMEZ6Ki Parallel Operation L1 Phase 4 25 mm2 12 4 AWG 10 mm2 8 AWG 63A N L2 Neutral Phase Ground 9PXMEZ6Ki Redundancy Only L1 Phase 4 25 mm2 12 4 AWG 6...

Страница 15: ...breaker 2 poles circuit breaker Recommended cable cross sections 9PXMEZ11Ki Normal AC source and Bypass AC source Terminal position Wire function Terminal wire size rating Minimum input wire size rat...

Страница 16: ...PS I O cover blue for UPS Input red for UPS Output refer to the UPS user manual to check the UPS terminal blocks connection 2 Connect the ModularEasy detection cable from the I O cord Set 1 to the spe...

Страница 17: ...10 Connect the I O cord Set 1 connector to the ModularEasy and secure it by fixing the two locking screws 11 Connect the two UPS together with the 9PX parallel cable and lock it Use of specific paral...

Страница 18: ...nput Bypass AC jumper inside the UPS I O cover refer to the UPS user manual to check the UPS terminal blocks connection 2 Connect ModularEasy detection cables 2 to the specific UPS connector MBP detec...

Страница 19: ...PS I O cover refer to the UPS User Manual 6 Insert the Output cable through the cable gland 7 Connect the wires to the Output terminal blocks 8 Tighten the cable glands 9 Slide back and secure the Mod...

Страница 20: ...he ModularEasy Bypass Input cover 5 5 Tighten the cable gland 6 Slide back and secure the ModularEasy Bypass Input cover 5 with the screw 7 Connect the 4 integrated power cables and the 2 previously i...

Страница 21: ...he Bypass AC source cable through the cable gland 15 Connect the wires to the Bypass AC source Input BP terminal blocks 16 Insert the Output cable through the cable gland 17 Connect the wires to the O...

Страница 22: ...m circuit breaker not provided to the I position On to switch on the utility power see 3 4Tower installation page 10 Set the Bypass source upstream circuit breaker not provided to the I position On to...

Страница 23: ...g the UPS display panel refer to the UPS user manual 3 Check the 9PX parallel cable are correctly connected and fixed PN 744 A2675 4 Check the two UPS display 1UPS 1UPS redundant Do not continue to th...

Страница 24: ...s of the ModularEasy to the 0 position OFF for 9PXMEZ11Ki 7 Disconnect all internal and external batteries of the faulty UPS only for UPS 9PX5000 and 9PX6000 8 Check if all of the power supply is real...

Страница 25: ...manual bypass switch to Test position 5 Verify that the UPS is correctly powered UPS display panel is lighted 6 Check the two UPS display 1UPS 1 UPS redundant Do not continue to the next step if it i...

Страница 26: ...Fast transients IEC 61000 4 5 level 4 Electromagnetic field IEC 61000 4 6 level 3 Conducted magnetic field IEC 61000 4 8 level 4 Marking CE Environment Operating temperature 0 to 40 C 32 to 104 F Stor...

Страница 27: ...FRAN AIS ModularEasy 9PXMEZ6Ki 9PXMEZ11Ki Manuel d installation et d utilisation Copyright 2014 EATON Tous droits r serv s SAV et assistance Contacter votre repr sentant SAV local 614 09354 01_FR...

Страница 28: ...pris entre 0 et 40 C exempt de contaminants conducteurs Ces limites sont con ues pour fournir une protection raisonnable contre des perturbations nuisibles lorsque l quipement est utilis dans un envir...

Страница 29: ...nt doit tre facilement accessible L unit peut tre d branch e du secteur par ouverture du disjoncteur et si elle est encore branch e sur l ASI par un arr t pr alable de cette derni re voir Manuel d uti...

Страница 30: ...lus 9RK 10 3 6 Exemple de configuration en 19 pouces avec EBM 9PX EBM 240V en option 11 3 7 Exemple de syst me int grant la batterie avec le ch ssis Trollet Frame en option non inclus BINTSYS 11 3 8 C...

Страница 31: ...iorer le traitement des d chets et faciliter le recyclage s parez les diff rents composants de l emballage Le carton que nous utilisons est recycl plus de 50 Les sacs et sachets sont en poly thyl ne L...

Страница 32: ...t Output et signal ModularEasy 5 6 kVA fonction de commutation avec chevauchement permettant une maintenance compl te continuit de l alimentation lectrique lors du passage de la position ASI la positi...

Страница 33: ...ommutateur de Bypass manuel du ModularEasy est sur la positionTEST ou BYPASS La charge n est pas prot g e Sur le 9PXMEZ11Ki il est possible de d river la charge sur une source Bypass AC s par e voir 4...

Страница 34: ...pour UPS2 3 1UPS 1UPS redondant signifie que la puissance de la charge est inf rieure la puissance maximale d une ASI 2UPS 0UPS redondant signifie que la puissance de la charge est sup rieure la puis...

Страница 35: ...dition Jetez ou recyclez l emballage en respectant l environnement ou stockez le pour un futur usage Placez le bo tier dans un endroit prot g ventil de fa on appropri e l abri de l humidit des gaz in...

Страница 36: ...Page 10 614 09354 01_FR 3 Installation 3 4 Position tour 3 5 Position rack avec le kit de rails non inclus 9RK...

Страница 37: ...FRAN AIS 3 Installation 3 6 Exemple de configuration en 19 pouces avec EBM 9PX EBM 240V en option 3 7 Exemple de syst me int grant la batterie avec le ch ssisTrollet Frame en option non inclus BINTSY...

Страница 38: ...du fil terminal Section minimale du fil d entr e Disjoncteur courbe D 9PXMEZ6Ki Mode parall le L1 Phase 4 25 mm2 12 4 AWG 10 mm2 8 AWG 63 A N L2 Neutre Phase Terre 9PXMEZ6Ki Redondance seule L1 Phase...

Страница 39: ...0 Disjoncteur bipolaire Disjoncteur bipolaire Sections de c bles recommand es 9PXMEZ11Ki Normal AC source et Bypass AC source Position sur le bornier Fonction du fil Section du fil terminal Section mi...

Страница 40: ...l ASI bleu pour UPS Input rouge pour UPS Output reportez vous au manuel d utilisation de l ASI pour rep rer la connexion des bornes de l ASI 2 Branchez le c ble de d tection du ModularEasy dans le jeu...

Страница 41: ...ecteur du jeu de cordons d entr e sortie 1 sur le ModularEasy et fixez le avec les vis de fixation 11 Reliez les deux ASI avec le c ble parall le 9PX et bloquez ce dernier L utilisation d un c ble par...

Страница 42: ...nt rieur du cache d entr e sortie des ASI reportez vous au manuel d utilisation des ASI pour rep rer la connexion de leurs bornes 2 Branchez les c bles de d tection du ModularEasy 2 sur le connecteur...

Страница 43: ...utilisation de l ASI 6 Introduisez le c ble Output dans le presse toupe 7 Branchez les fils sur les bornes Output 8 Serrez les presse toupe 9 Faites glisser le cache d entr e sortie 3 du ModularEasy...

Страница 44: ...e 6 Faites glisser le cache Bypass Input 5 du ModularEasy et fixez le avec la vis 7 Branchez les 4 c bles d alimentation int gr s et les deux c bles d alimentation Bypass Input d j install s sur les b...

Страница 45: ...AC source dans le presse toupe 15 Branchez les fils sur les bornes Bypass AC source Input BP 16 Introduisez le c ble Output dans le presse toupe 17 Branchez les fils sur les bornes Output 18 Serrez le...

Страница 46: ...ur le 9PXMEZ11Ki 5 R glez le disjoncteur en amont non fourni de la source AC sur la position I On pour activer le r seau voir 3 4 Position tour page 10 R glez le disjoncteur en amont non fourni de la...

Страница 47: ...fiez sur l cran de l ASI que celle ci est en mode Bypass reportez vous au manuel d utilisation de l ASI 3 V rifiez que le c ble parall le 9PX est correctement branch et fix R f 744 A2675 4 V rifiez qu...

Страница 48: ...sy soient sur la position 0 OFF dans le cas du 9PXMEZ11Ki 7 D branchez toutes les batteries internes l et externes de l ASI d fectueuse ASI 9PX5000 et 9PX6000 uniquement 8 V rifiez si l ASI d fectueus...

Страница 49: ...teur Bypass manuel du ModularEasy sur la position Test 5 V rifiez que l ASI est correctement aliment e l cran de l ASI est allum 6 V rifiez que les deux ASI affichent 1UPS 1UPS redondant Ne passez pas...

Страница 50: ...agn tiques IEC 61000 4 6 niveau 3 Champs magn tiques conduits IEC 61000 4 8 niveau 4 Marquage CE Conditions d environnement Temp rature de fonctionnement 0 40 C 32 104 F Temp rature de stockage 15 60...

Страница 51: ...dularEasy 9PXMEZ6Ki 9PXMEZ11Ki Installations und Bedienungsanleitung Copyright 2014 EATON Alle Rechte vorbehalten Service und Support Wenden Sie sich telefonisch an Ihren rtlichen Servicepartner 614 0...

Страница 52: ...0 40 C und frei von leitenden Kontaminationen vorgesehen Diese Grenzwerte wurden entwickelt um im Rahmen des Vern nftigen einen Schutz gegen sch dliche Interferenzen zu gew hrleisten wenn das Ger t in...

Страница 53: ...lle getrennt werden und wenn es au erdem an der USV angeschlossen ist nachdem die USV zuerst abgeschaltet wurde siehe das Benutzerhandbuch der USV Vergewissern Sie sich dass die elektrischen Angaben a...

Страница 54: ...Lieferumfang 9RK 10 3 6 Beispiel einer 19 Rack Konfiguration mit optionalem 9PX EBM 240V 11 3 7 Beispiel f r die Integration eines Batteriesystems mit dem optionalen Trollet Frame nicht im Lieferumfan...

Страница 55: ...estfrei Verpackung Zur besseren Abfallverwertung und Erleichterung des Recyclings sollten Sie die verschiedenen Verpackungsbestandteile trennen Der von uns verwendete Karton besteht zu ber 50 aus Recy...

Страница 56: ...Signalsteckverbinder ModularEasy mit 5 6kVA Die Make before break Funktion sichert die volle Betriebsleistung ununterbrochene Stromversorgung wenn von der USV auf den Bypass geschaltet wird und umgeke...

Страница 57: ...ModularEasy aufTEST oder BYPASS steht Die Last ist nicht gesch tzt Beim Modell 9PXMEZ11Ki kann f r die Last ein Bypass auf eine externe Bypass AC Source hergestellt werden n here Details hierzu siehe...

Страница 58: ...zeigten Lasten 3 1USV 1USV redundant bedeutet dass die Leistung der Last unter der H chstleistung einer USV liegt 2USV 0USV redundant bedeutet dass die Leistung der Last ber der H chstleistung einer U...

Страница 59: ...Sie die Verpackung auf verantwortliche Weise oder heben Sie sie f r eine sp tere Verwendung auf Bringen Sie das Ger t an einen gesch tzten Bereich der ausreichend bel ftet und frei von Feuchtigkeit en...

Страница 60: ...Seite 10 614 09354 01_DE 3 Installation 3 4 Installation amTower 3 5 Rack Einbau mit dem optionalen Schienensatz nicht im Lieferumfang 9RK...

Страница 61: ...UTSCH 3 Installation 3 6 Beispiel einer 19 Rack Konfiguration mit optionalem 9PX EBM 240V 3 7 Beispiel f r die Integration eines Batteriesystems mit dem optionalenTrollet Frame nicht im Lieferumfang B...

Страница 62: ...put Dr hte Trennschalter Kennlinie D 9PXMEZ6Ki Parallel Betrieb L1 Phase 4 25 mm2 12 4 AWG 10 mm2 8 AWG 63A N L2 Neutral Phase Erde 9PXMEZ6Ki Nur Redundanz L1 Phase 4 25 mm2 12 4 AWG 6 mm2 10 AWG 32A...

Страница 63: ...9PX8000 2 poligerTrennschalter 2 poligerTrennschalter Empfohlene Kabelquerschnitte 9PXMEZ11Ki Normal AC Source und Bypass AC Source Klemmen position Leiter funktion Querschnitt Klemmenanschlussdr hte...

Страница 64: ...N here Informationen zur Pr fung des Anschlusses an die USV Klemmenbl cke finden Sie im Benutzerhandbuch der USV 2 Schlie en Sie das ModularEasy Erkennungskabel des I O Kabels 1 an der daf r vorgeseh...

Страница 65: ...s I O Kabels 1 am ModularEasy an und sichern Sie es mit den beiden Fixierschrauben 11 Verbinden Sie die beiden USV mit dem parallelen 9PX Kabel und sichern Sie es F r die Erstinbetriebnahme und eine o...

Страница 66: ...O Versicherung N here Informationen zur Pr fung des Anschlusses an die USV Klemmenbl cke finden Sie im Benutzerhandbuch der USV 2 Schlie en Sie die ModularEasy Erkennungskabel 2 an der daf r vorgeseh...

Страница 67: ...USV 6 F hren Sie das Output Kabel durch die Kabelverschraubung ein 7 Schlie en Sie die Dr hte an den Output Klemmen an 8 Ziehen Sie die Kabelverschraubungen fest 9 Schieben Sie die I O Abdeckung 3 wi...

Страница 68: ...n 5 Ziehen Sie die Kabelverschraubung fest 6 Schieben Sie die ModularEasy Bypass Input Abdeckung 5 wieder auf und sichern Sie sie mit der Schraube 7 Schlie en Sie die 4 integrierten Netzstromkabel und...

Страница 69: ...abelverschraubung ein 15 Schlie en Sie die Dr hte an die Klemmen f r die Bypass AC Source Input BP an 16 F hren Sie das Output Kabel durch die Kabelverschraubung ein 17 Schlie en Sie die Dr hte an den...

Страница 70: ...e Wechselstromquelle nicht im Lieferumfang auf I Ein um die Netzstromversorgung einzuschalten siehe 3 4 Installation amTower Seite 10 Stellen Sie den vorgeschaltetenTrennschalter f r die Bypass Source...

Страница 71: ...tzerhandbuch der USV 3 Pr fen Sie ob das parallele 9PX Kabel ordnungsgem angeschlossen und gesichert ist Art Nr 744 A2675 4 Pr fen Sie die Anzeige f r zwei USV 1USV 1USV redundant Wenn dies nicht ange...

Страница 72: ...Ki die beiden USV Output Schalter am ModularEasy auf 0 AUS 7 Klemmen Sie alle internen und externen Batterien der defekten USV ab nur bei USV 9PX5000 und 9PX6000 8 Pr fen Sie ob die Stromversorgung wi...

Страница 73: ...am ModularEasy auf Test 5 Vergewissern Sie sich dass die USV ordnungsgem mit Spannung versorgt wird das USV Display leuchtet 6 Pr fen Sie die Anzeige f r zwei USV 1USV 1USV redundant Wenn dies nicht a...

Страница 74: ...etisches Feld IEC 61000 4 6 Stufe 3 Melder mit energietechnischen Frequenzen IEC 61000 4 8 Stufe 4 Zeichen CE Umgebungsbedingungen Betriebstemperatur 0 bis 40 C 32 bis 104 F Lagertemperatur 15 bis 60...

Страница 75: ...OL ModularEasy 9PXMEZ6Ki 9PXMEZ11Ki Manual de instalaci n y del usuario Copyright 2014 EATON Todos los derechos reservados Servicio y asistencia Llame a su representante de servicio local 614 09354 0...

Страница 76: ...escritos en este manual se deben instalar en un entorno entre 0 y 40 C sin contaminantes conductivos Estos l mites se han previsto para ofrecer una protecci n razonable contra interferencias cuando el...

Страница 77: ...e puede desconectar la unidad de la fuente de alimentaci n de CA mediante la apertura de este disyuntor y si a n est conectada al SAI desactivando previamente el SAI consulte el manual del usuario del...

Страница 78: ...9RK 10 3 6 Ejemplo de configuraci n de 19 de rack con EBM 9PX EBM 240 V opcional 11 3 7 Ejemplo de sistema de integraci n de bater a con Trollet Frame opcional no incluido BINTSYS 11 3 8 Requisitos d...

Страница 79: ...o de los residuos y facilitar el reciclaje separe los distintos componentes del embalaje El cart n que utilizamos est compuesto en m s del 50 por cart n reciclado Las bolsas est n fabricadas en poliet...

Страница 80: ...todo en uno gama ModularEasy 5 6 kVA Funci n conectar antes de cerrar caracter stica que permite el servicio completo continuidad de la alimentaci n el ctrica cuando se pasa de la posici n de SAI a la...

Страница 81: ...manual del ModularEasy est en la posici nTEST PRUEBA o Bypass Bypass La carga no est protegida En 9PXMEZ11Ki puede colocarse en Bypass la carga sobre una Bypass AC source independiente consulte 4 3 9...

Страница 82: ...a alimentaci n del SAI2 3 1UPS 1UPS redundante significa que la alimentaci n de la carga es inferior a la alimentaci n m xima de un SAI 2UPS 0UPS redundante significa que la alimentaci n de la carga e...

Страница 83: ...Deseche o recicle el embalaje de forma adecuada o gu rdelo para utilizarlo m s tarde Coloque el armario en un rea protegida con aireaci n adecuada y libre de humedad gases inflamables o corrosi n Los...

Страница 84: ...P gina 10 614 09354 01_ES 3 Instalaci n 3 4 Instalaci n de torre 3 5 Posici n de rack con kit de ra l opcional no incluido 9RK...

Страница 85: ...01_ES ESPA OL 3 Instalaci n 3 6 Ejemplo de configuraci n de 19 de rack con EBM 9PX EBM 240 V opcional 3 7 Ejemplo de sistema de integraci n de bater a conTrollet Frame opcional no incluido BINTSYS 9P...

Страница 86: ...ama o nominal de cable de input m nimo Curva D del disyuntor 9PXMEZ6Ki Operaci n Paralelo L1 Fase 4 25 mm2 12 4 AWG 10 mm2 8 AWG 63 A N L2 Neutro fase Masa 9PXMEZ6Ki S lo Redundancia L1 Fase 4 25 mm2...

Страница 87: ...Disyuntor de dos polos Disyuntor de dos polos Secciones de cable recomendadas 9PXMEZ11Ki Normal AC source y Bypass AC source Posici n del terminal Funci n del cable Tama o nominal cable de terminal Ta...

Страница 88: ...Output UPS Consulte el manual del usuario del SAI para comprobar la conexi n de los bloques de terminales del SAI 2 Conecte el cable de detecci n del ModularEasy del conjunto de cables de E S 1 al con...

Страница 89: ...el conector del conjunto de cables de E S 1 en el ModularEasy y f jelo con los dos tornillos de bloqueo 11 Conecte los dos SAI juntos con el cable paralelo 9PX y f jelo La utilizaci n de este cable pa...

Страница 90: ...ue est dentro de la tapa de E S del SAI Consulte el manual del usuario del SAI para comprobar la conexi n de los bloques de terminales del SAI 2 Conecte los cables de detecci n del ModularEasy 2 al co...

Страница 91: ...io del SAI 6 Inserte el cable de salida output a trav s del pasacables 7 Conecte los cables a los bloques de terminales de salida output 8 Apriete los pasacables 9 Vuelva a colocar la tapa de E S del...

Страница 92: ...arEasy 5 5 Apriete el pasacables 6 Vuelva a colocar la tapa de Bypass Input del ModularEasy en su sitio y f jela 5 con el tornillo 7 Conecte los cuatro cables de alimentaci n integrados y los dos cabl...

Страница 93: ...del racor para cables 15 Conecte los cables a los bloques de terminales Input BP de Bypass AC source 16 Inserte el cable de output a trav s del racor para cables 17 Conecte los cables a los bloques d...

Страница 94: ...te de CA no suministrado en la posici n I On para activar la alimentaci n de suministro el ctrico consulte 3 4 Instalaci n de torre p gina 10 Coloque el disyuntor de entrada de fuente Bypass no sumini...

Страница 95: ...anel de visualizaci n del SAI consulte el manual del usuario del SAI 3 Compruebe que el cable paralelo 9PX est conectado y fijado correctamente PN 744 A2675 4 Compruebe que en los dos SAI se visualiza...

Страница 96: ...del SAI del ModularEasy en la posici n 0 OFF en el caso del 9PXMEZ11Ki 7 Desconecte todas las bater as internas y externas del SAI defectuoso Solo para los SAI 9PX5000 y 9PX6000 8 Compruebe que realm...

Страница 97: ...Easy en la posici n Test Prueba 5 Verifique que el SAI recibe alimentaci n correctamente el panel de visualizaci n del SAI est iluminado 6 Compruebe que en los dos SAI se visualiza 1UPS 1UPS redundant...

Страница 98: ...nivel 4 Campo electromagn tico IEC 61000 4 6 nivel 3 Campo magn tico conducido IEC 61000 4 8 nivel 4 Etiquetado CE Condiciones ambientales Temperatura de funcionamiento De 0 a 40 C de 32 a 104 F Temp...

Страница 99: ...ModularEasy 9PXMEZ6Ki 9PXMEZ11Ki Copyright 2014 EATON 614 09354 01_RU...

Страница 100: ..._RU ModularEasy WEEE ModularEasy ModularEasy 0 40 C IEC EN 62040 1 1 2008 IEC EN 62040 2 2 2006 IEC EN 62040 3 2 0 2011 IEC 61000 4 2 3 IEC 61000 4 3 3 IEC 61000 4 4 4 IEC 61000 4 5 4 IEC 61000 4 6 3...

Страница 101: ...3 614 09354 01_RU ModularEasy 15 C 60 C ModularEasy EATON Eaton ModularEasy...

Страница 102: ...arEasy 9 3 3 9 3 4 10 3 5 9RK 10 3 6 19 EBM 9PX EBM 240V 11 3 7 Trollet Frame BINTSYS 11 3 8 12 4 14 4 1 9PXMEZ6Ki 14 4 2 9PXMEZ11Ki Normal AC source Bypass AC source 16 4 3 9PXMEZ11Ki Normal AC sourc...

Страница 103: ...5 614 09354 01_RU 1 EATON ModularEasy ModularEasy ModularEasy EATON www eaton com powerquality EATON 1 1 EATON CFC 50 PET 01 HDPE 02 PVC 03 LDPE 04 PP 05 PS 06 EATON EATON...

Страница 104: ...odularEasy Eaton ModularEasy 5 6 ModularEasy Normal Bypass IEC 16A C19 2 1 lb P x L x H p x L x H 9PXMEZ6Ki 22 8 10 3 690 x 440 x 130 27 x 17 x 5 540 x 440 x 130 21 3 x 17 x 5 9PXMEZ11Ki 32 6 15 690 x...

Страница 105: ...Bypass ModularEasy 4 UPS supply 5 Bypass mode Bypass ModularEasy TEST BYPASS 9PXMEZ11Ki Bypass AC source 4 3 9PXMEZ11Ki Normal AC source Bypass AC source 18 9PXMEZ6Ki 1 2 3 1 2 4 16 A 5 6 Bypass 1 2...

Страница 106: ...8 614 09354 01_RU 2 2 3 UPS NMC Ready Eaton 2 4 1 2 Power 1 2 3 1 1 2 0 1 0 2 5 Enter...

Страница 107: ...9 614 09354 01_RU 3 3 1 1 15 2 15 3 2 ModularEasy 3 3 ModularEasy 9PXMEZ6Ki 1 2 ModularEasy 3 9PX 744 A2675 4 4 5 9PXMEZ11Ki 1 2 ModularEasy 3 9PX 744 A2675 4 4 5...

Страница 108: ...10 614 09354 01_RU 3 3 4 3 5 9RK...

Страница 109: ...11 614 09354 01_RU 3 3 6 19 EBM 9PX EBM 240V 3 7 Trollet Frame BINTSYS 9PXMEZ11Ki 9PXMEZ6Ki...

Страница 110: ...i 9PX6000 9PX5000 D 63 A D 32 A 2 D 9PXMEZ6Ki L1 4 25 2 12 4 AWG 10 2 8 AWG 63 A N L2 9PXMEZ6Ki L1 4 25 2 12 4 AWG 6 2 10 AWG 32 A N L2 3 8 2 9PXMEZ11Ki 9PX8000 9PX11000 D 125 A 9PX11000 D 100 A 9PX80...

Страница 111: ...9PX8000 D 63 A 9PX11000 D 50 A 9PX8000 2 2 9PXMEZ11Ki Normal AC source Bypass AC source D 9PX11000 L1 4 35 2 12 4 AWG 35 2 1 AWG 125 A N L2 9PX8000 L1 4 35 2 12 4 AWG 25 2 2 AWG 100 A N L2 9PX11000 L...

Страница 112: ...14 09354 01_RU Normal AC source O Off ModularEasy 4 1 9PXMEZ6Ki 1 2 1 2 ModularEasy 1 614 09200 3 ModularEasy ModularEasy 2 4 Normal AC source 5 Input Normal AC source 6 Output 7 Output 8 9 ModularEas...

Страница 113: ...15 614 09354 01_RU 4 10 1 ModularEasy 11 9PX...

Страница 114: ...16 614 09354 01_RU 4 2 9PXMEZ11Ki Normal AC source Bypass AC source 1 4 1 1 2 2 ModularEasy 2 614 09260 3 ModularEasy 3 2 4...

Страница 115: ...17 614 09354 01_RU 4 Normal AC source 5 Input Normal AC source 4 6 Output 7 Output 8 9 ModularEasy 3 2 10 EBM 11 9PX 4...

Страница 116: ...9354 01_RU 4 3 9PXMEZ11Ki Normal AC source Bypass AC source 1 5 ModularEasy 2 ModularEasy 5 3 ModularEasy 5 3 50 10 8 AWG 4 Input BP ModularEasy 5 5 6 ModularEasy 5 7 4 2 1 2 8 ModularEasy 2 9 Modular...

Страница 117: ...14 09354 01_RU 10 4 11 Bypass AC source ModularEasy 3 12 Normal AC source 13 Input Normal AC source 14 Bypass AC source 15 Input BP Bypass AC source 16 Output 17 Output 18 19 ModularEasy 3 20 EBM 21 9...

Страница 118: ...y 4 14 Output ModularEasy 9PX 744 A2675 2 ModularEasy Bypass AC source 3 Bypass ModularEasy UPS 4 9PXMEZ6Ki ModularEasy I 9PXMEZ11Ki ModularEasy I 5 I 3 4 10 I 6 7 1 1 744 A2675 b UPS NMC Ready Eaton...

Страница 119: ...ce 9PXMEZ11Ki 4 ModularEasy 0 OFF ModularEasy 1 ON 5 1 9PXMEZ6Ki UPS output ModularEasy I 9PXMEZ11Ki UPS output ModularEasy I 2 Bypass 3 9PX 744 A2675 4 1 1 744 A2675 b UPS NMC Ready Eaton 5 ModularEa...

Страница 120: ...ypass mode 2 Bypass 3 ModularEasy Bypass Bypass mode ModularEasy Bypass AC source 9PXMEZ11Ki 4 30 5 p 6 ModularEasy 0 OFF 9PXMEZ6Ki ModularEasy 0 OFF 9PXMEZ11Ki 7 9PX5000 9PX6000 8 5 ON OFF 9 5 3 2 9P...

Страница 121: ...3 4 1 ModularEasy 4 1 4 2 4 3 2 9PXMEZ6Ki UPS output ModularEasy I 9PXMEZ11Ki UPS output ModularEasy I 3 9PX 744 A2675 4 ModularEasy Test 5 6 1 1 744 A2675 b S UPS NMC Ready Eaton 7 ON 2 8 9 10 Modula...

Страница 122: ...1 1 2008 IEC EN 62040 2 2 2006 IEC EN 62040 3 2 0 2011 IEC 61000 4 2 3 IEC 61000 4 3 3 IEC 61000 4 4 4 IEC 61000 4 5 4 IEC 61000 4 6 3 IEC 61000 4 8 4 0 40 C 32 104 F 15 60 C 5 140 F 25 55 C 13 130 F...

Страница 123: ......

Страница 124: ...www eaton com Powerquality EATON 9PX_ModularEasy 614 09354 01...

Отзывы: