34007724EN/AD - Page 23
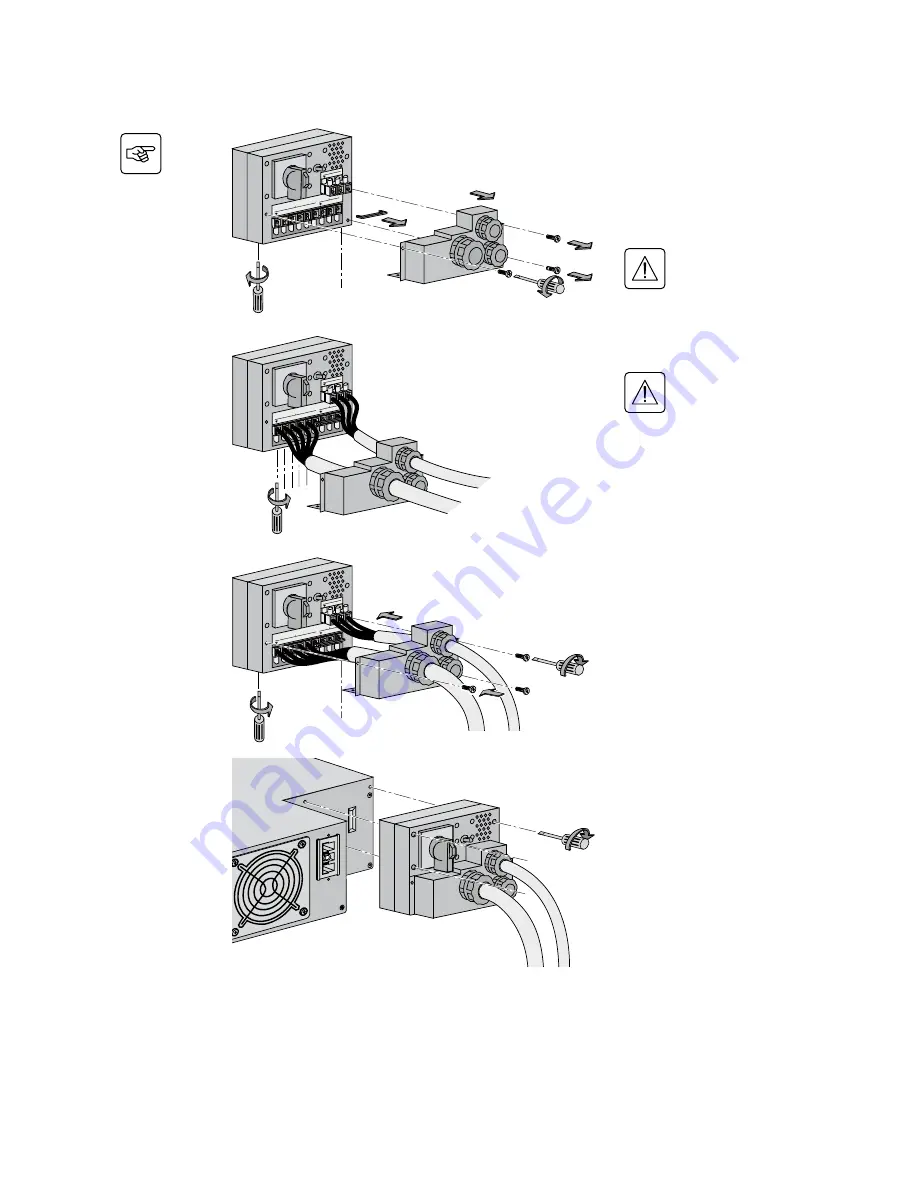
Frequency converter
1 - Remove the terminal block cover
(5 screws),
2 - Remove the bridge connected
between L2 and L1,
3 - Insert the Normal AC cable through
the cable gland,
4 - Connect the 5 wires to the Normal
AC terminal block,
Always connect the earthing
wire first.
5 - Insert the Output cable suppling the
load through the Output cable gland,
6 - Connect the 3 wires to output
terminal block,
Do not connect anything to the
Bypass AC terminal block,
7 - Refit the terminal block cover and
tighten the cable glands,
8 - Secure the junction Input/Output
box to the rear of the power module
by means of the 3 screws.
1
5
3
6
4
7
2
1
1
1
7
7
2. Installation
8
Rectifie
r Input
L2
L1
L1
Bypas
s Inpu
t
N2
L2
N1
L3
Outpu
t
N
L
Rectifie
r Input
L2
L1
L1
Bypas
s Inpu
t
N2
L2
N1
L3
Outpu
t
N
L
Card Setting
s
RS232 Downloa
d
66074
UP
S
data
Rese
t
100 10
1
2
ON
ETHERNET
IP
=
MAC=00E0D8FF855E
NORM
AL
φ
Rectifie
r Input
L2
L1
L1
Bypass
Input
N2
L2
N1
L3
Outpu
t
N
L
1
7
7
8
8
Содержание EX RT 11 3:1
Страница 2: ...3400772400 AD...
Страница 3: ...www eaton com Installation and user manual EX RT 5 3 1 EX RT 7 3 1 EX RT 11 3 1...
Страница 41: ...www eaton com Manuel d installation et d utilisation EX RT 5 3 1 EX RT 7 3 1 EX RT 11 3 1...
Страница 79: ...www eaton com Installations und Bedienungsanleitung EX RT 5 3 1 EX RT 7 3 1 EX RT 11 3 1...
Страница 117: ...www eaton com Manuale d installazione e d uso per l utente EX RT 5 3 1 EX RT 7 3 1 EX RT 11 3 1...
Страница 155: ...www eaton com Manual de instalaci n y de utilizaci n EX RT 5 3 1 EX RT 7 3 1 EX RT 11 3 1...
Страница 193: ...www eaton com Installatie en gebruiker shandleiding EX RT 5 3 1 EX RT 7 3 1 EX RT 11 3 1...
Страница 231: ...3400772400 AD...
Страница 232: ...www eaton com 3400772400 AD...


