2
Installation Instructions – Terrapin Series Incandescent and Compact Fluorescent Luminaires
Installation Instructions – Terrapin Series Incandescent and Compact Fluorescent Luminaires
IS-134 ADC140283 www.eaton.com
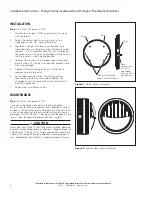
Figure 2.
EyeLid (Downlight Installation)
Figure 1.
Gasket
Plate
Directional Mounting
Arrows (for Wall Mount)
Place
Connections
of Fixture
and Supply
Wires in J-Box
Behind Plate.
J-Box
Plate / Gasket Assembly
INSTALLATION
otee:
N
Verify that the power is OFF.
1. Remove lens, using a TORX
®
screwdriver (for screws
with centerpin).
2. Select the correct type fasteners to use for the
mounting surface, 1/4” nominal diameter.
3. Locate on ceiling or wall over a junction box. Use
mounting plate as a template, layout fastener locations
(Figure 1.). If wall mounted, note the “up” notation on
the mount plate. If using an eyelid option, make certain
that the eyelid is in the upward position.
4. Connect fixture wires to the proper supply wires and
place in J-Box. 90° supply wire required, ground fixture
with wire provided.
5. Tighten all four mounting fasteners sufficiently to
compress plate into gasket.
6. For incandescent luminaires, install lamp tightly,
then loosen one to two turns and re-tighten. This
will properly seat the lamp for best mechanical and
electrical connection.
7. Replace lens and tighten screws.
MAINTENANCE
otee:
N
Verify that the power is OFF.
Lens panel should be cleaned on a regular schedule
(6- to 12-month intervals based on local conditions). Output
efficiency will be retained only if properly maintained. Clean
with any non-abrasive cloth and a mild solution of soap or
detergent (i.e. 409 Cleaner). Cleaning should be done on the
lens at room temperature and out of direct sunlight.
CAUTION
Never clean lens while it is hot. Do not use Gasoline, Benzene,
Acetone, Carbon Tetrachloride, or abrasives, strong alkalines, or
acid cleaners. If the lens has a factory applied trim color, these
solvents will remove the paint in addition to damaging plastic
lens. Replacement of entire lens is recommended in this case.
Содержание Cooper Lighting Fail-Safe Terrapin Series
Страница 7: ...7...


