background image

3

Manual CEAG 28011/-21 LED  1-8h/D

   40071860278(B)    January 2017   www.ceag.de

1 Normenkonformität

Die Leuchte ist konform mit: EN 60 598-1, EN 

60 598-2-22 und DIN EN 1838. Gemäß DIN 

EN ISO 9001 entwickelt, gefertigt und geprüft.

1 Conformity with standards

Conforms to: EN 60 598-1, EN 60 598-2-22 
and DIN EN 1838. 
Developed, manufactured and tested in ac-
cordance with DIN EN ISO 9001.


SICHERHEITSHINWEISE 

•  Die Leuchte ist bestim mungs gemäß in 

unbeschädigtem und einwandfreiem Zu-

stand zu betreiben!

•  Als Ersatz dürfen nur Originalteile von 

CEAG verwendet werden!

•  Vor der ersten Inbetriebnahme muss die 

Leuchte entsprechend den im Abschnitt 

Installation genannten Anweisungen ge-

prüft werden!

•  Die  Notleuchtenkenn  zeich  nung  vorneh-

men: Stromkreis und Leuchtennummer 

zuordnen und eintragen.

•  Die Protokollführung gemäß der nationa-

len Vorschriften ist durchzuführen (entfällt 

bei automatischer Protokollierung)!

•  Alle Fremdkörper müssen vor der ersten 

Inbetriebnahme aus dem Gerät entfernt 

werden!

•  Beachten  Sie  bei  allen  Ar              beiten  an  dem 

Gerät die nationalen Sicherheits- und 

Unfallverhütungsvorschriften und die 

nachfolgenden Sicherheitshinweise in der 

Betriebsanleitung, die mit einem       ver-

sehen sind!


SAFETY INSTRUCTIONS


•  The device shall only be used for its 

intended purpose and in undamaged and 

flawless condition

•  Only genuine CEAG spare parts may be 

used for replacement and repair

•  Prior to its initial operation, the luminaire 

will have to be checked in line with the 

instructions (see installation sector)

•  Carry out the marking of the emergency 

luminaire: Assign the circuit and the 

luminaire No. and enter them.

•  Recording in the minutes shall be 

performed in compliance with the 

national regulations (is deleted in case of 

automatic recording).

•  Any foreign object shall be removed from 

the luminaire prior to its initial operation!

•  Observe the national safety rules and 

regulations to prevent accidents as well 

as the safety instructions included in 

these operating instruction marked 

with    


Содержание CEAG 28011

Страница 1: ...Betriebsanleitung Mounting and Operating Instructions Zielgruppe Elektrofachkraft Target group Skilled electricians Verwendungszweck Notbeleuchtung nicht f r privaten Gebrauch Intended Application Eme...

Страница 2: ...2 7 TEST und Anzeigeeinheit 13 7 1 berwachungseinrichtung CGLine 12 8 Technische Daten 15 9 Wartung Instandhaltung 15 10 Entsorgung Recycling 15 Index 1 Conformity with standards 3 2 Brief description...

Страница 3: ...llierung Alle Fremdk rper m ssen vor der ersten Inbetriebnahme aus dem Ger t entfernt werden Beachten Sie bei allen Ar beiten an dem Ger t die nationalen Sicherheits und Unfallverh tungsvorschriften u...

Страница 4: ...red For maintained light switching a wire jumper must be inserted in the L and L terminals The PE wire must be connected with all variants For protection class II lumi naires this serves as functional...

Страница 5: ...betriebnahme Datum in das auf der Batterie vorgesehene Feld ein tragen Taster LED Folien Anschluss Beim Wechsel von Taster LED oder Leiterkarte bitte Markierung 1 auf der Leiterkarte und auf der Leite...

Страница 6: ...riebswahlschalter Kapitel 6 2 mode switch see chapter 6 2 Werkseinstellung Default mode Notlichtdauer 3 h AUTO BT AN Duration 3 h AUTO DT ON c LED Anschluss LED connection d Testtaster Anschluss conne...

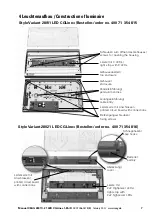
Страница 7: ...with 3 LEDs Befestigungsschrauben fixing screws Schrauben zum ffnen des Geh uses screws for opening the housing Geh useoberteil top enclosure Leitungseinf hrung cable entry Pendeleinf hrung pendulum...

Страница 8: ...ceag de 5 Ma bilder Dimensional drawings Style Variant 28011 LED CGLine Style Variant 28021 LED CGLine 341 202 92 341 198218 92 308 308 200 40 4 5 56 234 22 178 5 29 30 30 30 28021 LED CGLine mit Dec...

Страница 9: ...gne tem Montagezubeh r an Decke oder Wand befestigen 4 Bei Anschluss des LED Moduls auf Polarit t achten Batterieleitungen auf die Leiterkarte aufstecken Einstellungen der Betriebsart Dip Schalter sie...

Страница 10: ...larit t achten Batterieleitungen auf die Leiterkarte aufstecken Einstellungen der Betriebsart Dip Schalter siehe Kap 5 ber pr fen Die Abdeckung aufsetzen und die Piktogramme montieren Remove pictogram...

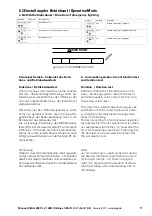
Страница 11: ...etzten Resets erfolgt Danach erfolgt genau 6 Monate nach dem letzten BT der n chste Test b Automatic operation time of function test and duration test Function Duration test Without connection of the...

Страница 12: ...eine gelbe LED Anzeige auf einen f lligen Test aufmerksam Blinkt die LED am Testtaster nach einem BT gelb wurde der BT nicht bestanden Die Batterie Best Nr 400 71 353 667 ist auszutauschen Dabei das...

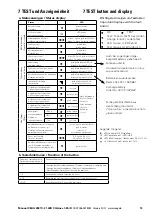
Страница 13: ...fast 2 Hz Sonstiges Other 1 st ndiger Notlichtbetrieb 1 h Emergency operation rot red Nach Bet tigung des Test Tasters f r t 1s After pushing the test button for t 1s 3 st ndiger Notlichtbetrieb 3 h...

Страница 14: ...die ber die drei LEDs an der Leuchte abgefragt werden kann Weitere Informationen zur Adressierung siehe Betriebsanleitung der zentralen CGLine berwa chungseinrichtung 7 1 Luminaire monitoring CGLine T...

Страница 15: ...e marked with corresponding symbols The LiIon battery integrated in the luminaire must be returned to the seller or an approved disposal location and must not be disposed of by the customer in ac cord...

Страница 16: ...ton we re energized by the challenge of powering a world that demands more With over 100 years experience in electrical power management we have the expertise to see beyond today From groundbreaking p...

Отзывы: