EATON
WSB11206 WCSB Tensioner / Brake with ORB Coolant Ports Installation, Operation and Maintenance Manual E-CLCL-II009-E
August 2015
24
WCSB tensioner / brake with ORB coolant ports
4.5.5.4 Applying the Gasket Tape to the IRON.
(a)
Start with the sealing area nearest to the inner
diameter on the IRON. Remove the adhesive backing
on the gasket tape a little at a time to prevent the
adhesive from picking up dirt during installation.
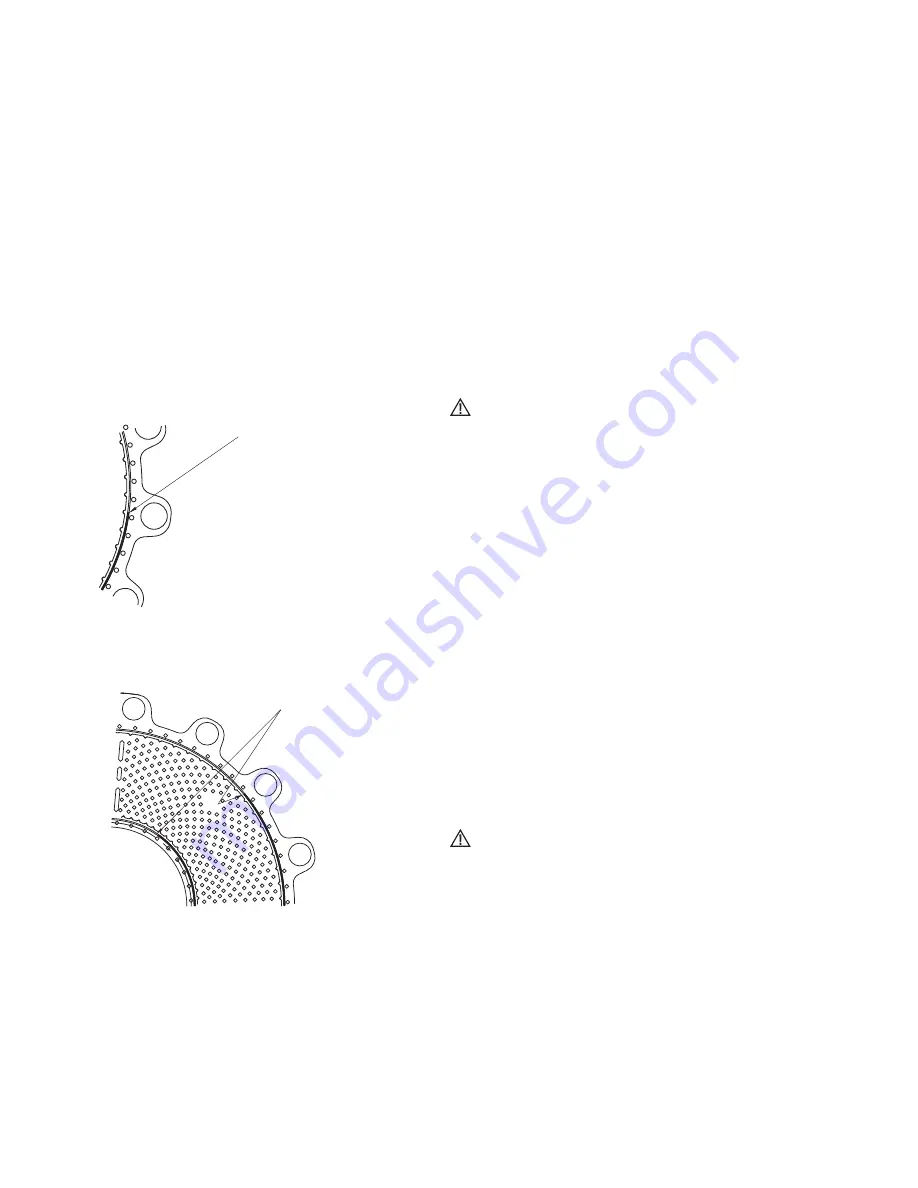
Start by positioning one end of the tape at the
center-line of a bolt hole as shown in Figure 10, using
the edge of the water cavity as a guide as shown in
Figure 11. Proceed to apply the tape on the sealing
surface following a smooth circular path, being sure
to press the tape in place.
Note: The tape will cover the machined groove that is located
between the water cavity and the bolt holes.
Start location of Gasket Tape
Gasket tape starts at
centerline of bolt hole
(Tape for inner and outer)
Figure 10
Placement of Gasket Tape
Gasket tape placed
using edge of water
cavity as guide and
covering the groove
Figure 11
(b)
After the gasket tape has been placed around the
entire circumference, overlap the starting end of the
end of the tape by a minimum of 0.44” (11,2 mm).
See Figure 9. Be sure to smooth the tape at the
overlap transition in order to get a good seal.
No air gaps or bubbles should be present.
(c)
Repeat steps (a) and (b) in Section 4.5.5.4 for the
outer sealing area nearest to the outer diameter of
the IRON, again using the edge of the water cavity
as a guide.
4.5.5.5 Proceed to Section 4.5.7 to complete the
wear plate (3) replacement.
Caution
Before the gasket tape is covered with the wear
plate, the sealing surface should be protected to
prevent contamination from dust, dirt or oils.
No additional cleaning or liquid should be applied
to the surface of the IRON or gasket tape.
4.5.6 Assembly with Loctite Superflex
®
#596 Sealant
4.5.6.1 Clean and completely dry the sealing surfaces at the
I.D. and O.D. on the pressure plate (14), reaction
plate(s) (31) and end plate (117). These surfaces
should be free of nicks and scratches to prevent
leaks. Minor nicks and scratches may be filled with
Loctite Superflex
®
#596 Sealant during assembly.
4.5.6.2 Apply a uniform bead of Loctite Superflex
®
#596
Sealant in the grooves of the pressure plate, reaction
plate(s) and / or end plate. Recommended bead
diameter is 0.060" - 0.090" (1,5 mm - 2,3 mm) for
all sizes 24” and 36”. For the 48”size, refer to
procedure 4.5.6.3 for proper sealant application
procedure. For the 24” and 36”, skip to capitalize
section 4.5.7 after application of sealant.
Caution
Loctite Superflex
®
#596 Silicon Sealant will begin to
set up and skin over in approximately 10 minutes.
The wear plate must be fastened to the mating
component within 10 minutes of applying the sealant.
4.5.6.3 The 48WCSB tensioner / brake assembly incorporates
a dual groove for both the Loctite Superflex
®
#596
Sealant and an O-ring. An initial bead of sealant
0.030" - 0.060" (0,7 mm - 1,5 mm) in size must be
applied to the bottom of the deep groove in order to
hold the O-ring in place. See Figure 12.
Содержание Airflex WSB11206
Страница 1: ......


