Eaton 70160 Скачать руководство пользователя страница 9

9

Model 70160

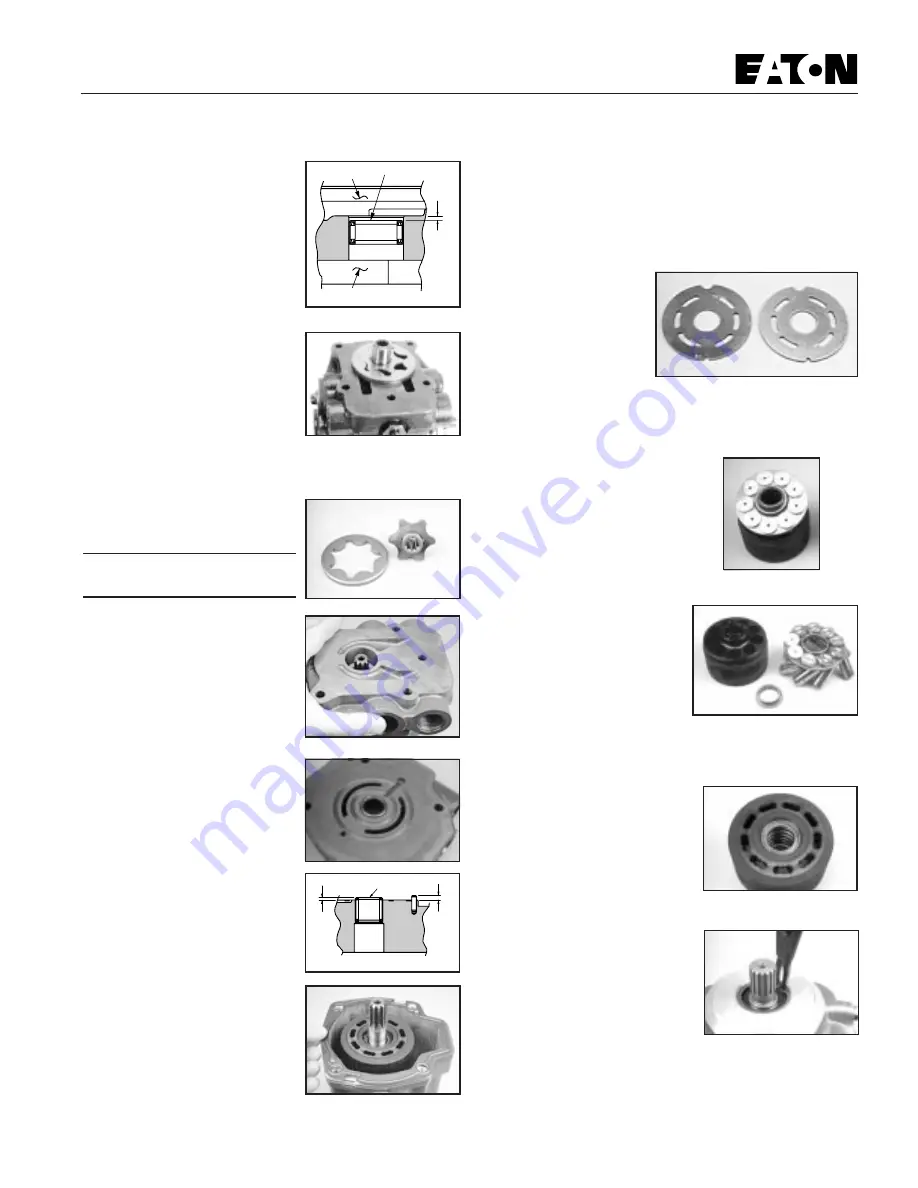
13 When the needle bearing
assembly is replaced, the
numbered end of the bearing must
face toward the flange side of the
adapter to the dimension as shown
(see Figure 13).

14 With the charge pump adapter
removed, remove the charge pump
outerring and inner gerotor ring
assembly (see Figure 14 and 15).

15 Charge pumps are available in
two different displacements Charge
pump displacements are based on
the thickness of the gerotor
assembly and the depth of the
pocket located in the charge pump adapter. To determine the
displacement, refer to the table below.

Gerotor Pocket Depth

Displacement

Depth of Pocket

cm

3

/r [in

3

/r]

mm [in.]

6.9 [.42]

6.35 [.25]

13.8 [.84]

12.7 [.50]

16 To separate the endcover
assembly from the dowel pins in
the pump housing assembly, insert
two screwdrivers between
endcover and housing assembly
and pry upward (see Figure 16).

17 After separation, remove the
endcover from the housing
assembly.

18 Turn the endcover assembly
over and inspect the needle
bearing. The needles in the needle
bearing must remain intact in the
bearing cage (see Figure 17).

19 When the needle bearing
assembly is replaced, the
numbered end of the bearing must
face the valve plate side of the
endcover to the dimension as
shown (see Figure 18).

20 With the endcover removed,
remove the gasket from the pump
housing assembly and discard (see
Figure 19).

21 Remove the valve plate from the piston block assembly.
Note:  This valve plate may have stuck to the endcover
assembly that was previously removed.

22 Valveplate directional rotation (CW or CCW) is identified
by the location of the metering slots located on the face of the
valve plates. Pump input
rotation should always turn
into the metering slots (see
Figure 20). A clockwise
valve plate is shown on the
left and a counter clockwise
valveplate is on the right.
Note:  Whenever pump
input rotation is changed, the valve plate must be replaced
along with the desired rotation charge pump adapter.

23 Remove the rotating kit assembly
by carefully retaining it in the housing
assembly (see Figure 21). Lift the
housing and rotating kit assembly and
turn over assemblies allowing the
rotating kit assembly to slide down the
input shaft and out of the pump
housing.

24 With the rotating kit
assembly removed, remove the
piston assemblies, spider and
spider pivot from the piston
barrel.(see Figure 22).

25 Inspect the piston
assemblies, spider, spider pivot
and piston block. The piston block assembly usually requires
no further disassembly unless the pins or block spring are
damaged.

26 When any excessive wear or
scratches are noted on the face of
the piston block, the block
assembly must be replaced (see
Figure 23).

DO NOT LAP THE FACE OF PISTON
BLOCK ASSEMBLY.

27 To remove the input shaft
assembly, use a pair of internal
snap ring pliers and remove the
shaft seal retaining ring from the
housing assembly (see Figure 24).

Numbered End

Gerotor Pocket

2.41 mm
[.095 in.]

Flange

Figure 13

Figure 17

2.79 mm
[.110 in.]

1.91 mm
[.075 in.]

Numbered End

Figure 18

Figure 20

Figure 22

Figure 23

Figure 24

Figure 15

Figure 16

Figure 14

Figure 19

Figure 21

Repair Information

 - Disassembly

Содержание 70160

Страница 1: ......

Страница 2: ...extremely important Clean the port areas thoroughly before disconnecting the hydraulic lines Plug the pump ports and cover the open hydraulic lines immediately after they re disconnected Drain the oil...

Страница 3: ...0 Single Piston Pump 78162 Single Piston Pump with Gear Pump 78161 Tandem Piston Pumps 78163 Tandem Piston Pumps with Gear Pump B Sequential Numbering C Engineering Design Code A A B B Tools Required...

Страница 4: ...Press Fit 6 5 4 1 Shaft assembly for rear pump of tandem Shaft assembly for single pump or front pump of tandem 1 7 7 8 8 8 8 9 10 10 9 10 10 11 11 29 48 12 24 41 16 Press Fit 23 17 17 14 3 50 50 1 51...

Страница 5: ...8 27 27 28 28 37 37 K4 4 2 1 2 2 26 26 21 20 18 19 19 1 19 19 1 18 2 27A 27B 28A 55 1 49 55 2 55 3 55 4 49 1 55 55 5 37 35 36 55 1 55 55 2 55 3 55 4 55 5 49 49 1 34 34 1 32 K2 1 K2 2 K2 3 32 K3 1 31 K...

Страница 6: ...2 Cap Screws 5 16 18 50 8 mm 2 in Long 27A 2 Cap Screws 5 16 18 82 6 mm 3 25 in Long 27B 2 Cap Screws 5 16 18 88 9 mm 3 5 in Long 28 2 Cap Screws 5 16 18 63 5 mm 2 5 in Long 28A 2 Cap Screws 5 16 18...

Страница 7: ...Kits K1 1 Tandem Piston Pump Mounting Kit K1 1 1 35T Coupler 36 8 mm 1 45 in long K1 2 1 O ring 1 59 mm Dia x 101 6 mm ID 0625 in Dia x 4 in ID K1 3 2 Cap Screws K1 4 2 Washer K2 1 Gear Pump Mounting...

Страница 8: ...0 PSI standard spring and poppet are shown on the bottom and the optional high pressure 13 7 to 20 7 bar 200 to 300 PSI spring and poppet is shown on the top The same charge pressure relief valve spri...

Страница 9: ...over assembly that was previously removed 22 Valveplate directional rotation CW or CCW is identified by the location of the metering slots located on the face of the valve plates Pump input rotation s...

Страница 10: ...osite cover plate The bearing cup in this cover plate is press fit and not removable Repeat steps 30 through 31 33 To remove swashplate first use a small press and press the drive shaft needle bearing...

Страница 11: ...See Parts Information manual for number 8 Place the bearing cup into trunnion cover over the crush ring or shims see Figure 40 9 Lubricate and install the o ring seal into counter bore of housing see...

Страница 12: ...24 Carefully install the endcover assembly by aligning it with the dowel pins located in the pump housing Use caution not to dislodge the valve plate see Figure 54 25 Align the spline of the gerotor...

Страница 13: ...th the problem statements and follow the action steps shown in the box diagrams This will provide help in correcting minor problems eliminating unnecessary machine down time Following the fault logic...

Страница 14: ...Below Level Repair or Replace Check System Pressure Reduce System Load High OK 9 Inspect Charge Relief Valve OK 11 Inspect Charge Pump 13 Inspect Motor 12 Inspect Inlet Screen or Filter Replace Clogge...

Страница 15: ...Servo Control If used OK OK OK 2 7 Defective Repair or Replace Inspect Motor 12 Replace Clogged Check Charge Pressure 10 Low OK Inspect Pump Bypass Valve If used Replace Pump Motor Defective Repair or...

Страница 16: ...spect Motor 12 Inspect Inlet Screen or Filter Replace Clogged OK 8 Check Charge Pressure 10 Low OK OK Replace Pump Motor Inspect Servo Control If used OK 2 Inspect Pump Bypass Valve If used OK Defecti...

Страница 17: ...r outlet c open inlet to charge pump 9 Check System Pressure a See figure 60 for location of pressure gauge installation b consult owner operators manual for maximum system relief valve settings 10 Ch...

Страница 18: ...engine over for 15 seconds 5 Replace the coil wire or return the fuel flow to the injectors Place the transmission unit in the neutral position start the engine and run it at a low idle The charge pum...

Страница 19: ...19 Model 70160...

Страница 20: ......

Отзывы: