


8
Manual CEAG Style Industry 40011 ... 40031 CG-S
30080001632_J September 2018 www.ceag.de
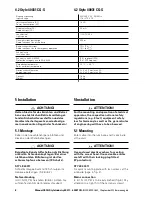
4.2 Style 40031 CG-S
4.2 Style 40031 CG-S
Eingangsspannung
Input voltage
230/240 V AC 50/60 Hz
176 – 275 V DC
Leistungsauf nahme (AC)
Power consumption (AC)
18 VA
Stromaufnahme (DC)
Rated current (DC)
40 mA
Leuchtmittel
Light source
11W /TC-SEL
Nennlichtstrom der Lampe
Rated luminous flux of the lamp
900 lm
Bemessungslichtstrom
Rated luminous flux for emergency operation
75 % (Phi
Netz
)
75 % (phi
mains
)
Schutzklasse
Insulation class
I
Schutzart nach EN 60529
Protection category acc. to EN 60529
IP 41 (optional IP54)
IP 41 (IP54 option)
Umgebungstemperatur
Perm. ambient temperature:
-10 °C .. +40 °C
Netzanschlussklemmen
Supply terminals
3 x 2 x 2,5 mm² max 6 A
3 x 2 x 2.5 mm² max 6 A
Gewicht
Weight
1,8 kg
1.8 kg
5 Installation
ACHTUNG!
Halten Sie die für das Errichten und Betrei-
ben von elektrischen Betriebsmitteln gel-
tenden Sicherheitsvorschriften und das
Gerätesicherheitsgesetz sowie die allge-
mein anerkannten Regeln der Technik ein!
5.1 Montage
Kabel in den Leuchtenkörper einführen und
diesen an der Wand befestigen.
ACHTUNG!
Beigefügte Kunst stoffscheiben als Dichtung
unter den Schraubenkopf legen! Bei einer
nichtbenutzten Einführung ist der Ver-
schluss stopfen zu belassen (IP-Schutz).
STYLE 40011
Schnellmontageeinsatz mit 2 Schrauben im
Gehäuse befestigen (S.4 Bild 2).
Netzver bindung
(L(U), N(0), PE) herstellen (Bild 5). Achten Sie
auf den festen Sitz der Klemmschrauben!
5 Installation
ATTENTION!
For the mounting and operation of electrical
apparatus, the respective national safety
regulations (e. g. ElexV, equipment safety
law for Germany) as well as the general rules
of engineering will have to be observed.
5.1 Mounting
Enter cable into the luminaire and fix luminaire
at the wall.
ATTENTION!
Use enclosed plastic washers for sealing
with the screw head. Unused cable entries
are left with their locking plug fitted
(IP protection).
STYLE 40011
Fix quick mounting plate with two screws at the
luminaire (page 4, fig. 2).
Mains connection
(L (U), N (0), PE) is to be established (fig. 5). Pay
attention to a tight fit of the terminal screws!


