Eaton 2596 Скачать руководство пользователя страница 8


IOM 2596 Cast 10”–16” | Fabricated 10”-36” 10/2011

                                            REV A.  


Page 8 of 15 

Eaton Filtration, LLC, 44 Apple Street, Tinton Falls, NJ 07724  |  www.eaton.com/filtration   |   Phone: 732-212-4700 


Installation, Operation & Maintenance Manual  

Model 2596 Self-Cleaning Strainer 


Cast 10” to 16” and Fabricated 10” to 36”
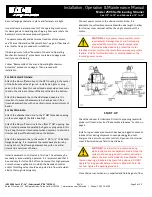
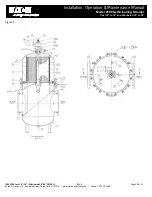
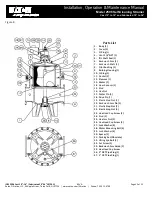
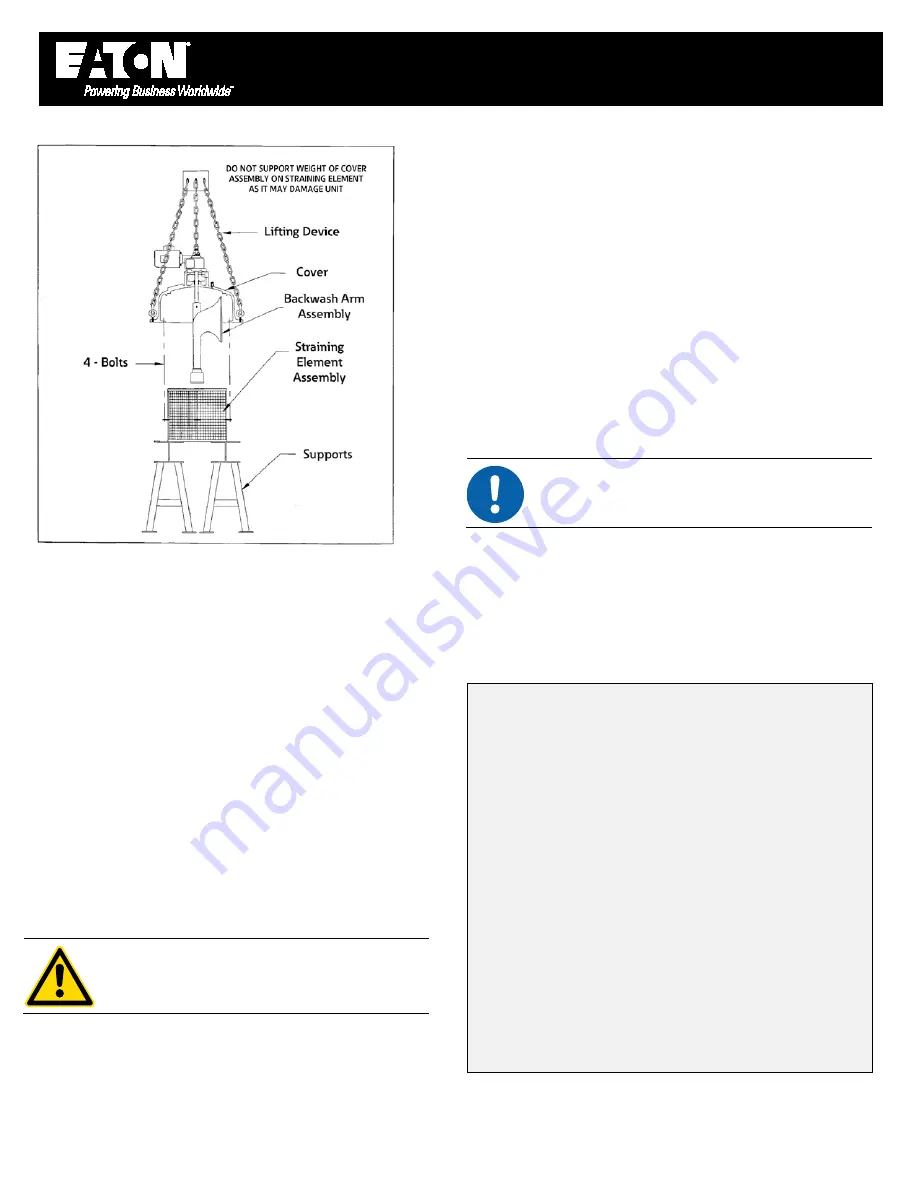
 

Fig 4A 


Before tightening swing bolts, rotate manually to ensure 

freedom from binding. See “Manual Operation of Backwash 

Arm”, page 6. 


1.


Align cover and body bolt blocks and secure with swing 

bolts. 


2.


Connect the electrical leads to the motor. Please note that 

the direction of rotation is not important. 


3.


Install fuses and connect power source. 


4.


The unit is now ready for operation. 


Refer to “Start-Up” procedures on page 3.
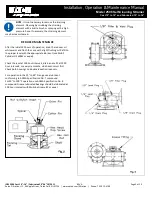
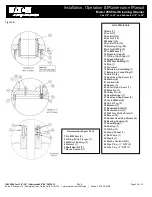
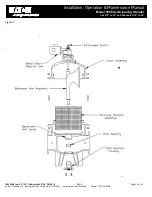


REDUCER


REPLACEMENT


(See Fig 3) 


1.


Disconnect power and remove motor leads. Remove motor 

flange bolts and washers and remove motor.  


CAUTION: 

Do not permit the motor to drop or 

allow its weight to rest on the drive shaft. 


2.


Remove the hair cotter pin and tap out drive pin from the 

shaft (see Fig 2). 


3.


Remove the locknut and spacer. 


4.


Remove the cap screws and washers securing the reducer 

to the reducer mount and remove the reducer. 


5.


Position the new reducer in place with input shaft parallel 

and opposite the strainer inlet nozzle. Secure with 

fasteners. 


6.


Replace spacer and locknut. Tighten locknut until step on 

backwash arm shaft is in contact with the sleeve of the 

reducer.


Follow Manual Operation of Backwash Arm, page 6.
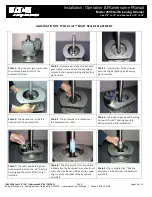


REMOVAL


OF


ORIFICE


PLATE


(IF


APPLICABLE) 


NOTE

: Certain applications may use an orifice plate 

on backwash arm. 


The orifice plate can be removed with the backwash arm and 

filter element in place by removing the screws attaching the 

orifice plate to the backwash arm then sliding the orifice plate 

out.


PILOT


BUSHING


&


HOUSING


REPLACEMENT 


Cast Strainers Only: 

To replace the pilot bushing: 


1.


Disconnect the power to strainer drive motor. Isolate the 

strainer then drain inner chamber. 


2.


Disconnect and remove part of the backwash line to allow 

removal of bushing housing. 


3.


Remove 3/4 cap screws (4 or 8) and drop guide bushing. 

This can be done with backwash arm in place if necessary. 


4.


Old guide bushing can be removed by cutting or drawn out 

with an extractor tool. Care must be taken not to damage 

housing wall. 


5.


After cleaning, insert new guide bushing using a wood 

block to tap it into housing. 


6.


Before replacing the guide bushing assembly, check the O-

ring seal and replace if necessary.


Содержание 2596

Страница 1: ...Assembly 6 Motor Replacement 7 Shaft Packing Replacement 7 Replacement or Maintenance of Filter Element and Backwashing Arm Bushing 7 Reducer Replacement 8 Removal of Orifice Plate 8 Pilot Bushing an...

Страница 2: ...ach to inside of flange protectors b Reapply rust preventative to any machined surface which became exposed due to handling and or receiving inspection c Make sure all openings are covered Seal flange...

Страница 3: ...ow off debris settled on the bottom Attach the backwash line to the center 2 NPT or 2 150 ANSI flanged opening It is important to prevent back pressure by having a short free flowing backwash line wit...

Страница 4: ...tling valve should be adjusted to a flow rate which attains thorough cleaning only Position blow off drain valve to the full open position for two to three minutes to clear the strainer of accumulated...

Страница 5: ...steam cleaned REDUCER MAINTENANCE After the initial 250 hours of operation drain the reducer oil while warm and flush the case with a light flushing oil Refill to the proper level with the appropriate...

Страница 6: ...vidual part Refer to this manual and the included assembly drawings for the location of parts CAUTION Do not perform any maintenance on this strainer until normal shut down procedures have been perfor...

Страница 7: ...ly to supports placed under support ring Remove the four bolts between the support ring and cover then lift the cover assembly See Fig 4 Inspect the element sealing surfaces and bushing located at bot...

Страница 8: ...nt and remove the reducer 5 Position the new reducer in place with input shaft parallel and opposite the strainer inlet nozzle Secure with fasteners 6 Replace spacer and locknut Tighten locknut until...

Страница 9: ...ing too tight 3 Bearing failure B Motor Reducer Failure 1 Incorrect power applied to strainer motor 2 Overload heaters in motor starter improperly sized 3 Lubricant level in reducer too low 4 Reducer...

Страница 10: ...REV A Page 10 of 15 Eaton Filtration LLC 44 Apple Street Tinton Falls NJ 07724 www eaton com filtration Phone 732 212 4700 Installation Operation Maintenance Manual Model 2596 Self Cleaning Strainer C...

Страница 11: ...Bushing 1 14 Ring 1 15 Grommet 16 Extrusion Small Ring 1 17 Extrusion Large Ring 1 18 Roll Pin 4 19 Hex Head Cap Screw 4 20 Washer 8 21 Locknut 4 22 Spacer 1 23 Nut w Nylon Insert 1 24 Drive Pin 1 25...

Страница 12: ...Page 12 of 15 Eaton Filtration LLC 44 Apple Street Tinton Falls NJ 07724 www eaton com filtration Phone 732 212 4700 Installation Operation Maintenance Manual Model 2596 Self Cleaning Strainer Cast 1...

Страница 13: ...Backwash Arm 1 7 Backwash Shaft 1 8 Pilot Bushing 1 9 Bushing Housing 1 10 O Ring 1 11 Gasket 2 12 Element 1 13 Motor 1 14 Gear Reducer 1 15 Stud 16 Hex Nut 17 Cotter Pin 2 18 Drive Pin 1 19 Elastic S...

Страница 14: ...and packing gland visible Photo 3 Internal view of the strainer with the original packing and packing gland removed Photo 4 The backwash arm shaft is cleaned with fine emery cloth Photo 5 The gasket...

Страница 15: ...filtrationinfo eaton com or call 732 212 4700 Europe Africa Middle East Auf der Heide 2 53947 Nettersheim Germany Voice 49 2486 809 0 China No 7 Lane 280 Linhong Road Changning District Shanghai 20033...

Отзывы: