General Instructions
Compressors require protection from elements. DO NOT
place your compressor in low spots or any place water
may puddle. Flooded compressors are not covered under
warranty.
1. Select preferred installation style (see
previous page) and determine position
of compressor.
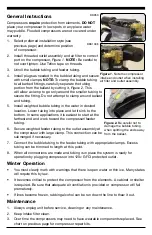
2. Install threaded outlet assembly and air filter to correct
port on the compressor, Figure 1. NOTE: Be careful to
not over tighten. Use Teflon tape on threads.
3. Unroll the bubble tubing and feeder tubing.
4. Install plugs as needed in the bubble tubing and secure
with small clamps. NOTE: To clamp the bubble tubing
to all barbed fittings, carefully separate the tubing
portion from the ballast by cutting it, Figure 2. This
will allow a clamp to go only around the smaller tubing to
secure the fitting. Do not attempt to clamp around ballast
and tubing.
5. Install weighted bubble tubing in the water in desired
location. Lower tubing into place and let it sink to the
bottom. In some applications it is easiest to start at the
farthest end and work toward the compressor/feeder
tubing.
6. Secure weighted feeder tubing to the outlet assembly at
the compressor with large clamp. This connection can be
submerged if necessary.
7. Connect the bubble tubing to the feeder tubing with appropriate clamps. Excess
tubing can be trimmed to length at this point.
8. When all connections are made and tubing is in place the system is ready for
operation by plugging compressor into 120v GFCI protected outlet.
Winter Operation
• You must clearly mark with warnings that there is open water or thin ice. Many states
will require this by law.
• It becomes critical to protect the compressor from the elements. A cabinet or shelter
is required. Be sure that adequate air ventilation is provided or compressor will fail
prematurely.
• If lines become frozen, rubbing alcohol can be run down the line to thaw it out.
Maintenance
1. Always unplug unit before service, cleaning or any maintenance.
2. Keep intake filter clean.
3. Over time the compressors may need to have wearable components replaced. See
chart on previous page for compressor repair kits.
Figure 1. Note the compressor
intake and outlet when installing
air filter and outlet assembly.
Figure 2. Be careful not to
damage the bubble tubing
when splitting the ends away
from the ballast.
DDK50
DDK100E


