background image


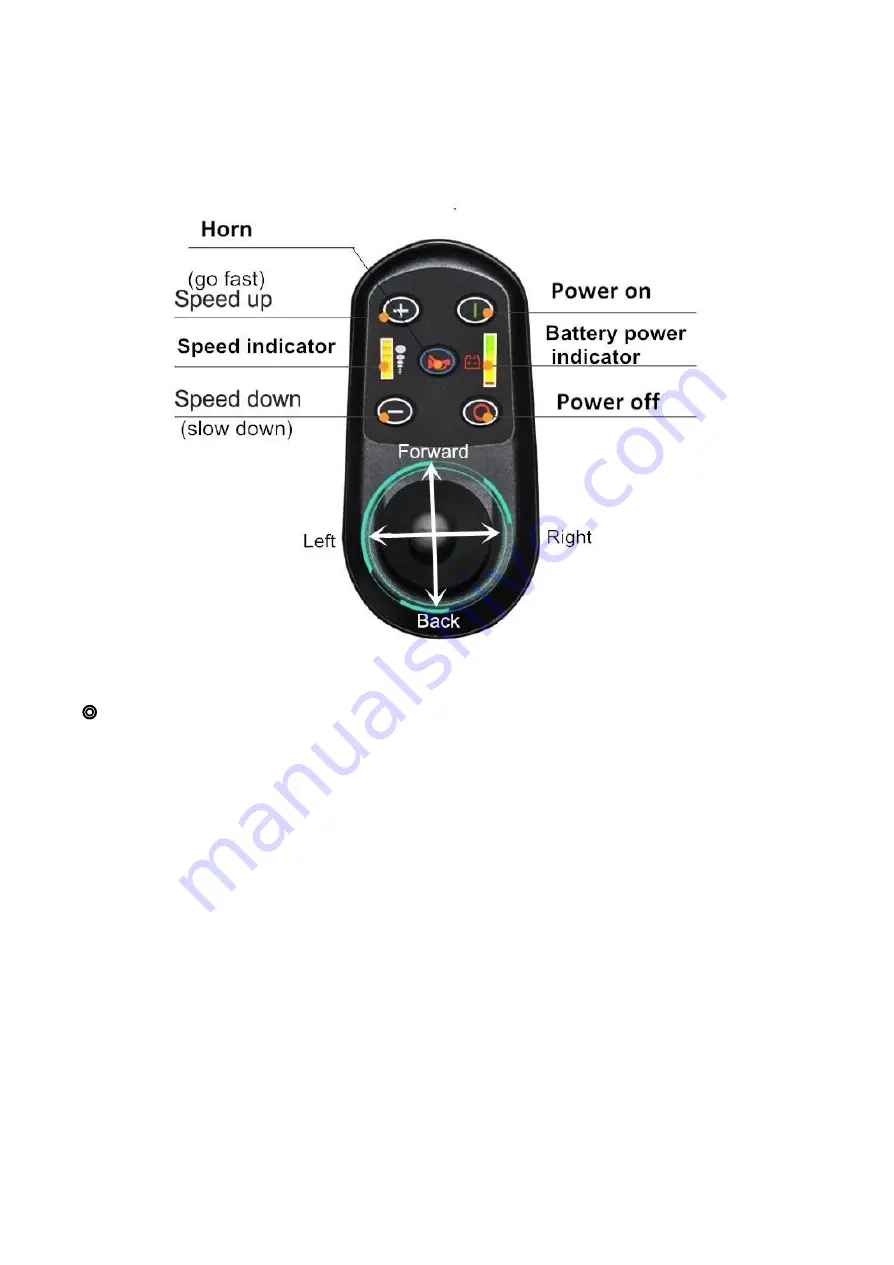
Controller 


The EasyFold PRO 2.0 is equipped with a joystick style controller.  


 Controller and Driving Tips 


1.

Take some time in a safe, controlled environment to learn the operation of the controller, the 

speed and the maneuverability of the wheelchair. 

2.

When turning, reduce your speed; this will help you avoid any potential tilting or tipping of the 

wheelchair. 

3.

Be sure to adjust the speed depending on your environment. 

4.

To slow down, slowly bring the joystick back toward the initial position. 

5.

To stop, bring the joystick back to the initial position. 

6.

Use extra care when you drive the EasyFold PRO 2.0 in reverse. You may lose control or fall 

if one of rear wheels hits an object. When operating in reverse: 

A.

Operate the wheelchair slowly and at an even speed. 

B.

Stop often and check to make sure your path is clear of obstacles.  


Содержание PRO 2.0

Страница 1: ......

Страница 2: ...pecifications 3 Specification Diagram 4 General Safety 5 Maintenance 7 Install Setup 8 Controller 11 Basic operation 12 Charging Batteries 14 Free Wheel Mode 17 Transporting Your EasyFold PRO 2 0 18 T...

Страница 3: ...are not specifically covered by this version of the Owner s Manual If you are not clear on how to operate or make use of any components or features contact EasyFold Canada for clarification Product d...

Страница 4: ...op speed EasyFold PRO is composed of a very durable lightweight aluminum alloy with 7 5 front wheels 12 rear wheels and two 250 Watt Brushless HUB motors to power them You will be amazed at how effort...

Страница 5: ...hour Driving Range 22KM Front Wheels 8 1 25 PU solid wheels Rear Wheels 12 5 2 125 PU solid wheels Maximum Suggested Climbing Slope max 8 Charging Time From Empty 6 8 hours Width of Armrest 510mm Sea...

Страница 6: ...Specification Diagram...

Страница 7: ...this Manual A WARNING label indicates that failure to abide by the following instructions may result in serious personal injury or death to the rider or others as well as damage to equipment A CAUTION...

Страница 8: ...harger and other electronic components avoid moisture If components come into contact with moisture dry it before use The EasyFold PRO seat is designed for comfort not specifically for pressure relief...

Страница 9: ...use on firm even surfaces such as concrete asphalt or indoor flooring Do not operate the EasyFold PRO in sand or loose soil This could damage the wheels bearings axles or motors and may loosen fasten...

Страница 10: ...ries 1 Use batteries that have been supplied by EasyFold our batteries are special lithium batteries designed specifically for use in the EasyFold PRO 2 0 2 Read all battery instructions before attemp...

Страница 11: ...o transmitters two way radios and cellular phones The interference from radio wave sources can cause the EasyFold PRO 2 0 to release its brakes move by itself or move in unintended directions Install...

Страница 12: ...ar of the EasyFold PRO 2 0 has locked the seat into place 5 Install the controller into the open slot on the arm of the chair on the right side if the user needs this can be changed to the left side T...

Страница 13: ...7 Insert two batteries and push to the back of the battery holder...

Страница 14: ...ential tilting or tipping of the wheelchair 3 Be sure to adjust the speed depending on your environment 4 To slow down slowly bring the joystick back toward the initial position 5 To stop bring the jo...

Страница 15: ...re the footrest is down before getting into the wheelchair POWER ON Press the Power button you will hear a beep and a light will indicate that power is on TURING STEERING Use the joystick style contro...

Страница 16: ...red clamps together STEP 2 Push down on the back support to set the position STEP 3 Release the clamps once the position is set NOTE When adjusting the backrest it is advised to do so while the EasyFo...

Страница 17: ...d below the 20 of capacity First Charging Method Charge both batteries at the same time via controller charge port 1 Turn the power off 2 Plug in the charger to the controller port see below 3 Allow y...

Страница 18: ...d the unit is charging green means the unit is fully charged Note this information is also located on the back of the charger 7 When the battery is fully charged remove cable then take out the DC char...

Страница 19: ...azardous materials disposal facility and call them for instructions 17 Before storing your EasyFold PRO 2 0 for long periods of time take these steps to maintain the battery a Fully charge the battery...

Страница 20: ...m to the wheels making them free to push manually Turn off the power of the wheelchair when in this mode both for safety and to save battery power 1 To put the EasyFold PRO 2 0 in Free Wheel Mode come...

Страница 21: ...er where it could move and slide WARNING Never sit in the wheelchair and be transported in a moving vehicle 1 Turn OFF the power from the controller 2 Remove the seat cushion 3 Press down on the top o...

Страница 22: ...tery Why is the EasyFold PRO noisy or vibrating when turning 1 Speed is set too low 2 Motor is damaged 1 Raise the speed At low speeds the motor may sound or feel strained 2 Replace the motor Why can...

Страница 23: ...il maintenance can be performed If the indicator light indicates a fault turn off the power and then turn on the power again If the fault is not released after turning on power again the indicator rep...

Страница 24: ...n most warranty parts can be easily replaced by the customer a family member relative or friend using the tool kit that comes with your chair The customer is responsible for any fees or charges both l...

Отзывы: