To order parts and supplies: 800.343.9353 >> eastwood.com
25
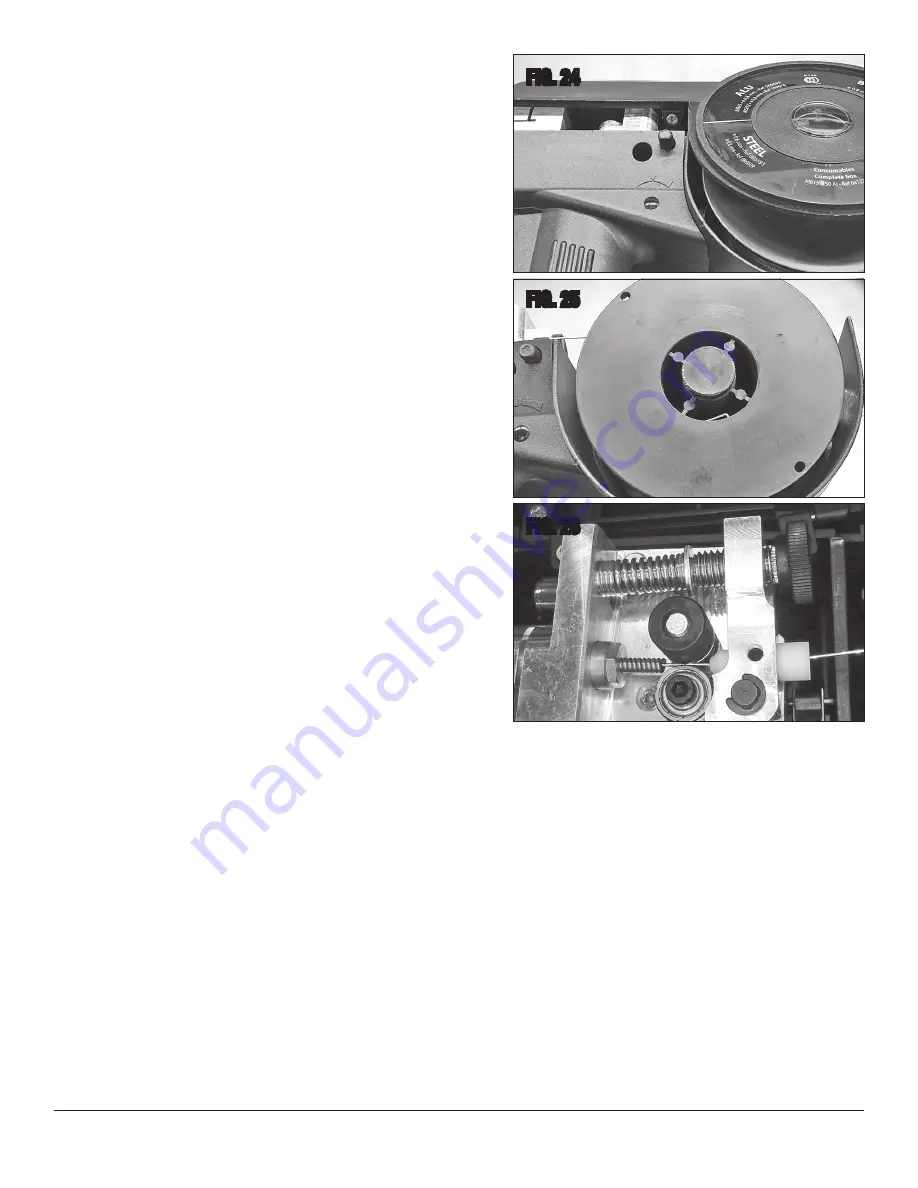
THREADING WELDING WIRE THROUGH THE SPOOL GUN
• Push button to open Spool Gun Side Cover
(FIG 24)
.
• Remove the Thumbscrew that retains the Wire Spool
(FIG 25)
.
IMPORTANT NOTE:
Thumbscrew has Left-Hand threads.
• Place Wire Spool on Spindle and replace the Thumbscrew.
• Loosen the Wire Tensioning Screw
(FIG 25)
until it is possible to feed the
welding wire through the drive roller grooves.
• Feed the wire by hand from the Spool into the Wire Inlet Guide, past the Drive
Rollers and into the Wire Inlet Tube
(FIG 25)
.
• Tighten the Wire Tensioner Thumb Screw
(FIG 26)
until it applies light pressure
onto the welding wire.
NOTE:
If this is too tight it will deform the wire and cause feeding issues, if it is
too loose the drive roller will slip on the wire.
• Remove the Nozzle and Contact Tip.
• Close the Spool Gun Side Cover.
• Plug in Welder to power source and turn on the Welder.
• Trigger the Spool Gun to feed the wire and adjust the Wire Tensioner Thumb
Screw
(FIG 26)
so that the wire does not slip.
• Replace Contact Tip and Nozzle.
• Feed wire through the gun and cut the wire exposing a ~3/4” length beyond
the contact tip.
SPOOL GUN WELDING OPERATION
Your Eastwood MP140i can be used to weld aluminum utilizing a Spool Gun (Not
Included). The Spool Gun is sold as an accessory to the MP140i, and you will also
need to purchase a cylinder of 100% Argon gas from your local welding supplier. This
following welding process is just a baseline to get you started.
• Refer to the ‘Suggested Settings’ chart which is located inside the side door of
your Welder. From the chart select your baseline starting point for the recom-
mended settings described in the chart.
• Ensure that the polarity is configured for DCEP welding.
• Set the process selector switch to MIG.
• Set the MIG / Spool Gun Selector Switch
[A]
to ‘Spool Gun’ on Front Panel.
• Connect your ground clamp to the work pieces that are to be welded. Make
sure the ground clamp contacts are placed on a clean piece of metal free of paint, grease, rust, oils, etc. It is recommended to place your ground clamp as
close to the weld area as possible.
• Assess your weld area and make sure the welding area is also cleaned of any paint, grease, rust, oils, etc. Aluminum has a layer of oxide on the surface
that should be removed prior to welding.
• Plug in the Welder and turn the switch on the Rear Panel to the “ON” position.
• Open your gas valve on the bottle and adjust the flow rate if necessary.
• Depress the Spool Gun trigger for a few seconds pointing the welding gun away from your body and then let go of the trigger and cut the wire back to
~3/4” stick out length.
• Wearing your welding helmet, gloves, and long sleeve shirt and pants, put the end of the wire sticking out of the Spool Gun into the joint to be welded.
• Position the Spool Gun so that it is perpendicular to the base metal with 10-15° angle in the direction of push travel.
• Depress the trigger to start the wire feed which starts the arc.
NOTE: When welding aluminum with a Spool Gun it is recommended to use a push technique. Using a drag technique will result in poor, dirty welds.
• When welding aluminum a spray arc transfer is preferred rather than short arc transfer that can be more commonly used on steels. This method involves
using a longer wire stick out (~3/4”). When the Welder settings and technique have been dialed in the spray arc transfer should create a hissing sound and
little or no spatter. Once positioned the trigger can be pulled and the weld started.
• Release the trigger on the Spool Gun to stop the weld.
• After welding is completed, close the valve completely on the Shielding Gas Bottle, turn Power Switch to the “OFF” position and unplug Welder.
FIG. 24
FIG. 25
FIG. 26


