To order parts and supplies: 800.343.9353 >> eastwood.com
9
• Parts should be covered by the cleaning
solution for it to work. If they protrude
above the surface, remove parts, or rotate
the part through several cleaning cycles so
that all surfaces receive cleaning exposure.
DO NOT
overfill with cleaning fluid in an
attempt to cover parts.
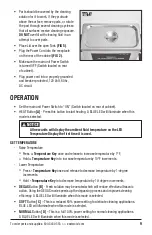
• Place Lid over the open Tank
(FIG 5)
.
• Plug the Power Cord into the receptacle
on the rear of the cabinet
(FIG 2)
.
• Make sure the main unit Power Switch
is turned OFF (Switch located on rear
of cabinet).
• Plug power cord into a properly grounded
and breaker protected, 120 Volt, 60hz,
AC circuit.
FIG. 5
FIG. 5
OPERATION
• Set the main unit Power Switch to “ON” (Switch located on rear of cabinet).
• HEAT Button
[A]
- Press this button to start heating. A BLUE LED will illuminate when this
mode is selected.
SET TEMPERATURE
- Raise Temperature
o
Press
+ Temperature Key
once and release to increase temperature by 1°F,
o
Hold
+ Temperature Key
in to increase temperature by 10°F increments.
- Lower Temperature
o
Press
- Temperature Key
once and release to decrease temperature by 1-degree
increments.
o
Hold
- Temperature Key
in to decrease temperature by 10-degree increments.
•
DEGAS
Button
[B]
- Fresh solution may be aerated which will reduce effective ultrasonic
action. Using the DEGAS mode speeds up the degassing process and improves cleaning
efficiency. A BLUE LED will illuminate when this mode is selected.
•
SOFT
Button
[C]
– This is a reduced 60% power setting for delicate cleaning applications.
BLUE LED will illuminate when this mode is selected.
•
NORMAL
Button
[D]
– This is a full 100% power setting for normal cleaning applications.
A BLUE LED will illuminate when this mode is selected.
All new units will display the ambient fluid temperature on the LED
Temperature Display the first time it is used.


