To order parts and supplies: 800.343.9353 >> eastwood.com
13
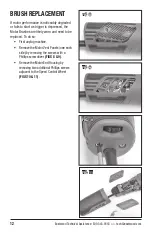
• Remove the spade connector at the end of
the braided brush lead from the terminal by
gripping with needle nose pliers and pulling
outward
(FIG 12)
.
• Placing a small straight-blade screwdriver
under the wound-spring tab, lift up and out
to release spring tension from brush and
pull straight out of shell
(FIG 13)
.
• Inspect Brush.
NOTE:
Brushes are considered worn if less
than 1/8” of carbon is remaining.
• Replace with new brush.
NOTE:
The carbon contact goes in first
and is keyed to the rectangular socket.
Release spring tension and carefully allow
spring tab to exert pressure on the top of
the brush.
• Repeat above procedure for opposite
brush.
• Replace the Motor End Housing and the
Motor Vent Panels and tighten screws.
The Brush Retaining Tab portion of
the wound-spring MUST be held in
place while the Brush is removed!
DO NOT allow the spring to release.
If the Brush Retaining Tab is acci-
dentally released, it will wind around
and stop against the outer edge of
the motor housing. To retrieve the
Brush Retaining Tab and rotate it to
the proper position, a hooking tool
must be fabricated with a paper clip,
slipped into the Spring Hook and ro-
tated back up to the proper position.
FIG. 12
FIG. 13


