background image

6


Model TC70001


OPERATING


STARTING:


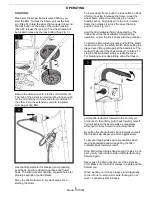
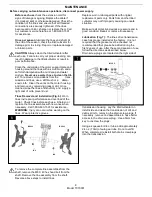
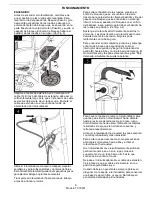
Make sure the wheel frame is raised before you 

start the tiller. To raise the frame, pull out the lock 

pin (Step A); rotate the wheel frame upward, beyond 

the lock button on the back of the motor housing 

(Step B); release the lock pin. The wheel frame will 

be locked in place by the lock button. (See Fig. 3)


Secure the extension cord into the cord retainer (5). 

The loop of the extension cord must be long enough 

for the cord retainer to freely slide from one side to 

the other. Plug the extension cord into the power 

cord plug on the tiller.


Use the tiller/cultivator for breaking sod, preparing 

seed beds, and for cultivating gardens and flower 

beds. The tiller/cultivator can also dig small holes for 

planting saplings or potted plants.


Move the tiller/cultivator to the work area prior to 

starting the motor. 


To lower wheel frame, push the lock button on back 

of motor housing to release the frame. Lower the 

wheel frame and pull out the lock pin on lower    

handle section. Align lock pin to the hole in wheel 

frame then release it to lock the wheel frame in    

position. (See Fig. 2

-

2)


Hold the tiller/cultivator firmly while starting. The 

tines will pull the tiller/cultivator forward during     

operation. Lower the tines slowly with the guide bar. 


To start the tiller/cultivator press and hold the safety 

lock button (A) on the safety switch while pulling the 

trigger lever (B) up and against the handle bar. The 

motor will start and the tines will begin to rotate. To 

stop the tiller/cultivator simply release the lever. 


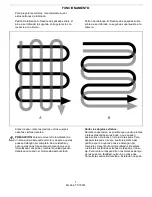
For breaking sod or deep tilling, allow the tines to 

pull the tiller/cultivator forward to the end of your 

arm

s reach, then firmly pull it back toward yourself. 

You will achieve the best results by repeatedly    

allowing it to move forward and pulling it back.


By pulling the tiller/cultivator back towards yourself, 

the tines will dig deeper and more aggressively. 


To prevent tripping, take extra precautions when 

moving backwards and when pulling the tiller/

cultivator back toward yourself.


If the tiller/cultivator digs deep enough to stay in one 

spot, gently rock it side to side until it starts moving 

forward again.


Never pass the tiller/cultivator over the extension 

cord. Make sure the cord is always in a safe position 

behind you.


When working on inclines always stand diagonally 

to the incline to retain a firm, safe footing. Do not 

work on extremely steep slopes.


Содержание TC70001

Страница 1: ...1 800 633 1501 BETWEEN 8 AM 5 PM EST MONDAY FRIDAY FOR ASSISTANCE SAVE THIS MANUAL FOR FUTURE REFERENCE This product has been engineered and manufactured to our high standard for dependability ease of...

Страница 2: ...on the circuit or outlet to be used for the tiller cultivator Receptacles are available having built in GFCI protection and may be used It is possible to tie the extension cord and power cord in a kno...

Страница 3: ...NG Do not operate the tiller cultivator near underground electrical cables telephone lines pipes or hoses If the tiller cultivator strikes a foreign body turn it off immediately wait for the tines to...

Страница 4: ...e section left RTC00046 2 Switch and power cable assy RTC00057 10 Wheel RTC00042 3 Cable clip RTC00051 11 Lock pin RTC00045 4 Center handle section RTC00050 12 Lock button 5 Cord retainer RTC00053 13...

Страница 5: ...del TC70001 This product must be assembled correctly before use 1 Remove the screws M5 X 12 and washers from wheel frame Insert the wheels on the axle of wheel frame then attach washers and screws M5...

Страница 6: ...2 2 Hold the tiller cultivator firmly while starting The tines will pull the tiller cultivator forward during operation Lower the tines slowly with the guide bar To start the tiller cultivator press a...

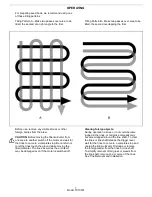
Страница 7: ...The tines as well as the unit itself may be damaged even if the motor is switched off Tilling Pattern B Make two passes over area to be tilled the second overlapping the first Clearing foreign objects...

Страница 8: ...performance and overload of the motor Check tines before each use Sharpen or replace the tine assemblies with new ones when necessary Call 1 800 633 1501 for assistance WARNING Injury can occur while...

Страница 9: ...er components are loose Switch off Wait till tines comes to a complete stop Remove jammed objects Tiller cultivator must be repaired Call our customer service help line at 1 800 633 1501 for assistian...

Страница 10: ...0001 SERIAL NUMBER PARTS AND SERVICE Always mention the model number when ordering kits items for this tool No Kit Item Number Description 1 RTC70001SET Tine Kit 2 WK TC SN Wheel Kit 3 RTC70001 U Uppe...

Страница 11: ...horized retailer This warranty does not apply to any product new or used purchased through unauthorized third party channels ANY INCIDENTAL INDIRECT OR CONSEQUENTIAL LOSS DAMAGE OR EXPENSE THAT MAY RE...

Страница 12: ...E LAS 8 00 AM Y LAS 5 00 PM HORA DEL ESTE DE LOS ESTADOS UNIDOS GUARDE ESTE MANUAL PARA CONSULTAS FUTURAS ADVERTENCIA Para reducir el riesgo de sufrir alguna lesi n el usuario debe leer y comprender e...

Страница 13: ...el amperaje de la etiqueta Ante la duda utilice el siguiente calibre m s grueso Cuanto m s bajo es el n mero de calibre m s grueso es el cable El cable de extensi n y el cable de alimentaci n se pued...

Страница 14: ...tengan y verifique si hay da os Si fuera necesario repare las piezas da adas antes de volver a poner en marcha la herramienta Si el rotocultivador comienza a vibrar de manera inusual ap guelo de inmed...

Страница 15: ...ierdo RTC00046 2 Conjunto de cable de alimentaci n e interruptor RTC00057 10 Rueda RTC00042 3 Sujetador de cable RTC00051 11 Pasador de bloqueo RTC00045 4 Mango central RTC00050 12 Bot n de bloqueo 5...

Страница 16: ...nales de gravedad MONTAJE 5 Modelo TC70001 M3 9 X 19 M5 X 12 M6 X 45 3 4 5 4 M6 X 45 4 7 7 9 10 5 B A C Este producto debe ser montado correctamente antes de su uso 1 Retire los tornillos M5 X 12 y ar...

Страница 17: ...lo para trabar el bastidor de las ruedas en posici n Ver Fig 2 2 Sostenga el rotocultivador firmemente mientras lo enciende Las p as llevar n el rotocultivador hacia delante durante la operaci n Baje...

Страница 18: ...n la unidad pueden da arse a n cuando el motor est desconectado Patr n de labranza B Realice dos pasadas sobre el rea a ser labrada la segunda superpuesta a la primera Quitar los objetos extra os Dura...

Страница 19: ...gastadas por nuevas cuando sea necesario Llame al 1 800 633 1501 para obtener asistencia ADVERTENCIA Se pueden producir lesiones mientras se trabaja con las p as Utilice guantes de protecci n Para qu...

Страница 20: ...nentes flojos Apague la unidad Espere hasta que las p as se detengan por completo Quite los objetos atascados El rotocultivador debe ser reparado Comun quese con nuestra l nea de ayuda de atenci n al...

Страница 21: ...001 N MERO DE SERIE PIEZAS Y SERVICIO LL MENOS PRIMERO Ll menos primero si tiene preguntas sobre el funcionamiento o el mantenimiento de este producto al 1 800 633 1501 de 8 00 a 17 00 hora est ndar d...

Страница 22: ...uidor minorista autorizado Esta garant a no se aplica a cualquier producto nuevo o usado adquirido a trav s de canales de terceros no autorizados CUALQUIER P RDIDA ACCIDENTAL INDIRECTA O RESULTANTE DA...

Страница 23: ...COMPOSEZ LE 1 800 633 1501 8 h 00 17 h 00 HEURE DE L EST POUR TOUTE ASSISTANCE CONSERVEZ CE MANUEL POUR POUVOIR LE CONSULTER ULT RIEUREMENT Ce produit a t con u et fabriqu selon notre norme lev e de...

Страница 24: ...la plaque signal tique En cas de doute utilisez le calibre imm diatement sup rieur Plus le num ro de calibre est bas plus le c ble est lourd Il est possible de nouer la rallonge et le c ble d alimenta...

Страница 25: ...rrer Si le cultivateur la griffe commence vibrer de fa on anormale arr tez le imm diatement et recherchez la cause du probl me Des vibrations signalent g n ralement un probl me DANGER RISQUE DE COUPUR...

Страница 26: ...ble contacteur et c ble d alimentation RTC00057 10 Roue RTC00042 3 Attache de c ble RTC00051 11 Goupille de verrouillage RTC00045 4 Section centrale du guidon RTC00050 12 Bouton de verrouillage 5 Disp...

Страница 27: ...d tre utilis 1 Enlevez les vis M5 x 12 et les rondelles du ch ssis de roue Ins rez les roues sur l essieu du ch ssis de roue puis fixez les rondelles et les vis M5 x 12 pour assujettir solidement Fig...

Страница 28: ...rel chez la pour verrouiller en position le ch ssis de roue Voir la Fig 2 2 Maintenez fermement le cultivateur la griffe au d marrage Les dents font avancer le cultivateur la griffe pendant son fonct...

Страница 29: ...ommages m me si le moteur n est pas en marche Motif de labourage B Faites deux passes sur la surface labourer la deuxi me chevauchant la premi re Enl vement des corps trangers Pendant l utilisation un...

Страница 30: ...ts avant chaque utilisation Aiguisez ou remplacez les ensembles de dents par de nouvelles pi ces lorsque n cessaire Appelez le 1 800 633 1501 pour obtenir de l aide AVERTISSEMENT Un travail sur les de...

Страница 31: ...serr s Arr tez le moteur Attendez que les dents s arr tent compl tement de tourner Enlevez les objets coinc s Le cultivateur la griffe doit tre r par Appelez notre service client le au 1 800 633 1501...

Страница 32: ...M RO DE S RIE 10 Mod le TC70001 APPELEZ NOUS D ABORD Appelez nous d abord pour toute question concernant le fonctionnement ou la maintenance de ce produit au 1 800 633 1501 entre 8 h 00 et 17 h 00 heu...

Страница 33: ...garantie ne s applique pas tout produit neuf ou usag achet par le biais de canaux tiers non autoris s TOUT DOMMAGE PERTE OU FRAIS CONS CUTIF INDIRECT OU CONS QUENT QUI POURRAIT R SULTER D UN D FAUT D...

Отзывы: