background image


CHARGING THE BATTERY PACK


When fully charged, the battery can be safety stored in temperatures 
down to –4° degrees F for a period of up to four weeks, before          
requiring charging. Fully charge battery pack every 90 days. 


If over a period of time the battery pack quickly runs down after a full 
75 minutes charging period, a replacement battery pack is needed. 


To prevent permanent damage to the battery, never store in a     
discharged condition. 


WINTER STORAGE

—Fully recharge before storage and then again 

every 90 days. 


Since the battery will not develop a memory, it does not have to be 
fully discharged before recharging. 


A small leakage of liquid from the battery cells may occur under  
extreme usage, charging or temperature conditions. This does       
not indicate a failure. However, if the outer seal is broken and this 
leakage gets on your skin. 


a.


Wash quickly with soap and water.


b.


Neutralize with a mild acid such as lemon juice or 
vinegar.


c.


If the battery liquid gets in your eyes, flush them with 
clean water for a minimum of 10 minutes and seek 
immediate medical attention. 


Charge the battery pack only with the charger provided. 


Allow at least 75 minutes of charge time before initial use of the 
chain saw.


Make sure the power supply is normal household voltage, 
120volts, 60Hz, AC only.


The battery charger should be operated in temperatures between 
32 and 100 degrees F.


The battery should be charged in a cool, dry place.


2 to 3 initial charging/discharging cycles may be required to 
achieve maximum run time/capacity.


Do not attempt to open the charger or the unit. There are no    
customer serviceable parts inside.  Call the customer service help 
line at 1

-

800

-

313

-

5111 for assistance. 


DO NOT incinerate battery packs even if they are severely      
damaged or completely worn out. They can explode in a fire   
causing injury. 


Use the battery charger indoors only. 


Disconnect charger from the power supply when not in use to   
prevent damage to the charger during a power surge.


TO CHARGE—SEE CHARGER MANUAL FOR COMPLETE INSTRUCTIONS


BATTERY DISPOSAL


Remove the battery pack from the chain saw. Cover the terminals with heavy duty adhesive tape. Do not attempt to destroy or disassemble battery 
pack or remove any components. This product contains lithium

-

ion  batteries which must be recycled or disposed of properly. Local, state or federal 

laws may prohibit disposal of these batteries  in ordinary trash.


The RBRC seal on the li

-

ion battery pack indicates that the costs to recycle the battery pack at the end of its useful life has already been 

paid by The Great States Corporation American Lawn Mower Company. It is illegal to place spent li

-

ion batteries in the local municipal 

solid waste or in the trash. RBRC in cooperation with The Great States Corporation American Lawn Mower Company has provided an 
environmentally friendly and easy way to recycle spent li

-

ion batteries. Just contact your local recycling center or call 1

-

800

-

8BATTERY 

for information on where to drop off the spent battery. 


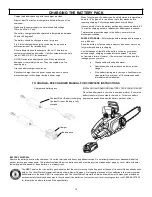
Charger and battery pack


Constant Red = Battery is charging


Constant Green = Battery is fully 
charged.


Charger


Battery pack


INSTALLING AND REMOVING BATTERY PACK FROM THE UNIT


Place the battery pack in your chain saw (see picture).  Ensure the 
battery is securely connected to chain saw.  To remove battery, 
depress release button and slide battery pack out of tool.


10


Содержание LCS32412

Страница 1: ...safety Properly cared for it will give you years of rugged trouble free performance WARNING To reduce the risk of injury the user must read and understand the operator s manual before using this prod...

Страница 2: ...tions Dress properly Do not wear loose clothing or jewellery Keep your hair clothing and gloves away from moving parts Loose clothes jewellery or long hair can be caught in moving parts If devices are...

Страница 3: ...nstructions for lubricating chain tensioning and changing accessories Improperly tensioned or lubricated chain may either break or increase the chance for kickback Keep handles dry clean and free from...

Страница 4: ...tor before installing the guide bar chain chain cover and chain cover lock knob Without all these parts in place the clutch can fly off or explode exposing the user to possible serious injury WARNING...

Страница 5: ...e that the chain will rotate without binding NOTE A new chain tends to stretch check chain tension frequently and tension as required INSTALLING REPLACING THE GUIDE BAR AND CHAIN 5 Remove the old chai...

Страница 6: ...to sharpening Refer to Chain Tension Section earlier in this manual Do all of your filing at the midpoint of the bar Use a 5 32 in diameter round file and holder Keep the file level with the top plate...

Страница 7: ...coasts after turned off Do not use under wet conditions Use extreme caution when cutting small size brush saplings or limbs under tension because slender and tense material may catch the saw and be wh...

Страница 8: ...g cuts are to be made NOTCHED UNDERCUT Cut a notch about 1 3 diameter of the tree perpendicular to the direction of the fall Make the cuts of the notch so they intersect at a right angle to the line o...

Страница 9: ...saw and put it down immediately Retreat along the cleared path but watch the action in case something falls your way Be alert for overhead limbs or branches that may fall and watch your footing WARNI...

Страница 10: ...o customer serviceable parts inside Call the customer service help line at 1 800 313 5111 for assistance DO NOT incinerate battery packs even if they are severely damaged or completely worn out They c...

Страница 11: ...and smoking Check tension for over tight condition Chain oil tank empty Chain installed backwards Adjust chain tension Fill tank with chain oil Reverse chain so that cutters face the right direction...

Страница 12: ...12 Oregon Bar Chain 91PJ045X Oregon Weight 8 6 lbs Automatic oiling pump system Protective bar cover Rubber over molded handle 12 TRIGGER SWITCH REAR HANDLE OIL TANK CAP FRONT HANDLE HAND GUARD CHAIN...

Страница 13: ...________________________________ ____________________________________________________________________ ____________________________________________________________________ _____________________________...

Страница 14: ...iler This warranty does not apply to any product new or used purchased through unauthorized third party channels ANY INCIDENTAL INDIRECT OR CONSEQUENTIAL LOSS DAMAGE OR EXPENSE THAT MAY RESULT FROM AN...

Страница 15: ...mienta le otorgar a os de ptimo rendimiento y resistencia ADVERTENCIA Para reducir el riesgo de sufrir alguna lesi n el usuario debe leer y comprender el manual del operario antes de usar este product...

Страница 16: ...stro de corriente o de colocar un paquete de bater as Transportar herramientas el ctricas con el dedo en el interruptor o enchufar herramientas el ctricas que tienen el interruptor encendido puede oca...

Страница 17: ...ctamente tensionada o lubricada podr a romperse o presentar un mayor riesgo de que ocurra un contragolpe Mantenga los mangos secos limpios y sin aceite ni grasa Los mangos con aceite o grasa son resba...

Страница 18: ...ves NOTA Use nicamente piezas de reemplazo id nticas al reemplazar la barra gu a y la cadena Extraiga el paquete de bater as de la motosierra Afloje la perilla de seguridad de la motosierra en sentido...

Страница 19: ...tiende a estirarse por lo tanto revise la tensi n de la cadena peri dicamente y aj stela seg n sea necesario INSTALACI N REEMPLAZO DE LA BARRA GU A Y LA CADENA 5 Retire la cadena vieja de la barra Ext...

Страница 20: ...a lima se hunda ni se balancee Aplique una presi n leve pero firme dirija la lima hacia el ngulo frontal del diente Levante la lima del acero en cada pasada de vuelta Realice algunas pasadas firmes en...

Страница 21: ...ones de humedad Tenga suma precauci n al cortar broza de peque o tama o v stagos o ramas con cierta tensi n debido a que los materiales delgados y tensos al entrar en contacto con la motosierra pueden...

Страница 22: ...que pase el peligro para realizar el trabajo ADVERTENCIA No tale rboles que tengan una inclinaci n excesiva o rboles grandes que tengan ramas en mal estado corteza floja o troncos huecos Estos rboles...

Страница 23: ...orte hasta llegar a la muesca cuando realiza el corte posterior La bisagra controla la ca da del rbol sta es una secci n de madera entre la muesca y el corte posterior SERRADO Serrado es el t rmino qu...

Страница 24: ...dad ya que en su interior no existen piezas que el usuario pueda reparar Comun quese con nuestra l nea de ayuda de atenci n al 1 800 313 5111 para recibir asistencia NO incinere los paquetes de bater...

Страница 25: ...bar si el ajuste es excesivo El tanque de aceite de la cadena est vac o La cadena est colocada hacia atr s Regule la tensi n de la cadena Recargue el tanque con aceite de cadena D vuelta la cadena par...

Страница 26: ...dena 91PJ045X Oregon Peso 3 9 kg 8 6 libras Lubricaci n autom tica de la barra y la cadena Protector de barra Mango de caucho sobremoldeado 12 INTERRUPTOR DE GATILLO MANGO TRASERO TAPA DEL TANQUE DE A...

Страница 27: ..._______________________________ ____________________________________________________________________ ____________________________________________________________________ ______________________________...

Страница 28: ...o Esta garant a no se aplica a cualquier producto nuevo o usado adquirido a trav s de canales de terceros no autorizados CUALQUIER P RDIDA ACCIDENTAL INDIRECTA O RESULTANTE DA O O GASTO QUE PUEDA DERI...

Страница 29: ...s de service intensif et sans soucis AVERTISSEMENT afin d viter de se blesser l utilisateur doit lire et comprendre le manuel de l utilisateur avant d utiliser ce produit Merci pour votre achat CONSER...

Страница 30: ...cher l outil Porter un outil avec le doigt sur son commutateur ou brancher un outil dont le commutateur est en position de marche peut causer un accident Retirer les cl s de r glage avant de mettre l...

Страница 31: ...s ou augmenter le risque de rebond Garder les poign es s ches propres et exemptes d huile ou de graisse Les poign es graisseuses ou huileuses sont glissantes et peuvent provoquer une perte de contr le...

Страница 32: ...emplacement du guide cha ne et de la cha ne Assurez vous que la batterie est d pos e de la tron onneuse D serrez le bouton de verrouillage de la scie cha ne dans le sens antihoraire 4 Enlever le couve...

Страница 33: ...cha ne tourne dans accroc REMARQUE les cha nes neuves ont tendance s allonger v rifiez souvent la tension de la cha ne et tendez la selon le besoin REMPLACEMENT DU GUIDE CHA NE ET DE LA CHA NE 5 Reti...

Страница 34: ...rme effectuez un mouvement vers le coin avant de la dent Relevez la lime de l acier chaque retour de celle ci Effectuez quelques coups fermes sur chaque dent Aff tez toutes les gouges de gauche dans u...

Страница 35: ...TTENTION la cha ne bouge encore apr s la mise hors tension N utilisez pas l outil dans des conditions mouill es Faites extr mement attention lors de la coupe de buissons de petite taille d arbrisseaux...

Страница 36: ...L utilisateur de la tron onneuse doit rester en amont car l arbre aura tendance rouler ou glisser vers le bas une fois abattu Enlevez la terre les cailloux l corce qui se d tache les clous les agrafe...

Страница 37: ...gardez o vous mettez les pieds AVERTISSEMENT ne coupez jamais le trait d abattage jusqu l entaille de direction La charni re contr le la chute de l arbre il s agit d une section de bois entre l entail...

Страница 38: ...cit maximum Ne tentez pas d ouvrir le chargeur ou l appareil Ils ne contiennent pas de pi ces r parables par le client Appelez notre service client le au 1 800 313 5111 pour assistance NE br lez PAS l...

Страница 39: ...e guide cha ne et la cha ne chauffent et fument V rifier si la cha ne est excessivement tendue Le r servoir d huile de cha ne est vide Cha ne install e l envers R gler la tension de la cha ne Remplir...

Страница 40: ...egon Poids 3 9 kg 8 6 lb Syst me de pompe de graissage automatique tui de protection du guide cha ne Caoutchouc sur poign e moul e 12 G CHETTE POIGN E ARRI RE BOUCHON DU R SERVOIR D HUILE POIGN E AVAN...

Страница 41: ...________________________________ ____________________________________________________________________ ____________________________________________________________________ _____________________________...

Страница 42: ...pas tout produit neuf ou usag achet par le biais de canaux tiers non autoris s TOUT DOMMAGE PERTE OU FRAIS CONS CUTIF INDIRECT OU CONS QUENT QUI POURRAIT R SULTER D UN D FAUT D UNE D FAILLANCE OU D UN...

Отзывы: