Eagle EG6088K Скачать руководство пользователя страница 15

- 12 

press spring. 

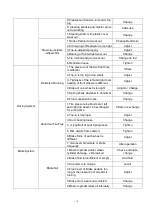
Trouble-Shooting for Motor: 


W

W

W

a

a

a

r

r

r

n

n

n

i

i

i

n

n

n

g

g

g

:

:

:


Only Qualified Electrician Can Change and Adjust The carbon Brush and Commutator.


Item 

Symptoms   

Possible Causes 

All copper plates turn black. 

The pressure of brush is incorrect. 

The commutator turns black 

in  a  certain  order  and  in 

groups. 

Short circuit in the commutator or armature coil; poor 

welding  or  disconnection  between  the  commutators 

and the armature coil. 

The commutator turns black 

in disorder. 

The  central  line  of  the  commutator  deviates  or  its 

surface is not round and not smooth. 

The  brush  wears  out,  turns 

colors and become broken. 

The motor vibrates; the clearance between the brush 

and  its  holder  is  too  big;  the  clearance  between  the 

brush and commutators is too big; the mica between 

different commutators extrudes; the brush is made by 

wrong materials; the brush is wrong in type. 

Big sparkles 

The  motor  is  over-loaded;  the  commutators  are  not 

clean,  not  round  or  not  smooth;  mica  or  some 

commutators  extrude;  the  brush  is  not  ground 

properly;  the  brush  is  big  in  pressure;  the  brush  is 

wrong  in  type;  the  brush  is  jammed  in  the  brush 

holder;  the  brush  holder  become  loose  or  vibrating; 

the polarity and sequence of magnetic poles become 

wrong.                       

The  brush  and  its  wires  get 

hot. 

Big sparkles of the brush; poor contact between brush 

and soft wires; small section area of soft wires. 

The brush is noisy 

The surface of the commutators is not smooth. 


7.4 Maintenance of the Speed Controller 

The speed controller of the vehicle is wholly imported, which adopts high frequency MOS technology to realize 

the control of speed, torque and brake with smoothness, silence, high efficiency and energy-save.


·

Prevent the vehicle runs way when starts. When the vehicle starts, the controller will inspect signal from the 

accelerator,  if  signal  exceeds  20%,  the  HPD  (protection  unit  in  the  controller)  will  prohibit  the  output  of 

controller.


Содержание EG6088K

Страница 1: ...Operation Manual for Shuttle Personnel Carrier ...

Страница 2: ...Fail to follow Warning instructions could result in severe injury or death to the vehicle occupants bystanders or persons inspecting or repairing the vehicle C C Ca a au u ut t ti iio o on n n Fail to follow Caution instructions could cause damage to the vehicle Special Notice Because the seat backrest wrapping film may stick to the seat vinyl and cause seat vinyl fading or stained please remove t...

Страница 3: ...rge the batteries 5 6 Rules for Safe Operation 6 7 Maintenance 7 7 1 Maintenance of Battery 7 7 2 Maintenance of the Gear Box 11 7 3 Maintenance of the Traction Motor 11 7 4 Maintenance of the Speed Controller 12 7 5 Maintenance of Brake System 13 7 6 Lubrication of the Whole Vehicle 13 7 7 Running in of New Vehicle 14 8 Storage 16 9 Trouble Shooting 16 10 Wiring Diagram 19 ...

Страница 4: ...ions mm LxWxH 4270X1490X2050 4270X1490X2050 5020X1490X2100 5020X1490X2100 8x6V 70 60 12x6V 80 75 Range km h smooth and straight road 20km h full load 16x6V 100 90 48V 3KW 35 48V 5KW 40 40 40 40 Maximum Speed km h 72V 5KW 45 45 Minimum Turning Radius m 4 5 4 5 6 6 Maximum Gradeability 20 20 20 20 Noise Db 60 60 60 60 Front 1210 1210 1210 1210 Tread mm Rear 1200 1200 1200 1200 Brake Distance V 20Km ...

Страница 5: ... 2 Label Content ...

Страница 6: ... The vehicle speeds up with the gradual stepping down and reaches the full speed when the pedal is stepped to the bottom The vehicle slows down when the pedal being released gradually When the pedal is fully released electric brake works Service Brake pedal Decelerate the vehicle Clutch Pedal Control the clutch When driving do not ride the clutch otherwise it will damage the clutch Handbrake Lever...

Страница 7: ...he battery should be recharged immediately On British Standard Meter except to use Voltage to judge if the battery need to be charged the battery power meter on the bottom is also be used as battery power indicator There are 10 divisions in this meter from 1 to 10 This meter will descend from higher division to low ones as the battery discharges When the battery is too low the red indicator light ...

Страница 8: ...g 5 2 Stop the Vehicle 1 Step the service brake pedal to decelerate the vehicle until it stops completely and shift the gear to Null position 2 Engage the handbrake lever to park the vehicle 3 Release the service brake 4 Switch off all lights 5 Switch off the power key and take out the key 5 3 Charge the batteries C C Ca a au u ut t ti iio o on n n 1 We have two different kinds of charger for you ...

Страница 9: ...les f Connect the two DC receptacles under the driver s seat 3 When it s onboard build in charger s no matter there is one set or two sets of batteries the process is as follows a Connect the charger s with AC power b Turn on the charger s c Turn off the charger s when the batteries are fully charged disconnect the charger s with AC power 6 Rules for Safe Operation The driver should have a good kn...

Страница 10: ...re all vent caps are tightly in place Clean the battery top with a cloth or brush and solution of baking soda and water When cleaning do not allow any cleaning solution or other foreign matter to get inside the battery This should be done every week b Clean battery terminals and the inside of cable clamps using a post and clamp cleaner Clean terminals will have a bright metallic shine This should ...

Страница 11: ...ng recharging the vehicle shall be parked in a well ventilated area with the fill caps tightly secured Keep far away from any flame and sparks to avoid any explosion or fire that could cause physical injury or damage to the property 5 WATERING Flooded batteries need water More importantly watering must be done at the right time and in the right amount or else the battery s performance and longevit...

Страница 12: ... charge but also help spot signs of improper vehicle such as undercharging and over watering and possibly even locate a bad or weak battery The following steps outline how to properly perform routine voltage and specific gravity testing on batteries I Specific Gravity Test Flooded batteries only 1 Do not add water at this time 2 Fill and drain the hydrometer 2 to 4 times before pulling out a sampl...

Страница 13: ...pen Circuit Voltage Test For accurate voltage readings batteries must remain idle no charging no discharging for at least 6 hrs preferably 24 hrs 1 Disconnect all loads from the batteries 2 Measure the voltage using a DC voltmeter 3 Check the state of charge with Table 1 4 Charge the battery if it registers 0 to 70 charged If battery registers below the Table 1 values the following conditions may ...

Страница 14: ...riction value on one side should not exceed 2mm Adjust the flatness of the platen spring plate feeling manually first tighten the screws diagonally use your hand to check the flatness of the spring plate If not flat tighten the screws for the non flat part Change the gear oil inside the gear box periodically for new vehicle change the oil after one month or accumulated running distance exceed 1200...

Страница 15: ...he brush is wrong in type 5 Big sparkles The motor is over loaded the commutators are not clean not round or not smooth mica or some commutators extrude the brush is not ground properly the brush is big in pressure the brush is wrong in type the brush is jammed in the brush holder the brush holder become loose or vibrating the polarity and sequence of magnetic poles become wrong 6 The brush and it...

Страница 16: ...efore reconnecting the battery The controller should not be subjected to pressured water flow from either a standard hose or a power washer 5 Make sure the connections are tight but do not over tighten them NOTES All above checks shall be performed under power off Above checks shall be carried out once every 3 months after the power key turns off the wave filter capacitor in the controller unit sh...

Страница 17: ...ths 4 The electricity system must be checked once every 3 months especially main circuit for its fastening parts and wiring connections Meanwhile the contactor should be checked any defective parts should be replaced immediately Its dust should be cleaned by low pressure air 5 The electric contactors easily become hot if their mutual contact is not in good condition so special attention should be ...

Страница 18: ...the surface of the charger Do not get any water inside the charger Y 10 Check if all terminals are tightened properly Please do this after the power is off Y 11 Clean the surface of the controller Y Controller 12 Check if the solenoid is in order checking its touching point Y 13 Check if any water gets in Check if it becomes too hot Y 14 Check if the carbon brush should be replaced Y Motor 15 Chec...

Страница 19: ...he battery once a month recharge the battery 9 Trouble Shooting There is no settled mode to diagnose and eliminate the malfunction of electric vehicles During maintaining and checking we suggest you first listen then look and feel Below is the diagnoses and maintenance of some common malfunctions 1 The vehicle doesn t move Turn on power key step on the accelerator pedal the vehicle doesn t move Ma...

Страница 20: ...ly run in one direction 2 Controller Failure Change 4 Possible reason and troubleshooting of the malfunction of electric vehicle mechanic system System Malfunction Possible reason Troubleshooting 1 Clearance of rear axle decelerating gear is too big or the decelerating gear is broken Adjust change 2 Transmission cross shaft wear out Change 3 Gear of transmission wear out or damage Change 4 Flange ...

Страница 21: ...t Adjust or Change 5 Spring shock absorber is abnormal Change Deflected Running 6 Front suspension loose Change 1 Tire pressure is abnormal or left and right tire doesn t be exchanged for a long time Inflate or exchange 2 Toe in is improper Adjust 3 Drum bearing loose Change 4 U type Bolt of Leaf Spring loose Tighten 5 Rim distort frame distort Tighten 6 Brake force of each wheel is different Adju...

Страница 22: ... cylinder is ineffective Change Braking drag 5 Parking brake is ineffective Change spring 1 Shoes distort Change 2 Brake facing wear out Change 3 Eyewinker in brake system Check Eliminate Braking noise 4 Brake drum breach scrape to uneven Change 10 Wiring Diagram 1 Wiring Diagram of Series System FIG 1 2 Wiring Diagram of Sepex System FIG 2 This manual tries to be as sound and elaborate as possibl...

Страница 23: ...FIG 1 ...

Страница 24: ...FIG 2 ...

Отзывы: