


Copyright © 2011 Eagle Tree Systems, LLC
2
http://www.eagletreesystems.com
Have questions or Feedback?
Eagle Tree is committed to providing great customer service. If you’ve read the manual and something is not clear, just ask. We’d much prefer to take the time to
answer your questions, rather than having you waste your valuable time struggling with an issue.
To get help, visit the Eagle Tree Guardian support thread at
http://www.rcgroups.com/forums/showthread.php?t=1399687
.
Chances are someone has posted a solution
to your problem already. If not, posting your problem there will get a very quick response from the Eagle Tree community.
If you prefer to not post on the forum, or you feel there is a problem with your Eagle Tree hardware, please open a support ticket with us at
http://ticket.eagletreesystems.com
and we will respond to your support ticket as soon as we can (normally 1-3 business days). Note that you may receive an answer to
your question more quickly from our forum above, since many other Eagle Tree customers also monitor the forum. Note that when you create a support ticket, you will
be emailed a link that will let you check the status of the ticket. If you do not receive the email, this most likely means that a spam filter is intercepting emails from
Eagle Tree.
Also Eagle Tree greatly values your feedback on how we can improve our products. To leave us feedback for a new feature request or improvement, either post the
feedback on our support thread above, create a support ticket with your feedback, or send feedback at
http://www.eagletreesystems.com/Feature/feature.html
Connection and Mounting
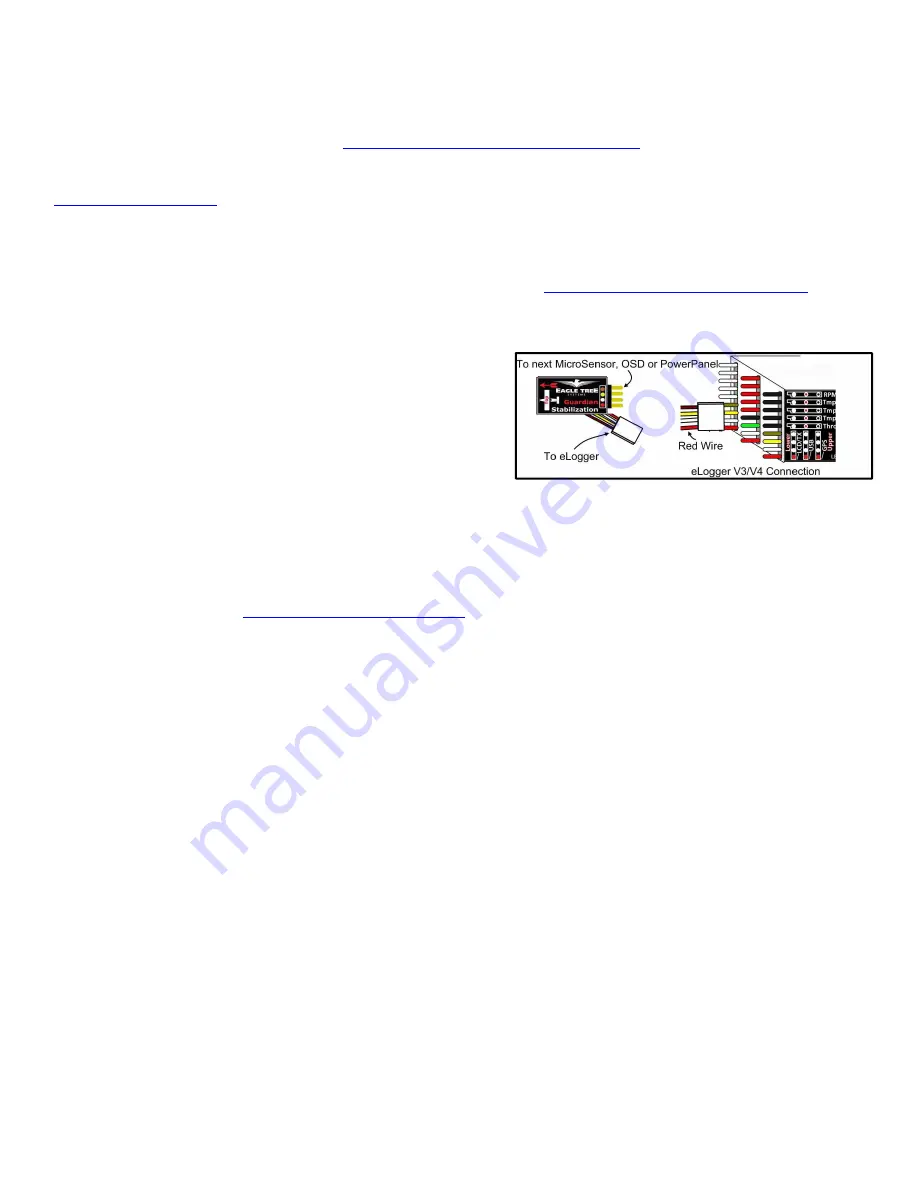
Connecting the Guardian to the eLogger V4 or V3
The Guardian plugs into the “LCD/OSD” or “LCD/TX” port of your eLogger V4 or V3, as
shown in Figure 3, or it can connect to the 4 pin expansion port of the OSD Pro. If you
have a PowerPanel or other MicroSensors, those can “daisy chain” connect to the pins on the
side of your Guardian, with the polarity as indicated on the Guardian label. Note that the
Guardian can connect anywhere in the chain of sensors. Once the Guardian has been
powered, its status light should begin blinking rapidly to indicate correct operation.
Connecting the Servos
Connect your receiver’s Aileron output (or Rudder receiver output, if the plane does not have Ailerons) and the Elevator receiver output to the OSD Pro’s Aileron and
Elevator servo inputs. Then, connect your servos to their corresponding OSD Pro servo outputs.
Note that when using the Guardian, the ailerons should be routed through the OSD Pro if the model has both ailerons and rudder, for proper stabilization and RTH.
Note that this is a change from the recommendation that the rudder be routed through the OSD Pro, when the Guardian is not present.
Windows Software and Firmware Update
To use the Guardian, you must update your software to Eagle Tree Windows Software version 9.76 or later. To update, download the latest software from the
support page of our website, located at
http://eagletreesystems.com/Support/apps.htm
. After downloading and installing the software, the firmware of your Guardian
may need to be updated. To upgrade your firmware, connect your eLogger to USB, and just click “Hardware, Firmware Control” and click the Update button for the
Guardian if the present firmware version is a higher number than the firmware stored in your Guardian.
Mounting the Guardian in your Model
Mount the Guardian in your model, placing it so the label is facing up and the “airplane” drawing on the label corresponds to the orientation of your aircraft. A properly
mounted sensor will be perfectly flat with its front facing the direction of flight, when the aircraft is in level flight.
We recommended mounting the Guardian with a piece of two-sided foam tape or Velrco to hold it firmly to your airframe while reducing vibrations. To reduce the risk
of the Guardian coming loose, tape, adhesive, or a mechanical restraint may be used.
Mounting the Guardian flat relative to level flight is important. However, minor mounting offsets can be compensated for by invoking your OSD Pro menu and using
the “Configure Guardian Stabilizer” -> “Reset Level Flight” option described below.
Vibrations
The Guardian is able to reject most levels of vibration. However, very strong vibrations can impact stability. To check for this issue after mounting the sensor, perform
a vibration test by securing your model to a test bench or stand and ramping up the throttle slowly while watching the AHI on your OSD Pro. If the AHI begins to pitch
or roll significantly during this test, remount your Guardian sensor further away from the motor, wires and any other sources of vibration or electromagnetic
interference.
Important Differences in OSD Pro Configuration when using Stabilization
There are a few differences in how you configure the OSD Pro, when stabilization is enabled vs disabled. These are described elsewhere in the document in more
detail:
•
When running the Servo Analysis Wizard, full elevator and aileron stick deflection should be given, rather than partial stick deflection. Partial stick
deflection is recommended when stabilization is disabled, to limit RTH servo deflections.
•
If your model has both ailerons and a rudder, the ailerons should be routed through the OSD Pro when stabilization is turned on, rather than rudder.
•
In Elevon mode, with stabilization enabled, the Guardian performs the servo mixing, so you must turn off mixing in your radio. But, if you disable
stabilization, the OSD Pro will again expect mixed inputs from your radio. Never turn stabilization off or on during flight if you have an elevon
model! Use the stabilization gain setting instead.
•
If you have previously configured RTH with your OSD Pro, it is recommended that you return all RTH gains/limits to their default values when stabilization
is enabled.


