background image


European Safety Systems Ltd.


Impress House, Mansell Road, Acton, London W3 7QH    


[email protected]

     Tel: +44 (0)208 743 8880 


www.e2s.com

    Fax: +44 (0)208 740 4200 

Document No. D165-00-001-IS_Issue_4    16-11-22 
 

Sheet 7 of 10 

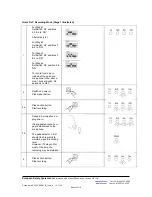
Quick Ref - Erase Single stage Mode (Stage 1 illustrated)


For Stage 1: 
Set 

Switch ‘S2’ positions 

2,3 & 7 to 'ON'  
 
Alternatively for : 
 
For Stage 2: 
Set 

Switch ‘S2’ positions 

3 & 7 to 'ON' 
 
For Stage 3: 
Set 

Switch ‘S2’ positions 

2 & 7 to 'ON' 
 
For Stage 4: 
Set 

Switch ‘S2’ position 7 

to 'ON' 


Switch on power or  
Press reset button 


3a 

Press action button: 
Erase will begin 


3b 

- - - - erase complete 


Содержание APPELLO A105NAX

Страница 1: ...The Beacon functions are either Xenon Strobe 1Hz flash rate LED Either Steady or 2Hz blink rate 2 Operating and Marking All units have the following operating requirements and limitations Unit Type No...

Страница 2: ...mode 5 Unit Set up and Recording The unit will need to be configured to suit the end user If recording either via the onboard microphone or the in line connector the unit will need to be supplied with...

Страница 3: ...erwise the unit will be damaged To change to the second third or fourth stage tone link the ve supply line to terminal relevant stage terminal Ie for Stage 2 link the ve supply to the S2 terminal for...

Страница 4: ...llo unit can be set up to either play an attention seeking tone and then a recorded message or just play the recorded message The user can o Record on each of the 4 stages using either the Line In or...

Страница 5: ...tage 3 Switch 2 Off Switch 3 Off Alarm Stage 4 3 Stage selection switch 4 Line In selected On board Microphone selected 5 Program Record Erase Mode ON Playback Record Erase Mode OFF 6 Message Tone Pla...

Страница 6: ...3 Set Switch S2 positions 2 4 to ON For Stage 4 Set Switch S2 position 4 to ON To record from Line in instead of the on board microphone follow above step 1 but set Switch S2 position 4 to OFF 2 Swit...

Страница 7: ...16 11 22 Sheet 7 of 10 Quick Ref Erase Single stage Mode Stage 1 illustrated 1 For Stage 1 Set Switch S2 positions 2 3 7 to ON Alternatively for For Stage 2 Set Switch S2 positions 3 7 to ON For Stag...

Страница 8: ...4200 Document No D165 00 001 IS_Issue_4 16 11 22 Sheet 8 of 10 Quick Ref Mass Erase Mode Erases All Stages 1 Set Switch S2 position 7 to ON 2 Set jumper J4 ME to ON position centre and right pin conne...

Страница 9: ...mper J6 to Sync on Set jumper J5 S M on Master unit to master position on Set jumper J5 S M on Slave unit to slave position off Position of S2 switch does not affect synch operation 3 Switch on power...

Страница 10: ...ne 19 1 4KHz 1 6KHz 1s 1 6KHz 1 4KHz 0 5s NFC48 265 Tone 2 Tone 5 Tone 29 Tone 20 660Hz Continuous Tone 2 Tone 5 Tone 29 Tone 21 554Hz 440Hz 1Hz Alternating Tone 2 Tone 5 Tone 29 Tone 22 544Hz 0 875 s...

Отзывы: