background image

Page M- ii

Repair and Service Manual

NOTES:

ELECTRICAL SYSTEM

Read all of Section B and this section before attempting any procedure. Pay particular attention to all Notices, Cautions, Dangers and Warnings.

Содержание TXT 48V

Страница 1: ...REPAIR AND SERVICE MANUAL TXT 48V ISSUED JANUARY 2010 ELECTRIC POWERED GOLF CAR 614279...

Страница 2: ...with the AC Drive motor must be towed with the Run Tow switch located under the passenger seat in the Tow position If the vehicle is to be used in a commercial environment signs similar to the ones il...

Страница 3: ...ned in this manual is subject to change without notice E Z GO Division of TEXTRON Inc is not liable for errors in this manual or for incidental or consequential damages that result from the use of the...

Страница 4: ...y charged battery will not freeze in winter temperatures unless the temperature falls below 75 F 60 C For winter storage the batteries must be clean fully charged and disconnected from any source of e...

Страница 5: ...Maintenance A Safety B Body C Wheels and Tires D Electronic Speed Control TCT E Front Suspension and Steering F Motor G Batteries and Charging H Battery Charger J Brakes K Direction Selector L Electri...

Страница 6: ...Page iv Repair and Service Manual TABLE OF CONTENTS NOTES...

Страница 7: ...his manual or for incidental or consequential damages that result from the use of the material in this manual This vehicle conforms to the current applicable standard for safety and performance requir...

Страница 8: ...y of each battery terminal and be sure to rewire the batteries correctly Always use specified replacement parts Never use replacement parts of lesser quality Always use recommended tools Always determ...

Страница 9: ...eiling of buildings necessitating proper ventilation Five air exchanges per hour is considered the minimum requirement Never charge a vehicle in an area that is subject to flame or spark Pay particula...

Страница 10: ...age viii Repair and Service Manual Notes SAFETY INFORMATION Read all of Section B and this section before attempting any procedure Pay particular attention to all Notices Cautions Dangers and Warnings...

Страница 11: ...THE ELECTRIC VEHICLE A 1 ROUTINE MAINTENANCE A 2 REAR AXLE A 2 BRAKES A 2 TIRES A 2 LIGHT BULB REPLACEMENT A 2 VEHICLE CLEANING AND CARE A 2 VEHICLE CARE PRODUCTS A 3 SUN TOP AND WINDSHIELD A 3 HARDW...

Страница 12: ...epair and Service Manual Notes GENERAL INFORMATION ROUTINE MAINTENANCE Read all of Section B and this section before attempting any procedure Pay particular attention to all Notices Cautions Dangers a...

Страница 13: ...ately secured before transporting The rated capacity of the trailer or truck must exceed the weight of the vehicle see GENERAL SPECIFICA TIONS for vehicle weight and load plus 1000 lbs 454 kg Lock the...

Страница 14: ...l is in the REAR AXLE section BRAKES After the vehicle has been put into service it is recom mended that the brakes be checked daily by performing a brake test To prevent severe injury or death result...

Страница 15: ...colors for use on TPE plastic bodies P N 28140 G and 28432 G Multi purpose Battery Protectant formulated to form a long term flexible non tacky dry coating that will not crack peel or flake over a wid...

Страница 16: ...TORQUE SPECIFICATIONS Fig 3 Torque Specifications ALL TORQUE FIGURES ARE IN FT LBS Nm BOLT SIZE Grade 2 1 4 5 16 3 8 7 16 1 2 9 16 5 8 3 4 7 8 1 Unless otherwise noted in text tighten all hardware in...

Страница 17: ...es items listed in previous table the following BATTERIES Clean battery terminals 3 Check charge condition and all connections WIRING 3 Check all wiring for loose connections and broken missing insula...

Страница 18: ...g BATTERIES Clean batteries terminals DIRECTION SELECTOR 3 Check for wear and smooth movement lubricate shaft with light oil if required KING PINS 3 Check for excessive play and tightness of retaining...

Страница 19: ...AUTIONS AND WARNINGS B 1 IMPORTANT SAFETY WARNING B 1 MODIFICATIONS TO VEHICLE B 1 GENERAL MAINTENANCE B 1 BEFORE SERVICING THE VEHICLE B 1 Additional Warnings B 2 BATTERY REMOVAL INSTALLATION B 3 LIF...

Страница 20: ...Page B ii Repair and Service Manual Notes SAFETY Read all of Section B and this section before attempting any procedure Pay particular attention to all Notices Cautions Dangers and Warnings...

Страница 21: ...reach high temperatures Battery acid and hydrogen gas could result in serious bodily injury to the technician mechanic and bystanders if not treated with utmost cau tion Be careful not to place hands...

Страница 22: ...cle of batteries and is explosive in con centrations as low as 4 Because hydro gen gas is lighter than air it will collect in the ceiling of buildings necessitating proper ventilation Five air exchang...

Страница 23: ...atteries Remove the batteries using a commercial battery car rier If the batteries have been cleaned and any acid in the battery rack area neutralized on a regular basis no cor rosion to the battery r...

Страница 24: ...n jack stands only in the areas indicated To raise the entire vehicle install chocks in front and behind each front wheel Ref Fig 2 Center jack under the rear frame crossmember Raise vehicle and locat...

Страница 25: ...Page B 5 Repair and Service Manual Notes Read all of Section A and this section before attempting any procedure Pay particular attention to all Notices Cautions Dangers and Warnings SAFETY...

Страница 26: ...Page B 6 Repair and Service Manual Notes SAFETY Read all of Section A and this section before attempting any procedure Pay particular attention to all Notices Cautions Dangers and Warnings...

Страница 27: ...1 BODY COMPONENT REPLACEMENT C 1 Instrument Panel Replacement C 1 Cowl Replacement C 4 Front Shield Replacement C 4 Rocker Panel Replacement C 4 Body Replacement C 5 Rear Bumper Replacement C 6 LIST...

Страница 28: ...Page C ii Repair and Service Manual NOTES BODY Read all of Section B and this section before attempting any procedure Pay particular attention to all Notices Cautions Dangers and Warnings...

Страница 29: ...ent the drill from being forced through the plastic body components where it could damage com ponents located immediately behind the rivet The best way to prevent this from occurring is to use a sharp...

Страница 30: ...Read all of Section B and this section before attempting any procedure Pay particular attention to all Notices Cautions Dangers and Warnings Fig 2 Body Components Front Frame 5 4 10 6 6 7 8 9 19 18 1...

Страница 31: ...nd Service Manual Read all of Section B and this section before attempting any procedure Pay particular attention to all Notices Cautions Dangers and Warnings Fig 3 Body Components Rear 28 27 34 30 31...

Страница 32: ...n the instru ment panel pockets Remove the bolts and washers 20 from the sides of the cowl and lift the cowl assembly from the vehicle Reassembly is the reverse order of disassembly and will require n...

Страница 33: ...tive piece of sheet metal be placed between the battery and the rivet Use of a drill depth stop will provide additional pro tection Remove hardware 28 attaching seat back supports 29 to body At the fr...

Страница 34: ...Page C 6 Repair and Service Manual NOTES BODY Read all of Section B and this section before attempting any procedure Pay particular attention to all Notices Cautions Dangers and Warnings...

Страница 35: ...epair and Service Manual WHEELS AND TIRES TABLE OF CONTENTS FOR SECTION D SECTION TITLE PAGE NO WHEEL AND TIRE SERVICE D 1 Tire Repair D 1 Wheel Installation D 1 LIST OF ILLUSTRATIONS Fig 1 Wheels and...

Страница 36: ...Page D ii Repair and Service Manual NOTES WHEELS AND TIRES Read all of Section B and this section before attempting any procedure Pay particular attention to all Notices Cautions Dangers and Warnings...

Страница 37: ...IONS section for recommended tire inflation pressure For outdoor applications with major use on grassy areas the follow ing should be considered On hard turf it is desirable to have a slightly higher...

Страница 38: ...is will assure even seating of the wheel against the hub With the valve stem to the outside mount the wheel onto the hub with lug nuts Finger tighten lug nuts in a cross sequence pattern Ref Fig 1 on...

Страница 39: ...ting a Solenoid for Continuity E 5 TROUBLESHOOTING DIAGRAMS E 6 INDUCTIVE THROTTLE SENSOR ITS TESTING AND REPLACEMENT E 10 CONTROLLER REPLACEMENT E 13 SOLENOID REPLACEMENT E 13 LIST OF ILLUSTRATIONS F...

Страница 40: ...ii Repair and Service Manual NOTES ELECTRONIC SPEED CONTROL TCT Read all of Section B and this section before attempting any procedure Pay particular attention to all Notices Cautions Dangers and War...

Страница 41: ...ption is enabled by the handheld diagnotic tool 4 The Freedom performance option This option includes all of the driving features of the Golf Coastal option except that the flat ground and downhill co...

Страница 42: ...rning beeper will be overridden and normal vehicle operation resumes The system functions in all key switch positions The TCT system is not a substitute for the ser vice brake which should be used to...

Страница 43: ...ensor to read the impulses of a ring magnet attached to the armature shaft of the motor Magnetic pulses are converted into electri cal signals which the controller uses to determine the motor speed Co...

Страница 44: ...as to the adequacy of the battery set charge the batteries and perform a load test using a discharge machine following manufacturer s instructions If batteries are satisfactory recharge bat tery set...

Страница 45: ...ne probe on one contact of the switch place the second probe on the second terminal of the switch Ref Fig 5 on Page E 5 Actuating a normally open NO switch will cause the DVOM to show 0 or give an aud...

Страница 46: ...ded to be closed 3 9 Throttle reapplied 1 Contactor opened 2 Contactor coil or wiring opened MAIN DRIVER OFF Main Driver FET detected as not turning ON Throttle applied to cause Contactor to close 3 8...

Страница 47: ...owers up with Key Direction and Throttle applied OR Throttle applied before Key and Direction switch applied KSI ON Forward or Reverse ON 8 Throttle 25 1 Incorrect sequence of Vehicle input controls 2...

Страница 48: ...ng any procedure Pay particular attention to all Notices Cautions Dangers and Warnings Fig 8 Controller Connectors and Connections RU N OW C From Motor 4AWG A1 From Motor 4AWG CB To Solenoid 4AWG CB T...

Страница 49: ...ions Dangers and Warnings Fig 9 Controller Wiring Diagram KSI WHT WHT WHT YEL BLU MAIN COIL BLU RED RED RED RED RUN TOW ORG RED ORG GRN GREY WHT YEL WHT RED RED GRN BLK BLK BLK BLK BLK A1 A A2 F2 S2 S...

Страница 50: ...3V when the solenoid clicks and 2 7V 0 5 volts at full pedal If the reading is out of specification the ITS sensor must be replaced The ITS attaches to the plastic pedal box using two plas tic studs a...

Страница 51: ...rs and Warnings Fig 11 ITS Adjustment Sheet 1 of 2 Use 7 32 drill to measure gap between plunger and ITS Micro switch disengaged Micro switch disengaged Pedal bracket rest against front of pedal frame...

Страница 52: ...tices Cautions Dangers and Warnings Fig 12 ITS Adjustment Sheet 2 of 2 Micro switch activated Plunger enters ITS Plunger fully activated Pedal bracket rests on rear of pedal frame opening 3 4 SOLENOID...

Страница 53: ...0 144 in lbs 13 5 16 3 Nm torque Replace the environmental cover and tighten the mount ing bolts to 35 44 in lbs 4 5 Nm torque Reconnect the BL battery cable and replace the seat SOLENOID REPLACEMENT...

Страница 54: ...ection before attempting any procedure Pay particular attention to all Notices Cautions Dangers and Warnings Fig 13 Solenoid Wiring SOL Red Wire Ring Terminal From Main Wire Harness SOL From Controlle...

Страница 55: ...15 Repair and Service Manual Notes Read all of Section B and this section before attempting any procedure Pay particular attention to all Notices Cautions Dangers and Warnings ELECTRONIC SPEED CONTRO...

Страница 56: ...16 Repair and Service Manual NOTES ELECTRONIC SPEED CONTROL TCT Read all of Section B and this section before attempting any procedure Pay particular attention to all Notices Cautions Dangers and War...

Страница 57: ...nion Unit Clearance F 14 Steering Wheel Replacement F 15 Steering Shaft and Column Replacement F 16 LIST OF ILLUSTRATIONS Fig 1 Axle Mounted Steering and Front Suspension F 1 Fig 2 Lubrication Points...

Страница 58: ...ii Repair and Service Manual NOTES FRONT SUSPENSION AND STEERING Read all of Section B and this section before attempting any procedure Pay particular attention to all Notices Cautions Dangers and Wa...

Страница 59: ...ar attention to all Notices Cautions Dangers and Warnings Fig 1 Axle Mounted Steering and Front Suspension Part of Frame Part of Frame Wave Washer Bearing Outer Snap Ring Inner Snap Ring Intermediate...

Страница 60: ...manual Be sure the vehicle is on a firm and level surface Never get under a vehicle while it is supported by a jack Use jack stands and test the stability of the vehicle on the stands before starting...

Страница 61: ...tate the wheel 2 3 more turns to displace excess grease If required tighten castellated nut 3 again until slight resistance is felt If the cotter pin hole in the spin dle 5 aligns with a slot in the c...

Страница 62: ...groove has conventional right hand threads To adjust wheel alignment loosen tie rod jam nuts 1 and turn tie rod 2 until correct alignment is achieved Tighten jam nuts to 36 40 ft lbs 49 54 Nm torque...

Страница 63: ...t the front axle 3 Ref Fig 6 on Page F 5 Compress shock absorber to clear the mounting bracket Loosen the nut securing the top of the shock absorber to the vehicle frame and then rotate the shock abso...

Страница 64: ...of front springs 17 Secure rack and pinion unit to spring with wire to prevent pulling apart intermediate shaft Remove the three 1 3 4 long bolts 18 two 1 1 2 long bolts 28 spring plate 24 and five l...

Страница 65: ...sure to install the long bolt 20 spring plate 24 spacer 23 nut 21 and washer 22 in their original locations Use new lock nuts 15 19 27 to secure the rack and pinion unit 16 two short bolts 18 and rear...

Страница 66: ...nd tighten front wheel s per WHEELS AND TIRES section Wheel Bearing and Race Replacement Tool List Qty Required Non ferrous punch 1 Ball peen hammer 1 Bearing driver 1 Remove hub 1 from spindle Ref Fi...

Страница 67: ...enger side front wheel and turn steering wheel fully to the left Remove the cotter pin 2 and loosen the castellated nut 3 until rack ball joint 1 threads are protected Using a ball joint separator as...

Страница 68: ...drive 1 Grasp the tie rod 8 at ball joints 6 and check for any vertical motion which would indicate a worn condition and require replacement Ref Fig 11 on Page F 9 To remove tie rod loosen wheel s and...

Страница 69: ...ew bellows aligning small end over groove in rack extension and secure with new wire tie 5 Leave large end loose until rack extension to rack and pinion unit clearance is checked or adjusted Install j...

Страница 70: ...rt front of vehicle per SAFETY section and remove front wheel Remove cotter pin 1 and loosen castellated nut 2 until tie rod ball joint 3 threads are protected Ref Fig 16 on Page F 12 Using a ball joi...

Страница 71: ...ssembly Clean rack pinion and housing Inspect gear teeth bearing surfaces and grease seal surfaces of rack and pinion for excessive wear or damage If any is found the rack and pinion unit must be repl...

Страница 72: ...ew cotter pin Maximum torque is 50 ft lbs 70 Nm Tighten bolt 13 securing intermediate shaft to pinion to 155 215 in lbs 180 250 kg cm torque After replacing or servicing steering components always ver...

Страница 73: ...lipboard to release the two bottom retaining tabs Then using thumb for leverage as shown reach from behind steering wheel with fingertips to first pull down and then push up to release the two top cli...

Страница 74: ...aft 4 Fig 22 Steering Shaft and Column Remove the four bolts 5 and washers 6 that secure the steering column 7 to the chassis and remove the column Remove large retaining ring 8 on bottom end of colum...

Страница 75: ...17 Repair and Service Manual Notes Read all of Section B and this section before attempting any procedure Pay particular attention to all Notices Cautions Dangers and Warnings FRONT SUSPENSION AND ST...

Страница 76: ...18 Repair and Service Manual NOTES FRONT SUSPENSION AND STEERING Read all of Section B and this section before attempting any procedure Pay particular attention to all Notices Cautions Dangers and Wa...

Страница 77: ...al G 1 Motor Disassembly G 1 Bearing Replacement G 3 Brush Replacement G 3 Motor Assembly G 4 Motor Tests G 4 Motor Installation G 4 LIST OF ILLUSTRATIONS Fig 1 Disconnect Battery Cable G 1 Fig 2 Mark...

Страница 78: ...Page G ii Repair and Service Manual NOTES MOTOR Read all of Section B and this section before attempting any procedure Pay particular attention to all Notices Cautions Dangers and Warnings...

Страница 79: ...le the Run Tow Maintenance switch must be left in the Tow Maintenance position for at least 30 seconds after the circuit is restored Disconnect the negative BL battery cable with an insulated wrench b...

Страница 80: ...and Service Manual Read all of Section B and this section before attempting any procedure Pay particular attention to all Notices Cautions Dangers and Warnings Fig 3 Motor Components Speed Sensor 14...

Страница 81: ...e side of the brush This keeps the brushes out of the way during bearing replacement Ref Fig 5 on Page G 4 Remove internal snap ring 8 and heat the commutator end cover again Press bearing 9 out from...

Страница 82: ...ng Ref Fig 3 on Page G 2 Motor Tests The armature and motor housing are not available as individual parts No testing is recommended to deter mine the specific area of failure When a test of the power...

Страница 83: ...Page G 5 Repair and Service Manual NOTES Read all of Section B and this section before attempting any procedure Pay particular attention to all Notices Cautions Dangers and Warnings MOTOR...

Страница 84: ...Page G 6 Repair and Service Manual NOTES MOTOR Read all of Section B and this section before attempting any procedure Pay particular attention to all Notices Cautions Dangers and Warnings...

Страница 85: ...s H 3 Battery Replacement H 3 Prolonged Storage H 4 Battery Charging H 5 AC Voltage H 5 TROUBLESHOOTING H 5 Hydrometer H 6 Using A Hydrometer H 6 LIST OF ILLUSTRATIONS Fig 1 Correct Electrolyte Level...

Страница 86: ...e H ii Repair and Service Manual NOTES BATTERIES AND CHARGING Read all of Section B and this section before attempting any procedure Pay particular attention to all Notices Cautions Dangers and Warnin...

Страница 87: ...Overfilling batteries may result in electro lyte being expelled from the battery during the charge cycle Expelled electrolyte may cause damage to the vehicle and storage facility Aerosol containers o...

Страница 88: ...battery being charged will gas with the majority of the gassing taking place at the end of the charging cycle This gas is hydrogen which is lighter than air Water and sulfuric acid droplets will be ca...

Страница 89: ...d also be sprayed with the sodium bicarbonate baking soda solution Fig 4 Preparing Acid Neutralizing Solution Allow the solution to sit for at least three minutes use a soft bristle brush or cloth to...

Страница 90: ...electronic devices need to be disconnected since they will contribute to the premature discharge of batteries During periods of storage the batteries will need atten tion to keep them maintained and p...

Страница 91: ...stem that prevents the vehicle from being driven when the charger plug is inserted in the vehicle charging receptacle AC Voltage Battery charger output is directly related to the input voltage If mult...

Страница 92: ...ith an internal thermometer that will measure the temperature of the electrolyte and will include a conversion scale to correct the float reading It is important to recognize that the electrolyte temp...

Страница 93: ...ame brand type and approximate age Fig 8 Hydrometer Temperature Correction 160 71 1 032 030 150 65 6 028 026 140 60 0 024 022 130 54 4 020 018 120 48 9 016 014 110 43 3 012 010 100 37 8 008 006 90 32...

Страница 94: ...ge H 8 Repair and Service Manual NOTES BATTERIES AND CHARGING Read all of Section B and this section before attempting any procedure Pay particular attention to all Notices Cautions Dangers and Warnin...

Страница 95: ...e J i Repair and Service Manual CHARGER DESCRIPTION J 1 PORTABLE CHARGER INSTALLATION J 1 UNDERSTANDING THE CHARGER J 2 LED DISPLAY INFORMATION J 2 LED Operation Codes J 2 LED Fault Codes J 2 MAINTENA...

Страница 96: ...Page J ii Repair and Service Manual Notes BATTERY CHARGER Read all of Section B and this section before attempting any procedure Pay particular attention to all Notices Cautions Dangers and Warnings...

Страница 97: ...n any way refer all repair work to qualified personnel Not for use by children Portable chargers are shipped with the vehicle Prior to vehicle or charger operation chargers must be removed and mounted...

Страница 98: ...charged RED FLASH fault code LED Fault Code RED FLASH Light turns on briefly but does not flash after that check for valid AC voltage ONE RED FLASH One flash a pause and then again one flash and a pa...

Страница 99: ...Page J 3 Repair and Service Manual Notes Read all of Section B and this section before attempting any procedure Pay particular attention to all Notices Cautions Dangers and Warnings BATTERY CHARGER...

Страница 100: ...Page J 4 Repair and Service Manual Notes BATTERY CHARGER Read all of Section B and this section before attempting any procedure Pay particular attention to all Notices Cautions Dangers and Warnings...

Страница 101: ...allation K 17 Brake Shoe Removal K 17 Brake Shoe Installation K 17 Brake Cable and Equalizer Assembly Removal and Installation K 18 Compensator Assembly Removal and Installation K 19 Brake Pedal Remov...

Страница 102: ...atching Pressure K 15 Fig 21 Brake Assembly K 15 Fig 22 Wheel Brake Lubrication Points K 16 Fig 23 Backing Plate Removal and Installation K 17 Fig 24 Brake Shoe Trailing 17L K 17 Fig 25 Brake Shoe Lea...

Страница 103: ...e cables is governed by the brake pedal If the cables can not travel far enough to absorb the slack free travel in the system and still apply the shoes to the drums the braking effort at the wheel bra...

Страница 104: ...Doing so will cause permanent damage to the adjuster assem bly and result in a gradual loss of brakes The wheel brakes are equipped with an automatic adjuster mechanism that is designed to compensate...

Страница 105: ...top tube within the spring is engaged and the linkage becomes solid Ref Fig 3 on Page K 3 The brake compensator assembly applies a spring load to the parking brake system and insures that the parking...

Страница 106: ...ight Providing free travel is correctly adjusted the clevis pins will not be under tension by the brake cables Test Result Fails 2 out of 3 Fails 2 out of 3 Perform the Periodic Brake Performance Test...

Страница 107: ...lling Do this by first verifying that some braking function exists Then drive vehicle at slow speed and apply the brakes aggressively As the brakes adjust and stop the vehicle more effectively start d...

Страница 108: ...provided that shoes have 06 1 5 mm min material System not adjusted properly Check and adjust per manual End of brake cable loose from anchor brackets Check and repair Cracked brake drum Replace Start...

Страница 109: ...r glazed Check again when shoes are dry Rusted or sticky brake pivot hardware Replace Neither wheel locks Brake system requires complete adjustment Adjust entire system Brake pedal not returning Check...

Страница 110: ...eliminate the need for routine brake testing and inspection as shown on the Periodic Service Schedule in Section A Continued proper brake operation depends on periodic mainte nance Brake Pedal and Li...

Страница 111: ...ee motion when the pedal is applied and released Inspect the brake cable sup ports to be sure the cables are properly secured If any of these conditions are found replace both cables and equalizer as...

Страница 112: ...severe injury or death resulting from operating a vehicle with improperly oper ating brake system the braking system must be properly maintained All driving brake tests must be done in a safe locatio...

Страница 113: ...avel Adjusting Brake Pedal Free Travel on page 14 Then repeat the Periodic Brake Performance Tests If vehicle fails remove from service and refer to Wheel Brake Inspection to evalu ate the reason for...

Страница 114: ...ficantly worn and leaving a ledge of unworn drum Inspect the splines for galling wear and corrosion If any of these problems are found the drum must be replaced 3 Remove any accumulated brake dust fro...

Страница 115: ...es to show more wear at the leading and trailing edges Ref Fig 14 on Page K 12 If the brake shoe thickness is approaching 06 1 5 mm it is recommended that the shoes be replaced It is recommended that...

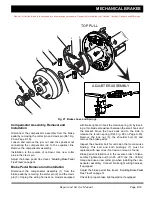
Страница 116: ...e brake cables start to move the brake levers This should not be confused with the light resistance that is felt as the brake pedal is depressed enough to remove slack from the compensa tor and cables...

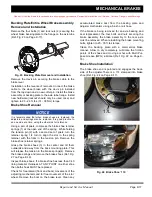
Страница 117: ...drum Remove washer 4 and spindle cap adapter 7 Slide the brake drum 5 from the axle shaft If required tap the drum with a plastic faced hammer to loosen it from the axle shaft or use drum puller P N 1...

Страница 118: ...om brake assembly Do NOT use a commercial brake cleaner unless the entire brake has been disassembled Remove any accumulated brake dust with a brush Remove the brake shoes Brake Shoe Removal on page 1...

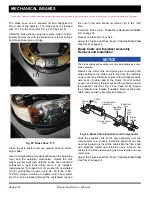
Страница 119: ...g 1 4 turn to align the slot in the spring retainer with the flats in the tension pin Remove the brake shoe retainer springs Grasp the brake shoes 3 in the center and tilt them outwards and away from...

Страница 120: ...e brake drum Brake Drum Removal and Installa tion on page 15 Repeat on other side of vehicle Adjust the brake pedal free travel Adjusting Brake Pedal Free Travel on page 14 Brake Cable and Equalizer A...

Страница 121: ...rom the brake pedal by removing the cotter pin 2 and the clevis pin 3 Unplug the wiring harness on models equipped with brake lights Unhook the torsion spring 4 by insert ing a thin blade screwdriver...

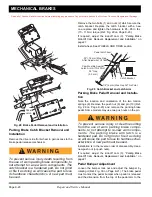
Страница 122: ...29 Catch Bracket and Latch Arm Parking Brake Pedal Removal and Installa tion Note the location and orientation of the two torsion springs 8 Remove the push nut 9 and pin 10 Ref Fig 28 on Page K 20 and...

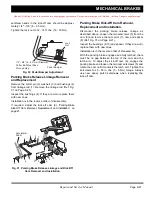
Страница 123: ...g 31 Parking Brake Release Linkage and Kick Off Cam Removal and Installation Parking Brake Kick Off Cam Removal Replacement and Installation Disconnect the parking brake release linkage as described a...

Страница 124: ...Page K 22 Repair and Service Manual NOTES MECHANICAL BRAKES Read all of Section B and this section before attempting any procedure Pay particular attention to all Notices Cautions Dangers and Warnings...

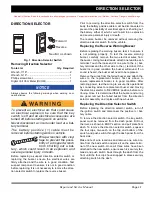
Страница 125: ...AGE NO DIRECTION SELECTOR L 1 Removing Direction Selector L 1 Replacing the Reverse Warning Buzzer L 1 Replacing the Direction Selector Switch L 1 LIST OF ILLUSTRATIONS Fig 1 Direction Selector Switch...

Страница 126: ...age L ii Repair and Service Manual NOTES DIRECTION SELECTOR Read all of Section B and this section before attempting any procedure Pay particular attention to all Notices Cautions Dangers and Warnings...

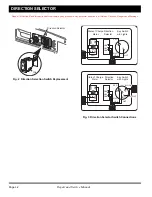
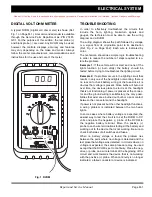
Страница 127: ...the Reverse Warning Buzzer Before replacing the warning buzzer test it to ensure it is not working properly To test the reverse warning buzzer carefully remove the two electrical wires from the buzzer...

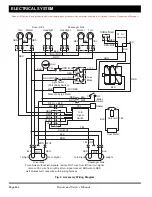
Страница 128: ...angers and Warnings Fig 2 Direction Selection Switch Replacement Fig 3 Direction Selector Switch Connections OFF ON Direction Selector Clip RED RED RED 1 2 4 B B1 I WHT YEL BLK Key Switch with Lights...

Страница 129: ...Page L 3 Repair and Service Manual NOTES Read all of Section B and this section before attempting any procedure Pay particular attention to all Notices Cautions Dangers and Warnings DIRECTION SELECTOR...

Страница 130: ...Page L 4 Repair and Service Manual NOTES DIRECTION SELECTOR Read all of Section B and this section before attempting any procedure Pay particular attention to all Notices Cautions Dangers and Warnings...

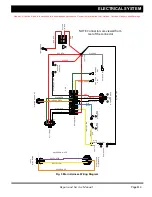
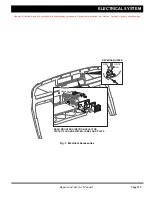
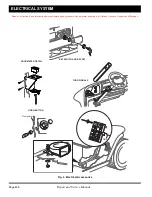
Страница 131: ...SECTION TITLE PAGE NO DIGITAL VOLT OHM METER M 1 TROUBLESHOOTING M 1 POWER SUPPLY M 3 MAIN ACCESSORY WIRING M 3 LIST OF ILLUSTRATIONS Fig 1 DVOM M 1 Fig 2 Accessory Wiring Diagram M 2 Fig 3 Electrica...

Страница 132: ...Page M ii Repair and Service Manual NOTES ELECTRICAL SYSTEM Read all of Section B and this section before attempting any procedure Pay particular attention to all Notices Cautions Dangers and Warnings...

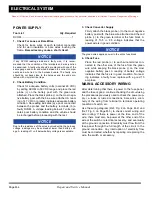
Страница 133: ...hoot the lighting circuit Example 2 If a problem occurs in the lighting circuit that results in only one of the headlights not working there is no reason to check battery wiring or the fuse since it i...

Страница 134: ...of Key Switch RED RED RED RED BRN BLK YEL Turn Signal Switch GRN WHT YEL WHT BLK Flasher YEL YEL BLU WHT BLK K L B K L B BRN WHT BRN WHT WHT D E R D E R Taillight Taillight YEL BRN GRN Turn Signal Tu...

Страница 135: ...NOSTIC PLUG SOLENOID COIL SOLENOID COIL SPLICE 2 SPLICE 1 SPEED SENSOR OUT A B C WHITE FNR POWER FNR FORWARD FNR REVERSE REVERSE BUZZER RED RED RED RED RED GREEN GREEN GREEN BLACK ORANGE RED BLACK WHI...

Страница 136: ...e harness voltage readings may be somewhat lower than battery volt age A reading of 1 volt below battery voltage is acceptable 3 Check Converter Supply Firmly attach the black probe to the most negati...

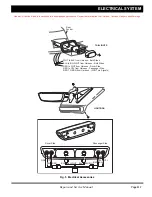
Страница 137: ...n B and this section before attempting any procedure Pay particular attention to all Notices Cautions Dangers and Warnings Fig 3 Electrical Accessories RED GRN BLK REVERSE BUZZER DASH MOUNTED DIRECTIO...

Страница 138: ...all of Section B and this section before attempting any procedure Pay particular attention to all Notices Cautions Dangers and Warnings Fig 4 Electrical Accessories ON OFF KEY SWITCH AND KEY SET GRN H...

Страница 139: ...Cautions Dangers and Warnings Fig 5 Electrical Accessories RED GRN BLK BLK BLK BLK BLK BLK RED YEL BLU WHT BLU WHT Driver Side Passenger Side Rear Fender WHT to BLK from Harness Both Sides BLK to BLU...

Страница 140: ...Page M 8 Repair and Service Manual NOTES ELECTRICAL SYSTEM Read all of Section B and this section before attempting any procedure Pay particular attention to all Notices Cautions Dangers and Warnings...

Страница 141: ...EAR SUSPENSION N 1 GENERAL N 1 Shock Absorber Removal N 1 Shock Absorber Installation N 1 Rear Spring Removal N 1 Rear Spring Installation N 1 Rear Axle Assembly Removal N 1 Rear Axle Installation N 2...

Страница 142: ...Page N ii Repair and Service Manual NOTES REAR SUSPENSION Read all of Section B and this section before attempting any procedure Pay particular attention to all Notices Cautions Dangers and Warnings...

Страница 143: ...m shock absorber nut 1 Ref Fig 3 on Page N 3 Compress the shock absorber 2 and remove the top shock absorber nut 3 Remove the shock absorber 2 Shock Absorber Installation Shock absorber installation i...

Страница 144: ...from the battery Fig 1 Disconnect Battery Cable Remove the wires to the motor being careful to prevent the axle assembly 6 from rotating remove the bottom shock mounting hardware and the springs from...

Страница 145: ...epair and Service Manual Read all of Section B and this section before attempting any procedure Pay particular attention to all Notices Cautions Dangers and Warnings Fig 3 Rear Suspension 1 2 3 4 5 5...

Страница 146: ...Page N 4 Repair and Service Manual NOTES REAR SUSPENSION Read all of Section B and this section before attempting any procedure Pay particular attention to all Notices Cautions Dangers and Warnings...

Страница 147: ...1 Axle Shaft Seal Removal and Replacement P 2 Axle Shaft Replacement P 3 LIST OF ILLUSTRATIONS Fig 1 Add Check and Drain Rear Axle Lubricant P 1 Fig 2 Removing Installing Outer Snap Ring P 1 Fig 3 Rem...

Страница 148: ...Page P ii Repair and Service Manual NOTES REAR AXLE Read all of Section B and this section before attempting any procedure Pay particular attention to all Notices Cautions Dangers and Warnings...

Страница 149: ...is a precision assembly and therefore any repair or replacement of parts must be done with extreme care in a clean environment Before attempting to perform any service on the axle read and understand...

Страница 150: ...t Tools List Qty Required Internal snap ring pliers 1 Seal puller 1 Seal installer P N 18739 G1 1 Ball peen hammer 1 Use care to prevent damage to the inner surface of the axle tube at the sealing are...

Страница 151: ...uter snap ring Coat the outboard spline of the axle with a commercially available anti seize compound Install the brake hub and drum thrust washer nut and new cotter pin Ref Fig 8 on Page P 3 Fig 7 In...

Страница 152: ...Page P 4 Repair and Service Manual NOTES REAR AXLE Read all of Section B and this section before attempting any procedure Pay particular attention to all Notices Cautions Dangers and Warnings...

Страница 153: ...AND WINDSHIELD Q 1 Tailering Q 1 GOLF CAR SUN TOP Q 1 Rear Support Installation Q 1 Front Strut Q 1 Sun Top Q 1 SPLIT WINDSHIELD Q 3 ONE PIECE FRONT WINDSHIELD Q 4 REAR WINDSHIELD Q 5 LIST OF ILLUSTRA...

Страница 154: ...age Q ii Repair and Service Manual NOTES WEATHER PROTECTION Read all of Section B and this section before attempting any procedure Pay particular attention to all Notices Cautions Dangers and Warnings...

Страница 155: ...ce the teflon washer 5 on the end of the bolt This teflon washer is needed to prevent squeaking 3 Insert rear strut 2 through the square hole in the top of the seat back support and push the bolt thro...

Страница 156: ...ion before attempting any procedure Pay particular attention to all Notices Cautions Dangers and Warnings Fig 1 Golf Car Sun Top D A C B DETAIL A DETAIL B DETAIL C FRONT FRONT OF VEHICLE DETAIL D REAR...

Страница 157: ...bottom onto the front strut so that it snaps into place See Details B and C Repeat for opposite side of windshield Position top grips 8 as shown See Detail D at top hole on each side of front strut Se...

Страница 158: ...t gently tap sash to ensure windshield seats properly See Detail A Insert screw 4 through washer 5 rubber grommet 6 and existing hole in front strut Secure with washer 5 and lock nut 7 See Detail B Do...

Страница 159: ...p sash to ensure rear windshield seats properly See Detail A Insert screw 4 through washer 5 rubber grommet 6 and existing hole in rear strut Secure with washer 5 and lock nut 7 See Detail B Do not ov...

Страница 160: ...Page Q 6 Repair and Service Manual NOTES WEATHER PROTECTION Read all of Section B and this section before attempting any procedure Pay particular attention to all Notices Cautions Dangers and Warnings...

Страница 161: ...Tow position and also when the battery charger is con nected to the vehicle The main menu appears after the data is uploaded from the unit controller charger etc the main menu will not be displayed if...

Страница 162: ...e the value of the parame ter BOOKMARK To set a position in the Menu hold a Book mark Key down for four seconds until the Bookmark set screen is displayed To jump to a selected Bookmark position press...

Страница 163: ...mph Accel Selection 1 3 2 Braking Selection 1 3 3 5 Freedom Speed 14 5 19 5 18 5 mph Accel Selection 1 2 1 Braking Selection 1 2 1 Monitor Battery Amp Hours 0 100000 AmpHr Battery Voltage 0 100 V Ela...

Страница 164: ...s Speed Sensor Fault 0 100000 Hrs Main Driver On 0 100000 Hrs Main Coil Open 0 100000 Hrs Main Dropout 1 0 100000 Hrs Motor Stall 0 100000 Hrs Main Driver Off 0 100000 Hrs Main Dropout 2 0 100000 Hrs...

Страница 165: ...ar Fault History YES NO Information OEM Info Display OEM information Reconfigured Display reconfigure status Model Number Display handheld model number Serial Number Display handheld serial number Man...

Страница 166: ...age R 6 Repair and Service Manual Notes HANDHELD DIAGNOSTICS Read all of Section B and this section before attempting any procedure Pay particular attention to all Notices Cautions Dangers and Warning...

Страница 167: ...Page S i Repair and Service Manual TROUBLESHOOTING TABLE OF CONTENTS FOR SECTION S SECTION TITLE PAGE NO 1206HB 5201 Controller Faults and Troubleshooting S 1...

Страница 168: ...Page S ii Repair and Service Manual NOTES TROUBLESHOOTING Read all of Section B and this section before attempting any procedure Pay particular attention to all Notices Cautions Dangers and Warnings...

Страница 169: ...to cause Contactor to close 3 8 Condition clears 1 Controller defective MOTOR STALL High Armature Current when no Speed Pulses detected Contactor closed 6 Speed Pulses appear 1 Motor is stalled 2 Defe...

Страница 170: ...nd Throttle applied OR Throttle applied before Key and Direction switch applied KSI ON Forward or Reverse ON 8 Throttle 25 1 Incorrect sequence of Vehicle input controls 2 Defective Throttle device TH...

Страница 171: ...Page S 3 Repair and Service Manual Notes Read all of Section B and this section before attempting any procedure Pay particular attention to all Notices Cautions Dangers and Warnings TROUBLESHOOTING...

Страница 172: ...Page S 4 Repair and Service Manual Notes TROUBLESHOOTING Read all of Section B and this section before attempting any procedure Pay particular attention to all Notices Cautions Dangers and Warnings...

Страница 173: ...al GROUNDING REQUIREMENTS T 1 GROUND SYSTEMS T 1 LIGHTINIG PROTECTION REQUIREMENTS T 1 EQUIPMENT FAULT AND PERSONAL SAFETY SYSTEM T 1 GROUND NETWORK REQUIREMENTS T 1 EXTERNAL GROUNDING REQUIREMENTS T...

Страница 174: ...Repair and Service Manual Notes LIGHTNING PROTECTION AND GROUNDING Read all of Section B and this section before attempting any procedure Pay particular attention to all Notices Cautions Dangers and...

Страница 175: ...hms cannot be obtained due to high soil resistivity rock formations or other abnormal conditions alternate methods for reducing the resistance to earth must be considered Chemical Treatments No salt c...

Страница 176: ...24 below grade and be at least 24 away from the struc ture All bends in the conductor shall have a minimum radius of 8 and be no less than 90 degrees Ground Mats In areas where electrodes cannot be dr...

Страница 177: ...all pull boxes junction boxes and power panels In existing facilities where an existing conduit is not large enough to accommodate an additional ground conductor or where a conduit section is insulat...

Страница 178: ...Repair and Service Manual Notes LIGHTNING PROTECTION AND GROUNDING Read all of Section B and this section before attempting any procedure Pay particular attention to all Notices Cautions Dangers and...

Страница 179: ...Page U i Repair and Service Manual PAINT TABLE OF CONTENTS FOR SECTION U SECTION TITLE PAGE NO PAINTING U 1 Minor Scratches U 1 Larger Scratches U 1 Complete Panel Repair U 1...

Страница 180: ...Page U ii Repair and Service Manual NOTES PAINT Read all of Section B and this section before attempting any procedure Pay particular attention to all Notices Cautions Dangers and Warnings...

Страница 181: ...clean the surface to be repaired with alco hol and dry ii Mask the area to be painted common masking tape is adequate prior to repair and use aerosol type touch up paint iii Apply spray touch up paint...

Страница 182: ...Page U 2 Repair and Service Manual NOTES PAINT Read all of Section B and this section before attempting any procedure Pay particular attention to all Notices Cautions Dangers and Warnings...

Страница 183: ...F CONTENTS FOR SECTION V SECTION TITLE PAGE NO TXT ELECTRIC FLEET V 1 TXT ELECTRIC FREEDOM V 2 LIST OF ILLUSTRATIONS Fig 1 Vehicle Dimensions V 3 Fig 2 Vehicle Dimensions Incline Specifications and Tu...

Страница 184: ...e V ii Repair and Service Manual NOTES GENERAL SPECIFICATIONS Read all of Section B and this section before attempting any procedure Pay particular attention to all Notices Cautions Dangers and Warnin...

Страница 185: ...all Height No Canopy Overall Height With Canopy Wheel Base Front Wheel Track Rear Wheel Track Ground Clearance at Differential 91 0 in 231 cm 47 0 in 119 cm 46 5 in 118 cm Top of steering wheel 68 0 i...

Страница 186: ...th Overall Height No Canopy Overall Height With Canopy Wheel Base Front Wheel Track Rear Wheel Track Ground Clearance at Differential 91 0 in 231 cm 47 0 in 119 cm 46 5 in 118 cm Top of steering wheel...

Страница 187: ...RAL SPECIFICATIONS Repair and Service Manual Fig 1 Vehicle Dimensions 47 0 in 119 cm Front 34 0 in 86 cm Rear 38 5 in 97 cm 46 5 in 118 cm 68 in 173 cm 66 0 in 168 cm 91 0 in 231 cm 4 5 in 11 0 cm Gro...

Страница 188: ...nual GENERAL SPECIFICATIONS Fig 2 Vehicle dimensions Incline Specifications and Turning Clearance Diameter TURNING CLEARANCE DIAMETER 19 ft 5 8 m RECOMMENDED MAX RAMP 25 GRADE or 14oMAX RECOMMENDED MA...

Страница 189: ...e V 5 GENERAL SPECIFICATIONS Repair and Service Manual Fig 3 Battery Charger Dimensions 6 3 16 cm 1 8 4 5 cm 1 4 3 5cm 7 8 19 8 cm 11 4 28 9 cm 4 8 12 2 cm 10 5 26 7 cm 2 5 6 3 cm 4 1 10 4 cm 5 4 13 7...

Страница 190: ...ge V 6 Repair and Service Manual GENERAL SPECIFICATIONS Read all of Section B and this section before attempting any procedure Pay particular attention to all Notices Cautions Dangers and Warnings NOT...

Страница 191: ...m properly as the result of normal use age wear or abuse It is virtually impossible to anticipate all possible compo nent failures or the manner in which each component may fail Be aware that a vehicl...

Страница 192: ...l may not be reproduced in whole or in part without the express permission of E Z GO Division of Textron Inc Technical Communications Department E Z GO Division of Textron Inc 1451 Marvin Griffin Road...

Отзывы: