E-Vision VS308P8 Скачать руководство пользователя страница 16

16

Quick Guide  -  NVS308P8 NVS316P8  -  090061007

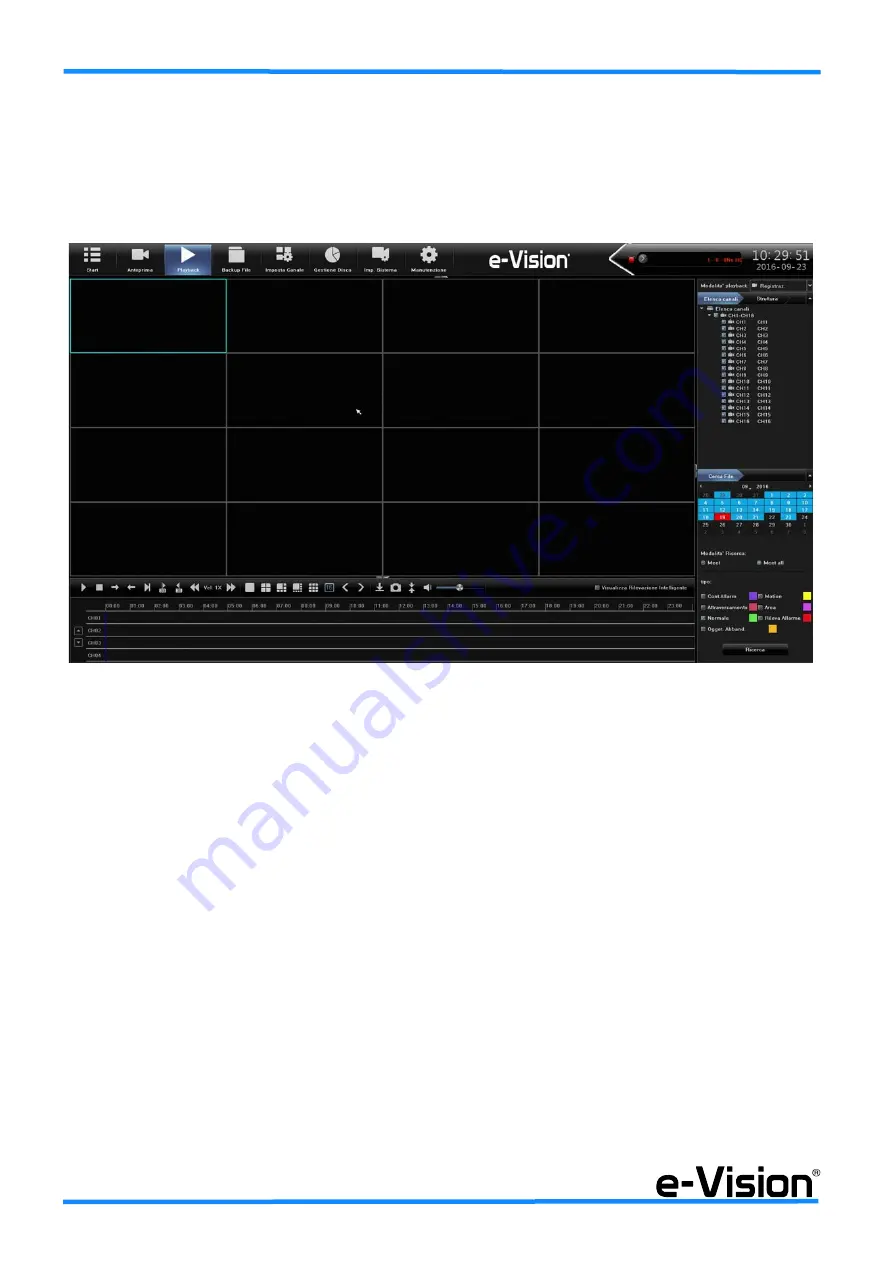
3.4 Riproduzione di video

NOTA: L’unità remota continuerà a registrare mentre si riproducono i video su PC, sia in caso di playback remoto che locale.

Per accedere alle funzioni di riproduzione selezionare RIPRODUZIONE nel menu visualizzato nella pagina principale.

Apparirà la seguente finestra:

Nell’area 

DATA

 (

B

), i video disponibili per la riproduzione, e quindi selezionabili, sono indicati in colore blu.

•Per la riproduzione di video:

- selezionare il canale o i canali desiderati (

A

);

- selezionare la data desiderata nell’area 

DATA

 (

B

) che sarà evidenziata in colore rosso, quindi l’opzione CERCA (

C

);

- utilizzare il mouse per selezionare l’ora desiderata sulle barre;

- utilizzare l’area (

E

) per selezionare i filtri di ricerca per gli eventi;

Nell’area segnata con la lettera (

D

) sarà possibile visualizzare barre di colore diverso in base al tipo di evento.

(A)

(B)

(C)

(D)

(E)

Содержание VS308P8

Страница 1: ...Guida Rapida Quick Guide NVS308P8 NVS316P8 Network Video Recorder 090061007 IT08020000001624 ...

Страница 2: ...nterno prima di aver disconnesso l alimentazione primaria e di emergenza Alcuni prodotti incorporano batterie ricaricabili o meno per l alimentazione di emergenza Errori nel loro collegamento possono causare danni al prodotto danni a cose e pericolo per l incolumità dell operatore scoppio ed incendio FOREWORD FOR THE INSTALLER Comply strictly with current standards governing the installation of el...

Страница 3: ...stallazione ActiveX 20 4 2 Accesso al software tramite browser senza ActiveX 23 4 3 Accesso con applicazione Fseye 23 4 3 1 Caratteristiche dell applicazione Fseye 23 4 3 2 Operatività applicazione Fseye 23 4 4 Accesso tramite servizio DDNS e Vision 26 4 5 LOGIN 27 4 6 AREA 1 Menu Principale 28 4 7 AREA 2 Elenco telecamere e MAIN STREAM e EXTRA STREAM 28 4 8 AREA 3 Controlli PTZ 28 4 9 AREA 4 Cont...

Страница 4: ...on 47 8 2 Software access via browser without ActiveX 50 8 3 Access with the Fseye application 50 8 3 1 Fseye characteristics 50 8 3 2 Fseye operativity 50 8 4 Access with e Vision DDNS service 53 8 5 Software login 54 8 6 AREA 1 Main menu 55 8 7 AREA 2 Cameras list and MAIN STREAM and EXTRA STREAM 55 8 8 AREA 3 PTZ controls 55 8 9 AREA 4 Brightness contrast and preset controls 56 8 10 AREA 5 Inte...

Страница 5: ...PPXQLW UHTXLUHPHQWV IRU FRPSRQHQWV RI ILUH QWUXGHU DQG VRFLDO DODUP V VWHP 1 RPSDWLELOLWj HOHWWURPDJQHWLFD 0 3DUWH 1RUPH JHQHULFKH PLVVLRQH SHU JOL DPELHQWL UHVLGHQ LDOL FRPPHUFLDOL H GHOO LQGXVWULD OHJJHUD OHFWURPDJQHWLF FRPSDWLELOLW 0 3DUW HQHULF VWDQGDUGV PLVVLRQ VWDQGDUG IRU UHVLGHQWLDO FRPPHUFLDO DQG OLJKW LQGXVWULDO HQYLURQPHQWV H TXLQGL ULVSRQGHQWH DL UHTXLVLWL HVVHQ LDOL GHOOH GLUHWWLYH DQ...

Страница 6: ...è immesso sul mercato dopo il 13 agosto 2005 con divieto di conferimento all ordi nario servizio di raccolta dei rifiuti urbani DISPOSAL INSTRUCTIONS USERS INFORMATION According to Directive 2012 19 EU on the Waste of Electric and Electronic Equipment WEEE it is here specified that this Electrical Electromechanic Device started to be commercialized after 13th August 2005 and it shall be disposed o...

Страница 7: ...0p può essere utilizzata per la connessione di monitor di grandi dimensioni ad alta definizione che rispondono principalmente alle esigenze di sale di regia e controllo per la visualizzazione contemporanea a pieno schermo di tutte le telecamere presenti nel sistema La visione e la gestione degli NVR può essere effettuata sia da postazione PC Client locale via LAN Videosurveillance Client Software ...

Страница 8: ... STEP 4 STEP 5 Far scivolare il coperchio del dispositivo nel senso indicato dalle frecce Connettere i cavi come indicato nelle immagini sopra Collocare l HDD nell alloggiamento predisposto e fissarlo esternamente con le viti tramite i fori appositi ...

Страница 9: ...3 1 1 Accesso al menu OSD con il mouse Collegare un mouse USB ad una qualsiasi delle porte USB disponibili del DVR Le funzioni dei tasti del mouse sono quelle illustrate in figura seguente Muovere il cursore sul video per visualizzare le barre con le icone di comando e di stato Le barre saranno visualizzate nell area inferiore Vista interna con elementi posizionati e collegamenti effettuati in mod...

Страница 10: ...re alla seguente finestra di login Selezionare il tipo di utente dal menu a tendina user UTENTE o admin AMMINISTRATORE e digitare la password con la tastiera virtuale che apparirà cliccando nel relativo campo Nome utente default admin Password default 888888 Si raccomanda di modificare la password di default quanto prima ...

Страница 11: ... Selezionare il formato video e la risoluzione desiderati quindi l opzione Successivo Selezionare LAN 1 e le impostazioni di rete IP Subnet Mask e Gateway quindi l opzione Successivo nei modelli con versione firmware minore di 1 1 5 identificabili dal menu Manutenzione LAN 1 e LAN 2 sono invertiti LAN 1 indirizzo IP scheda LAN 2 indirizzo IP scheda di rete della di rete del cliente porta switch ...

Страница 12: ...sire il dispositivo puntare con uno smartphone il codice utilizzando l applicazione Fseye A questo punto sarà visualizzato il menu principale NOTA Se si desidera rilanciare la procedura guidata selezionare START GUIDE e riavviare la procedura 1 2 3 4 5 6 ...

Страница 13: ... MERO 80 HTTP E LA NUMERO 554 RTSP 2 IN CASO DI PUBBLICAZIONE DEL DVR SENZA MODALITÀ ACTIVEX LE PORTE DA APRIRE SUL ROUTER SONO LA NU MERO 80 HTTP LA NUMERO 1935 RTMP E LA NUMERO 554 RTSP 3 SE I DVR SONO UTILIZZATI IN RETE WAN O INTERNET SI CONSIGLIA DI MODIFICARE LA PORTA DI DEFAULT 80 E LE PORTE 1935 E 554 CON UNA PORTA HTTP CON NUMERO SUPERIORE A 1024 4 SE SI UTILIZZA L APPLICAZIONE FSEYE IN MO...

Страница 14: ...e nella colonna di de stra le telecamere aggiunte al NVR 1 Per aggiungere i canali in modalità automatica settando i parametri delle telecamere corretti per la connessione sele zionare l opzione Modifica IP quando si aggiunge un canale 4 per telecamere modello BCV300 BCM300 DCV300 DCM300 BCM500 DCM500 selezionare come protocollo di ricerca solo I8H 3 quindi CERCA 1 e AGGIUNGI TUTTO 2 per modelli d...

Страница 15: ... interno al NVR o su rete cliente eseguire una ricerca col tasto CERCA e utilizzare le frecce centrali 5 per aggingere le telecamere 3 3 Creazione di strutture L NVR permette di creare strutture layout sequenze di visualizzazioni personalizzate richiamabili dalla pagina principale NOTA Se nell area STATO riquadro A lo stato della telecamera risulta Connessione Fallita verificare i parametri sotto ...

Страница 16: ...ea DATA B i video disponibili per la riproduzione e quindi selezionabili sono indicati in colore blu Per la riproduzione di video selezionare il canale o i canali desiderati A selezionare la data desiderata nell area DATA B che sarà evidenziata in colore rosso quindi l opzione CERCA C utilizzare il mouse per selezionare l ora desiderata sulle barre utilizzare l area E per selezionare i filtri di r...

Страница 17: ...tazioni selezionare il tasto AVVIA BACKUP H per salvare i dati 4 APPLICAZIONE SOFTWARE DEL NVR L accesso all NVR è consentito in vari modi fare riferimento al manuale tecnico per maggiori dettagli 1 tramite browser IE utilizzando ACTIVEX o tramite qualsiasi browser senza ACTIVEX 2 tramite dispositivi smartphone con l applicazione Fseye 3 tramite browser utilizzando il servizio DDNS e Vision 4 pubb...

Страница 18: ...ezionare Strumenti Impostazioni Visualizzazione Compatibilità Inserire IP della telecamera Speed Dome tra i siti compatibili e selezionare AGGIUNGI NOTA l inserimento dell IP della telecamera tra i siti compatibili è solo raccomandato non è obbligatorio per il cor retto funzionamento STRUMENTI ...

Страница 19: ...rocedura illustrata di seguito per definire correttamente le impostazioni di sicurezza di internet Avviare il browser Internet Explorer cliccando sull icona del desktop o utilizzando il menu START Selezionare Strumenti Opzioni Internet Selezionare Strumenti Opzioni Internet Sicurezza STRUMENTI Trascinare il cursore con il mouse e abbassare la protezione ...

Страница 20: ...roseguire con l installazione delle ActiveX 4 5 3 Installazione ActiveX Avviare il browser Internet Explorer cliccando sull icona del desktop o utilizzando il menu START Inserire l indirizzo IP della telecamera nella barra degli indirizzi della finestra del browser in alto A questo punto per il funzionamento della telecamera è necessario installare i controlli ACTIVE X Downloading Active X Control...

Страница 21: ...ale selezionare Downloading Active X Control Please click here e procedere Per installare i controlli ACTIVE X in modalità automatica selezionare CONSENTI Sarà visualizzata la seguente finestra Selezionare il comando INSTALLA Sarà visualizzata la finestra principale di installazione dei controlli ...

Страница 22: ...onare NEXT quindi INSTALL Al temine della registrazione selezionare FINISH per terminare l installazione dei controlli Al termine dell intera procedura avviare nuovamente Internet Explorer e digitare l IP della telecamera che funzionerà corret tamente ...

Страница 23: ...eal Time audio bidirezionale monitoraggio controllo obiettivo PTZ Playback remoto 1 canale max Segnalazione allarmi Supporto stream principale e secondario Supporto visualizzazione multipla 1 4 9 16 canali Archiviazione immagini e registrazioni 4 7 2 Operatività applicazione Fseye Scaricare l applicativo dall APPSTORE o GOOGLEPLAY cercando il nome Fseye Dopo aver scaricato e installato l applicazi...

Страница 24: ... NAME quindi selezionare l icona QR Code e acquisire il QR code con lo smartphone tramite menu OSD del NVR System Setting Network Parameter Platform Icona QR Code oppure utilizzare l etichetta po sizionata sul contenitore del NVR dopo aver selezionato l icona del codice nell immagine sopra ...

Страница 25: ...316P8 Quick Guide 25 Dopo l acquisizione del codice sarà visualizzata la finestra a sinistra Selezionare OK Sarà visualizzata la schermata DEVICE LIST Selezionare l icona di un immagine per visualizzare la schermata a destra ...

Страница 26: ...re i parametri riportati sull etichetta nel riquadro nella seguente finestra NOTA IMPORTANTE PER L UTILIZZO DEL SERVIZIO DDNS E VISION Prima di iniziare la programmazione del DVR è necessario configurare correttamente il Router Biso gna cioè aprire sul Router le porte utilizzate dal DVR In altre parole si deve programmare una NAT tra l IP privato del DVR e l IP pubblico dinamico del Router sulla p...

Страница 27: ...e Italian Sarà visualizzata la finestra principale del software AREA 1 Tastidelmenuprincipale Anteprima Riproduzione Registro File Configurazione Uscita AREA 2 Elenco telecamere supportate e stream AREA 3 Controlli PTZ AREA 4 Controlli luminosità contrasto e preset AREA 5 Tasti Intercom Voc Acquisizione Schermo Intero Ferma Tutto Info Allarme Tasti per la modalità di visualizzazione canali AREA 6 ...

Страница 28: ...r ottimizzare la visualizzazione in funzione della banda disponibile Il flusso principale supporta 1080p 720p 960H D1 CIF QCIF ma la risoluzione può variare in base alle diverse impostazioni dei singoli canali Il flusso secondario supporta solo QCIF CIF ed è normalmente usato per connessioni in rete 4 12 AREA 3 Controlli PTZ Utilizzare le 8 frecce direzionali per direzionare la telecamera collegat...

Страница 29: ...ne di preset 4 14 AREA 5 Tasti Intercom Voc Acquisizione Schermo Intero Ferma Tutto Info Allarme Icone che indicano da sinistra a destra le funzioni Intercom Voc Acquisizione Schermo Intero Ferma Tutto Info Allarme 4 15 AREA 5 Tasti per la modalità di visualizzazione canali Tasti per selezionare le varie modalità di visualizzazione Nell ordine da sinistra a destra Schermo pieno 4 finestre 9 finest...

Страница 30: ...urre i video archiviati sui DVR Per ricercare il video da riprodurre selezionare il canale 1 la data 2 quindi RICERCA 3 i dati trovati saranno visualiz zati colorati in base al tipo di dato blu programmazione ecc Selezionare PLAY 4 per avviare la riproduzione I tasti in basso a sinistra corrispondenti al numero 4 indicano nell ordine PLAY STOP FW lento FW veloce SNAPSHOT BACKUP FRAME FULL SCREEN L...

Страница 31: ...re le selezioni desiderate quindi selezionare RICERCA per avviare la ricerca dei dati 4 16 4 Menu File Questa finestra consente di riprodurre i video archiviati sul PC Per ricercare il video da riprodurre selezionare l intervallo di tempo 1 la cartella 2 quindi il tasto RICERCA 3 i dati trovati saranno visualizzati nell area centrale 4 Selezionare PLAY per avviare la riproduzione 3 4 1 2 ...

Страница 32: ... 4 16 5 Menu Configurazione Questa finestra consente di configurare i parametri del DVR Per dettagli sulle funzioni fare riferimento al manuale tecnico 4 16 6 Menu Uscita Nella finestra principale selezionare USCITA per uscire dall applicazione ...

Страница 33: ...090061007 NVS308P8 NVS316P8 Quick Guide 33 Pagina bianca Blank page ...

Страница 34: ... and HDMI outputs and the 1080p Full HD HDMI output can be used to connect high definition large size monitors that mostly meet the requirements of control monitor centers that need to display all the cameras in the network full screen simultaneously The NVRs can be accessed and managed both from local PC Client site via LAN network Videosurveillance Client Softwa re and from a remote site via PC ...

Страница 35: ...ick Guide 35 STEP 3 STEP 4 STEP 5 Slide the DVR cover as indicated by arrows Wire cables as indicated in the images above Position the HDD in the arranged area and fix it from the outside with the screws through the dedicated holes ...

Страница 36: ...se connected to the unit 7 1 1 OSD menu access with mouse Connect the mouse USB mouse to one of the NVR ports available Mouse keys functions are illustrated below Move the cursor on the screen to display status and control icon bars Such bars will be displayed in the lower area Internal view with components positioned and correct wiring EXIT ENTER SETTINGS ...

Страница 37: ...Select START LOGIN to access OSD menu the following window will be displayed Select the correct user from the menu user USER or admin ADMIN then digit the password using the virtual keyboard Default admin Default 888888 We strongly recommend to change the default password ...

Страница 38: ...lect NEXT Select image resolution then select NEXT Select LAN 1 and network settings IP Subnet Mask and Gateway then select NEXT in models with firmware version lower than 1 1 5 identifiable from the Maintenance menu LAN 1 and LAN 2 are swapped LAN 1 IP address of customer s network card LAN 2 IP address of switch port network card ...

Страница 39: ...ick Guide 39 To read the device use a smartphone to scan the QR code using Fseye application The main OSD menu will be displayed NOTE If you wish to run the wizard again please select START GUIDE and run the guide again 1 2 3 4 5 6 ...

Страница 40: ...E ROUTER NUMBER 80 HTTP AND PORT NUMBER 554 RTSP 2 WHEN USING THE NVR WITHOUT ACTIVEX PLUGIN OPEN THE FOLLOWING PORTS ON THE ROUTER NUMBER 80 HTTP NUMBER 1935 RTMP AND NUMBER 554 RTSP 3 WHEN USING THE NVR ON A WAN NETWORK OR ON THE INTERNET WE RECOMMEND TO MODIFY DEFAULT PORT NUMBER 80 AND PORTS 1935 AND 554 AND ASSIGN PORTS NUMBER ABOVE 1024 4 WHEN USING FSEYE APPLICATION WITH DDNS STATIC IP SERV...

Страница 41: ...ras within the network on the right side cameras added to the NVR 1 How to add cameras automatically after having set correct parameters for cameras connection select Modify the IP address when add channel 4 for BCV300 BCM300 DCV300 DCM300 BCM500 DCM500 camera models select only I8H protocol filter 3 then SE ARCH 1 and ADD ALL 2 for previous Full HD camera models select only I8 protocol filter 3 t...

Страница 42: ...R internal switch or the customer network then start the search with SEARCH option 1 and use central arrows 5 to add cameras 7 3 Structures creation NVS300P8 NVR allows to generate structures that is preset layout sequences of cameras that can be recalled on the main window NOTE If in the column STATUS A the status of a connection is Connect Failed verify camera parameters below in Channel Paramet...

Страница 43: ...window will be displayed In DATE SELECT area B videos available for playback that is selectable will be indicated in blue colour To playback a video select the channel s A select the date in DATE SELECT area B it will be highlighted in red colour then select SEARCH C use the mouse to select the time on the bars below D use options in E area to select filters for your search In D area coloured bars...

Страница 44: ...ct START BACKUP H to save data 8 NVR SOFTWARE APPLICATION The NVRs can be accessed see the technical manual for more details 1 using smartphones with Fseye application 2 via IE browser using ACTIVEX or via any browser without using ACTIVEX 3 via browser using the e Vision DDNS service 4 setting a public static IP address for NVRs or using a different DDNS service No IP DynDns etc as a conse quence...

Страница 45: ...Select Strumenti Impostazioni Visualizzazione Compatibilità Tools Compatibility View Settings Add Speed Dome camera IP address to trusted sites list and select AGGIUNGI ADD NOTE the addition of the camera IP address is only recommended it is not indispensable for proper working of the system TOOLS ...

Страница 46: ...veX plugins See the following instructions to set the Internet security settings Open IE browser from the desktop icon or the Start menu Select Strumenti Opzioni Internet Tools Internet Options Select Strumenti Opzioni Internet Sicurezza Tools Internet Options Security TOOLS Draw cursor to lower protection level ...

Страница 47: ...erification https for all sites in this zone Now the ActiveX plugins can be installed 8 5 3 ActiveX installation Open IE browser from the desktop icon or the Start menu Digit camera IP address in the address bar top window Install ACTIVE X plugins to view the camera For the manual installation of ACTIVE X plugin select Downloading Active X Control Please click here Downloading Active X Control Ple...

Страница 48: ...48 Quick Guide NVS308P8 NVS316P8 090061007 For the automatic installation of ACTIVE X plugin select CONSENT The following window will be displayed Select INSTALL The following window will be displayed ...

Страница 49: ...308P8 NVS316P8 Quick Guide 49 Select NEXT then INSTALL At the end of the procedure select FINISH to close the installation of controls Restart IE browser and digit camera IP address the camera will now work properly ...

Страница 50: ... PTZ camera control Remote playback max 1 channel Alarm warning Primary and secondary stream support Multiple visualization support 1 4 9 16 channels Image and recording storage 8 7 2 Fseye operativity Download the Fseye application from the APPSTORE or from GOOGLEPLAY After downloading and installing the application you will start at the login screen on the left Choose LOCAL ACCESS to see the lis...

Страница 51: ...name in the corresponding field then select the icon that is circled in the image above and use the phone camera to scan the QR code available in the OSD menu of the NVR System Setting Network Parameter Platform Icona QR Code or on the label placed on the housing of the NVR ...

Страница 52: ...2 Quick Guide NVS308P8 NVS316P8 090061007 Once the code is acquired the screen on the left will be shown Select OK The DEVICE LIST will be shown Select any image icon to visualize the screen on the right ...

Страница 53: ...VR digit label data in the red square above in the following menu window IMPORTANT NOTE FOR THE USE OF E VISION DDNS SERVICE Before proceeding with the NVR setup the correct configuration of the router is required It will be necessary to open the router ports used by the DVR that is to configure a NAT between the NVR private IP and the router public dynamic IP on the port required For the NAT a TC...

Страница 54: ...me admin password 888888 In Language field select English The software main window will be displayed AREA 1 Main menu functions Preview Playback Log File Configuration Exit AREA 2 Playback stream management AREA 3 PTZ controls AREA 4 Brightness contrast and preset controls AREA 5 Controlli Intercom Voc Capture Full Screen StopAll Alarm Info Camera display format controls AREA 6 Cameras display are...

Страница 55: ...a main or extra and recording mode for the stream se lected Select Main Stream Extra Stream to optimise images display according to the bandwidth available 8 12 AREA 3 PTZ controls Use the wheel 8 arrows to pan tilt the camera connected to the selected input Use the centre key for automatic positioning of the camera Use controls on the right to increase and decrease Zoom Focus Iris Move cursor on ...

Страница 56: ...rast and to set cancel call a preset position 8 14 AREA 5 Intercom Voc Capture Full Screen StopAll Alarm Info Audio Keys indicating left to right Intercom Voc Capture Full Screen StopAll Alarm Info and Audio functions 8 15 AREA 5 Cameras display modes Keys to select cameras display modes Left to right full screen 4 windows 9 windows 16 windows ...

Страница 57: ...to the NVR To search videos select the channel 1 the date 2 then RICERCA SEARCH 3 the data found will be displayed with different colours according to data type blue configuration etc Select PLAY 4 to start data playback Icons at number 4 in above window indicates from left to right PLAY STOP Slow FW Fast FW SNAPSHOT BACKUP FRAME FULL SCREEN FRAME option indicates that the video will be played one...

Страница 58: ...rea on the right Select the necessary options then select RICERCA SEARCH to start data search 8 16 4 Menu File File This window allows to playback videos saved to the PC To search videos select time interval 1 and searching folder 2 then select RICERCA SEARCH 3 the data found will be displayed in the central area 4 Select PLAY to start data playback 3 4 1 2 ...

Страница 59: ... 8 16 5 Menu Configurazione Configuration This window allows to configure NVR parameters For more details on the window options see technical manual 8 16 6 Menu Uscita Exit On the main window menu bar select USCITA EXIT to close the application ...

Страница 60: ...v Made in China 090061007 Le informazioni e le caratteristiche di prodotto non sono impegnative e potranno essere modificate senza preavviso The information and product features herein are not binding and may be changed without prior notice EL MO SpA Via Pontarola 70 35011 Campodarsego PD Italy Tel 390499203333 R A Fax 390499200306 Help desk 390499200426 www elmospa com info elmospa com ...

Отзывы: