


32
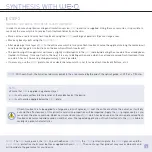
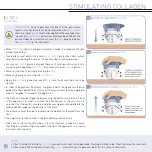
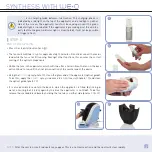
STIMULATING COLLAGEN SYNTHESIS WITH
y
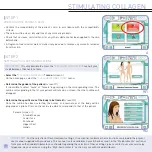
STEP 1
PREPARING THE PATIENT’S SKIN
• Confirm the compatibility of the patient’s skin, in accordance with the compatibility
criteria.
• The skin must be clean, dry and free of any cosmetic products.
• Check that no cream, moisturizer, oil or any other substance has been applied to the skin
beforehand.
• A fragrance-free micellar water solution may be used to remove any cosmetic residues
from the skin.
y
STEP 2
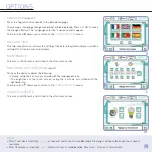
SETTING UP COLLAGEN STIMULATIONE
IMPORTANT:
It is only possible to access the “
COLLAGEN STIMULATION
” menu if your
credit balance of flashes is not zero.
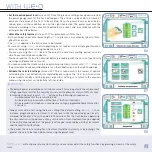
• Select the “
COLLAGE STIMULATION
” menu (screen
A
)
On the home page, select the “
COLLAGEN STIMULATION
” menu.
• Determine the gender of the patient (screen
W1
)
It is possible to select “male” or “female” by pressing on the corresponding icons. The
outline corresponding to that of your patient will remain on screen; the other outline will
disappear.
• Determine the specific area of the body to be treated (screen
W2
)
Once the outline has been selected, the names of 4 main areas of the body will be
proposed as options. Press on the main area which corresponds to that of the patient.
Female (screen
T
):
Around the eyes
Lower face
Forehead
Upper chest
Hands
A
W1
W2
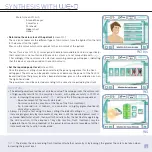
IMPORTANT:
For the selection of flash treatment settings, it is essential to observe the instructions contained in the present
user manual supplied with your device. This manual is also available on your E-Swin account, in the “My documents” section or
from your authorised distributor.In case of doubt regarding the selection of these settings, please contact our sales service by
telephone, via your account, using the “My E-Swin contacts” section or your authorised distributor.
Содержание WE-O
Страница 1: ...User Manual...
Страница 17: ...17 17 BY TOUCH SCREEN...
Страница 18: ......
Страница 19: ......
Страница 38: ......
Страница 39: ......
Страница 55: ......
Страница 63: ...63 CONTACT commercial e swin com www e swin com FOR REQUESTS ABOUT AFTER SALES SERVICES OR SPARE PARTS CONTACT...
Страница 64: ...www e swin com Ref M030GB000C13A...