


EN
ENTER 40
31
6
DVB-S Operation
6.1
First Time Installation
Press “Source Key” on your remote control to open source menu. With
/
keys select DVB-S2 Mode and confirm with OK. A program list of Astra 19.2 is
preinstalled.
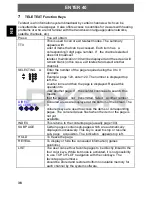
6.2
Satelliten Managment
Configure the settings of satellites and confirm with OK.
Satellites' list:
Press
/
to select a satellite, whose settings will be shown at
right side.
LNB Type
Press
/
/
OK
to show the list of LNB Types which is
shown as frequencies of local oscillator. You also can enter
frequency by User Single, User Dual at bottom of the list.
LNB Power
Press
/
to set the LNB power
22K
Press
/
to switch on or off the 22K, which is set with
auto when LNB Type is dual local oscillator.
Toneburst:
Enable or Disable the toneburst switcher.
DiSEqC1.0:
Select the right port up to 4 for the right LNB.
DiSEqC1.1:
Select the right port up to 16 for the right LNB.
Motor:
Press LEFT/RIGHT to select DiSEqC1.2 or DiSEqC1.3.
Then Press OK to show the menu to set position.
DiSEqC1.2:
Move the motor to a right position to lock the signal.
DiSEqC1.3:
Move the motor according to the local and satellite
positions.
Motor Settings:
(Select DiSEqC and press OK to open)
Move Auto:
Press LEFT/RIGHT to start to move West/East. It will be
stopped automatically when the signal is locked.
Move
Continue:
Press LEFT/RIGHT to start to move West/East. It will keep
moving until you stop it.
Move
Step[1]:
Press LEFT/RIGHT to move just a step.
Store
Position:
Store current position of motor.
Goto
Position:
Press LEFT/RIGHT to goto the position stored.
Goto
Reference:
Rest all the positions.
Goto X: goto the position calculated from the local and satellite
positions.


