background image

6

Features

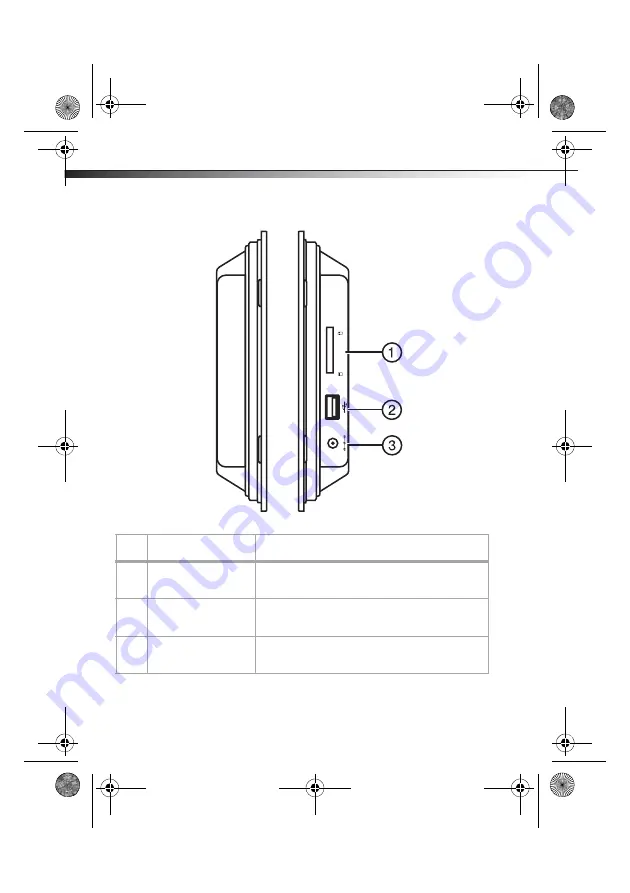
Side views

#

Slot/Port/Jack

Description

1

Memory card slot

Insert an SD, SDHC, MMC, MS, or xD memory card 
(not provided) into this slot to view pictures.

2

USB port

Insert a USB flash drive (not provided) into this 
port.

3

DC 5 V jack

Plug the AC


adapter (provided) into this jack to 

provide power to your digital picture frame.

M

S

DC

V

5

SD/MMC/XD

09-0442 DX_DPF7-10_MAN_ENG_V1.fm  Page 6  Tuesday, July 7, 2009  3:00 PM

Содержание DX-DPF7-10

Страница 1: ...7 Digital Picture Frame DX DPF7 10 USER GUIDE 09 0442 DX_DPF7 10_MAN_ENG_V1 fm Page 1 Tuesday July 7 2009 3 00 PM...

Страница 2: ...day limited warranty 21 Introduction Congratulations on your purchase of this Dynex 7 Digital Picture Frame Your DX DPF7 10 is designed for reliable and trouble free performance Important safety inst...

Страница 3: ...manufacturer or sold with the device When a cart is used use caution when moving the cart device combination to avoid injury from tip over 12 Unplugthisdeviceduringlightningstormsorwhenunused for lon...

Страница 4: ...sameorequivalenttype Features Package contents Digital picture frame AC adapter Remote control with CR2025 battery UserGuide QuickSetupGuide Controls and connections Top view Button Description 1 POWE...

Страница 5: ...opy a picture from an inserted memory card into the frame s internal memory or to delete a picture from the frame s internal memory 5 ROTATE down Press to navigate down in the on screen menus or to ro...

Страница 6: ...d not provided into this slot to view pictures 2 USB port Insert a USB flash drive not provided into this port 3 DC 5 V jack Plug the AC adapter provided into this jack to provide power to your digita...

Страница 7: ...utton Description 1 MENU Press to enter the Setup Menu screen 2 EXIT Press to return to the Main menu On the Main menu press to enter the CardSelection screen 09 0442 DX_DPF7 10_MAN_ENG_V1 fm Page 7 T...

Страница 8: ...or to go to the next picture Press up to navigate up in the on screen menus Press down ROTATE to navigate down in the on screen menus or to rotate a picture 4 MODE ENTER In picture mode press to toggl...

Страница 9: ...to the right and pull the battery tray out of the remote control 3 If this is the first time you will be using the remote control remove the insulation sheet that covers the battery OR Ifyouarereplac...

Страница 10: ...Doinganyofthesethingsmaycause thebatterytogive offheat crack orstartafire Donotleavethebatterywithothermetallicmaterials Doingthismaycausethebatterytogiveoffheat crack or startafire Whenthrowingawayor...

Страница 11: ...ter To connect the AC adapter 1 Complete all other connections 2 Plug the small DC power connector into the DC 5V jack on the side of your digital picture frame then plug the other end into an AC powe...

Страница 12: ...a horizontal or a vertical position Makesurethatthestandisrotatedtoapositionindicated on the back of the frame in order to ensure stability Your frame can also be wall mounted Please use the slots on...

Страница 13: ...your digital picture frame 1 Press EXIT The Mainmenu opens 2 Press or to highlight the SETTING icon then press MODE ENTER The Setupmenuopens 3 Press or to highlight an option then press MODE ENTER to...

Страница 14: ...e used No Effect Cover Up Cover Down Cover Left and Cover Right OSD Language Select the language to be used for theon screendisplay YoucanselectEnglish French or Spanish The default language is Englis...

Страница 15: ...en inserted then the slideshow will be of pictures stored in the inserted media 2 Press EXIT until the card selection screen appears then press LEFT or RIGHT to select the source you want to play and...

Страница 16: ...lected Copying and deleting pictures To copy pictures to your frame 1 Insert a memory card or USB device into your frame A slideshow a pictures from the inserted media begins 2 Locate the picture you...

Страница 17: ...bleshooting Problem Solution The frame won t turn on Make sure that the AC adapter is inserted properly into the frame A memory card is inserted in your digital picture frame but pictures cannot be vi...

Страница 18: ...plastic shipping tab has been removed from the remote s battery compartment Make sure you are aiming the remote at the sensor located in the middle of the frame If youare still having problems replac...

Страница 19: ...mful interference in a residential installation This equipment generates uses and can radiate radio frequency energy and if not installed and used in accordance with the instructions may cause harmful...

Страница 20: ...leton a circuit different from that to which the receiver is connected Consult the dealer or an experienced radio TV technician for help FCC warning Changes or modifications not expressly approved by...

Страница 21: ...gewith new or rebuilt comparable products or parts Products and parts replaced under thiswarrantybecomethepropertyofDynexandarenotreturnedtoyou Ifservice ofProductsandpartsarerequiredaftertheWarrantyP...

Страница 22: ...service the Product Products sold as is or with all faults Consumables such as fuses or batteries Products where the factory applied serial number has been altered or removed REPAIR REPLACEMENT AS PRO...

Страница 23: ...TATE TO STATE OR PROVINCE TO PROVINCE Contact Dynex For customer service please call 1 800 305 2204 www dynexproducts com Distributed by Best Buy Purchasing LLC 7601 Penn Avenue South Richfield Minnes...

Страница 24: ...U S A 2009 Best Buy Enterprise Services Inc All rights reserved DYNEX is a trademark of Best Buy Enterprise Services Inc Registered in some countries All other products and brand names are trademarks...

Отзывы: