background image


Parametric EQ (Output Channels) 

Pressing the PEQ button places the current 

preset in Edit mode and jumps 

The LCD screen to a pre-selected 

parametric EQ (bands 1-5). Subsequent 

button presses advances the display to the 

next output channel (OUT1 to OUT6). Use the <SELECT > key to navigate 

between the PARA EQ BAND (1-5), Type, Frequency, Q and Gain parameters. 

Adjust the values of each parameter using the up/down VALUE arrows. 

 Output 1-6 Parametric EQ


Band 

Type 

Frequency

Slope

Resp / Q 

 Gain

PARA EQ BAND 1-5 

LOSLV 

20Hz - 20000Hz


HISLV 

20Hz - 20000Hz


For detailed 

6dB/oct.


12dB/oct.


6dB/oct.


12dB/oct.


-15.0dB to +15.0dB


-15.0dB to +15.0dB


EQ plot im- 

PEQ 

20Hz - 20000Hz 

0.40 to 20 

-15.0dB to +15.0dB


ages please 
see page 45 

LOPASS 

20Hz - 20000Hz


HIPASS 

20Hz - 20000Hz


ALLPS1 

20Hz - 20000Hz


6dB/oct.


12dB/oct. 

0.40 to 2.00


6dB/oct.


12dB/oct. 

0.40 to 2.00


ALLPS2 

20Hz - 20000Hz 

0.40 to 2.00


Delay  (Output Channels) 

DSP 260’s output delays can be applied to 

output channels OUT1 - OUT6 and can be 

used to compensate for the positioning of 

cabinets or speaker arrays relative to each 

other or the original sound source. 

The Delay parameter determines the delay 

time of the corresponding channel or the 

distance between different loudspeaker 

clusters. The delay time or physical 

distance is displayed in milliseconds, 

microseconds, feet, inches, meters, or 

centimeters. 


To access the Delay screen, press the 

Delay button found on the output 

processing menu. Subsequent button 

presses will toggle the display between 

OUT1 to OUT6. Use the <SELECT> key to 

navigate between Delay (-200.00ms to 

700.00ms) and Bypass (on/off). The 

values for each parameter can be adjusted 

using the up/down VALUE arrows. 

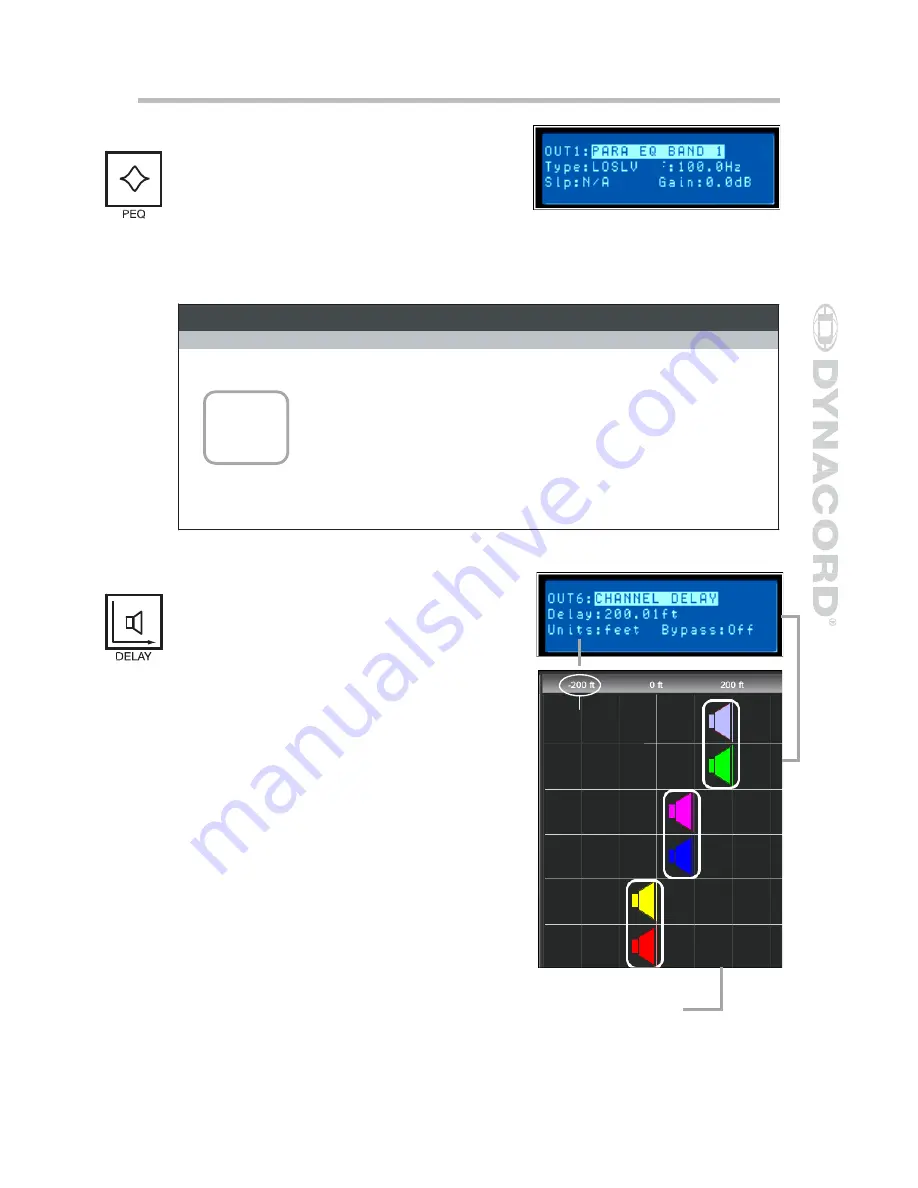
Here we have Units set 
to Feet to describe 
physical distance be- 
tween devices.


2


1


4


3


6


5


Here Output 5 and 6 are linked and their delay is set to 200 feet. Output 3 and 4 are 
also linked and set to 100 feet. In this configuration, speaker outputs 5 and 6 are said to 
be 200 feet in front of Main speaker output array 1 and 2. The effect of air temperature 
on the actual delay time will also be automatically calculated based on the Temperature 
Parameter in the Setup Menu.  See Output Linking. 

31 

Owners Manual


Содержание DPS260

Страница 1: ...Owner s Manual...

Страница 2: ...www dynacord com...

Страница 3: ...lled with liquids such as vases are placed on the equipment 15 To completely disconnect this equipment from the AC Mains disconnect the power plug from the AC receptacle 16 The mains plug of the power...

Страница 4: ...stment 18 Editing Operation 19 Factory Presets 19 User Presets Standard Editing 19 User Preset Full Editing 19 Unpacking Warranty 19 Run time Mode 20 LCD Display 20 Input Level Meters 20 Output Level...

Страница 5: ...onfigurations of the DSP 260 37 List and Detailed Descriptions 37 Stereo 2 Way Full Range 38 3 Way Stereo 39 4 Way FR 40 5 Way FR 41 Free Configuration Full Edit 2 in 6 Out 42 3 Way Stereo Mono Sub FR...

Страница 6: ...Overview Compare Edit Input Meters Display Value Select Buttons Dynacord DSP 260 Program U01 FullEdit 2in 6out Edit Setup Store Recall USB Port Setup Store Recall 6...

Страница 7: ...Output Gain Reduction Meters Out put Channel Function Indicators and Output Level Meters HPF PEQ GEQ Delay X Over PEQ Delay Level Mute Mute Mute Mute Mute Mute Output Control buttons for Cross Over P...

Страница 8: ...ono full range 3 way stereo with a mono sub full range 4 way stereo with mono sub and low frequency and finally as a freely assignable 2 x 6 matrix router The DSP 260 replaces entire racks of signal p...

Страница 9: ...for recall of up to eight selectable presets Front panel USB port for connection to PC preset editing and real time parameter control and monitoring Firmware updates FLASH memory for preset storage a...

Страница 10: ...e performance is obtained when the nominal average input level consistently lights the 3dBu green and or 6dBu Yellow LED indicators As the DSP 260 is a digital audio device and digital clipping produc...

Страница 11: ...e original un edited preset This compare function will audibly switch between the altered parameters and the previously stored settings allowing you to hear the effect of any DSP changes that have bee...

Страница 12: ...een 12 Input HPF Button Pressing the HPF button places the current preset in Edit mode and jumps to the Hi Pass Filter screen of Input A Subsequent button presses toggle the display between Input A an...

Страница 13: ...understand how the meters work and what they are displaying The Output Meters are displayed as dB to Limiter Threshold In other words these meters will display the headroom between the output level a...

Страница 14: ...re fuse If necessary replace the fuse only with a specified 5x20mm T800mA L250V replacement Disconnect A C power before replacing a fuse Before turning the unit back on assess the condition of the A C...

Страница 15: ...110 Ohm twisted pair cabling and an XLR connector 30 Balanced XLR Thru Each analog audio input is connected to an electronically buffered and balanced output as a through connector The signal does not...

Страница 16: ...by the dealer installer to match the configuration of your country or region The DSP 260 must only be connected to a properly wired three pin grounded A C outlet A C power must range from 100 240VAC 5...

Страница 17: ...female to female RS232 cable that conforms to the null modem wiring convention is used to connect the two units Cable length should be kept to less than 45 feet 15m for the most reliable operation The...

Страница 18: ...vel Adjustment The final step in setting up installing and connecting the DSP 260 is to set proper input levels to the unit The DSP 260 does not itself have input level controls Proper input level set...

Страница 19: ...reset locations for later recall Editing can be performed from the front panel LCD display or on a PC with the DSP 260 Editor Graphic User Interface Application Full editing is recommended only for ex...

Страница 20: ...e nominal average input level consistently lights the 3dBu green and or 6dBu yellow LED indicators As the DSP 260 is a digital audio device and digital clipping produces very unpleasant results the Cl...

Страница 21: ...ange is indicated by no lit LED s Preset Recall The DSP 260 preset memory provides 60 factory program presets and can store up to 20 user presets Recall F01 F60 U01 U20 Factory presets have been desig...

Страница 22: ...lect an empty location or a location of a preset that will be over written Press the Select buttons to navigate down to the preset name field Use the Value Up and Down buttons to select the field for...

Страница 23: ...dless of the configuration selected Any parameter can be changed without any effect on other parameter values PROCESSING MENUS Regardless of the edit mode selected there are two means to enter edit mo...

Страница 24: ...usic can be limited to frequencies above 60 Hz and voice only reproduction is limited to much higher frequencies Hi pass filter applications and settings will be determined by the needs of the given D...

Страница 25: ...ss any band of the DSP 260 s Input PEQ multi mode filter bank set the desired band s gain to 0 0dB This will have the effect of bypassing the selected filter band The following section details the typ...

Страница 26: ...equencies that are affected by the filter Use the Select buttons to navigate to the filter setting you wish to adjust and the Value Up and Down buttons to alter these settings Press the Value Up and D...

Страница 27: ...The slope determines how quickly frequencies below that will be attenuated See response curve Use the Select buttons to navigate to the filter setting you wish to adjust and the Value Up and Down but...

Страница 28: ...band s fader up or down To exit the Input GEQ edit screen press the Input GEQ button use the Select buttons to again highlight the top line of the edit screen display or press any other DSP block but...

Страница 29: ...frequencies to the appropriate drivers to accurately reproduce sound The crossover network can also be used to insure that low frequency energy is not accidently routed to the mid range or tweeter dr...

Страница 30: ...onding Lo Pass frequency parameter depending on the Configuration that is currently being used High pass frequencies are set with a pre determined frequency that attenuates frequencies below the cross...

Страница 31: ...r the positioning of cabinets or speaker arrays relative to each other or the original sound source The Delay parameter determines the delay time of the corresponding channel or the distance between d...

Страница 32: ...ected amplifiers Because different amplifiers can have different sensitivities it is common to need to calculate the limiter offset to a factory preset based on the amplifier sensitivity The DSP 260 o...

Страница 33: ...it VALUE Setup Store Recall Setup Menus Configuration Configuration window is where you can select the desired setup for your system Use the SELECT key to navigate to the Mode parameter to choose the...

Страница 34: ...he MODE parameter Use the up down VALUE arrows to choose between Normal Fast Peak Hold and Slow Decay Temperature This parameter is used to calculate the speed of sound for converting delay times into...

Страница 35: ...e system settings from being modified by a user This can be set from the front panel or from the GUI software From the front panel Use the SELECT key to navigate to the Lock menu Use the VALUE key to...

Страница 36: ...peration Use the SELECT key to navigate to the MODE parameter and use the up down VALUE arrows to choose between RS 232 and Contacts Contacts allow control messages to select individual presets per pi...

Страница 37: ...nal filters which can be used as parametric EQs Low High shelving filters or Lo Pass and Hi Pass filters and also as All Pass filters In addition to a gain control for adjusting the output level and a...

Страница 38: ...put OUT 4 and OUT 5 are the corresponding right Low frequency and High frequency output channels Note On Input channels all Parametric EQ and Graphic EQ parameters are linked For Output channels linki...

Страница 39: ...channels 3 6 L R are the High frequency channels Note On Input channels all Parametric EQ and Graphic EQ parameters are linked For Output channels linking applies to Crossovers EQ Delay Level and Limi...

Страница 40: ...hannel and OUT 4 is the mono High frequency OUT 5 and OUT 6 are Full range channels Note On Input channels all Parametric EQ and Graphic EQ parameters are not linked For Output channels linking applie...

Страница 41: ...id Frequency channel OUT 5 is the mono High frequency channel and OUT 6 is the Full range channel Note On Input channels all Parametric EQ and Graphic EQ parameters are not linked For Output channels...

Страница 42: ...IN 2 This configuration provides a blank slate for creating any custom routing and processing application Note In this Configuration no channels or parameters are linked Right Left IN B IN A B IN A B...

Страница 43: ...channels OUT 3 6 are L R High frequency channels and OUT 4 is the Full range channel Note On Input channels all Parametric EQ and Graphic EQ parameters are linked For Output channels linking applies t...

Страница 44: ...UT 3 is the left Mid frequency channel OUT 4 is the left High frequency channel OUT 5 is the right Mid frequency channel and OUT 6 is the right High frequency channel Note On Input channels all Parame...

Страница 45: ...45 Owners Manual EQ Plot Images 6dB PEQ Cuts Q Changes 6dB Oct Shelves at 200Hz and 2kHz...

Страница 46: ...46 12dB PEQ Cuts Q Changes 12dB Oct Shelves at 200Hz and 2kHz...

Страница 47: ...47 Owners Manual Bessel Filters Butterworth Filters...

Страница 48: ...48 Hi Lo Pass Filters Linkwitz Riley Filters...

Страница 49: ...49 Owners Manual PEQ Gains...

Страница 50: ...vel Limiter Limiter Limiter Limiter Limiter Limiter Input A Input B Out 1 Link Out 2 Link Out 3 Link Out 4 Link Out 5 Link Out 6 Source Bandpass Source Bandpass Source Bandpass Source Bandpass Source...

Страница 51: ...el Level Limiter Limiter Limiter Limiter Limiter Limiter Input A Input B Out 1 Link Out 2 Link Out 3 Link Out 4 Link Out 5 Link Out 6 Source Bandpass Source Bandpass Source Bandpass Source Bandpass So...

Страница 52: ...Dimensions 483mm 19in 43 6mm 1 72in 441mm 17 36in WARNING AVIS CAUTION ATTENTION 357mm 14in 353mm 13 9in 43mm 1 69 52...

Страница 53: ...ically balanced Nominal Output Voltage 1 23 V 4 dBu Maximum Output Voltage 8 7 V 21 dBu Output Impedance 50 ohm D A Conversion 24 Bit Sigma Delta Frequency Response 10 Hz 22 kHz 0 5 dB THD N 0 01 band...

Страница 54: ...Notes 54...

Страница 55: ...1 6006 5103 Asia Pacific Rim Headquarter Asia Singapore Telex Communications SEA Pte Ltd 38C Jalan Pemimpin Singapore 577180 Tel 65 6319 0621 Fax 65 6319 0620 Japan EVI Audio Japan Ltd 5 3 8 Funabash...

Страница 56: ...EVI AUDIO GmbH Subject to change without prior notice Printed in Germany 27 05 2008 www eviaudio de www dynacord com...

Отзывы: