background image

3


CAUTION

Please read and understand this entire manual before attempting to assemble, operate or install 

the product. If you have any questions regarding the product, please call customer service at: 

1-877-447-4768, 8:00a.m. - 4:30 p.m., CST, Monday – Friday.

• DO NOT use this product for anything other than its intended purpose. It is NOT intended for   

  commercial use. It is NOT intended to be installed or used in or on a recreational vehicle and/    

  or boat.

• In the event of an oil or grease fire, do not attempt to extinguish with water. Immediately call    

  the fire department. A Type BC or ABC fire extinguisher may, in some circumstances contain    

  the fire. 

• This appliance is for outdoor use only in well-ventilated areas. DO NOT operate it in a building,  

  garage or any other enclosed area, or under overhead construction.

• A minimum clearance of 10 ft (3048 mm) to combustible material is required on the front, sides  

  and back. It is very important to always maintain proper clearances to combustibles.

• DO NOT obstruct the flow of combustion air/or ventilation air for the appliance.

• When cooking, the griddle must be on a level, stable noncombustible surface in an area clear  

  of combustible material, including long or dry grass.

• Before each use check that no dead leaves or debris are under the appliance.

• Store this appliance in a dry, protected location.

• The use of alcohol, prescription or nonprescription drugs may impair the user’s ability to  


  properly assemble and safely operate this appliance.

• Allow the griddle to cool to 115°F (45°C) before moving or storing. Use caution when lifting and  

  moving the appliance to avoid back strain or back injury. DO NOT move the appliance while it  

  is in use.

SAFETY

Содержание DGL260CNP

Страница 1: ...Number _____________________________ Purchase Date ______________________ Questions problems missing parts Before returning to your retailer call our customer service department at 1 877 447 4768 8 0...

Страница 2: ...ended 2 Never operate this appliance within 10 feet 3 m of any structure combustible material or other gas cylinder 3 Never operate this appliance within 25 feet 7 5 m of any flammable liquid 4 Never...

Страница 3: ...arage or any other enclosed area or under overhead construction A minimum clearance of 10 ft 3048 mm to combustible material is required on the front sides and back It is very important to always main...

Страница 4: ...and its components to cool completely before conducting any routine cleaning or maintenance This griddle is designed only to be used with a 1 lb 16 4 oz disposable propane cylinder with a CGA 600 con...

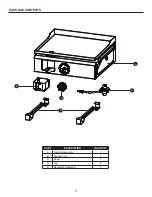
Страница 5: ...5 PACKAGE CONTENTS PART DESCRIPTION QUANTITY A Firebox Assembly 1 B Grease Cup 1 C Knob 1 D Leg 2 E Regulator Assembly 1 E D A B C...

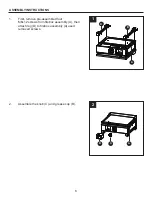
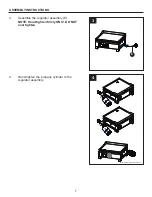
Страница 6: ...EMBLY INSTRUCTIONS 1 First remove pre assembled four M6x12 screws from firebox assembly A then attach leg D to firebox assembly A used removed screws 2 Assemble the knob C and grease cup B 2 1 D D A A...

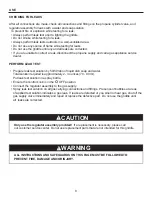
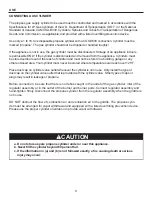
Страница 7: ...SSEMBLY INSTRUCTIONS 3 Assemble the regulator assembly E NOTE Hand tighten firmly ONLY DO NOT over tighten 4 Hand tighten the propane cylinder to the regulator assembly 3 4 E Must not be removed on th...

Страница 8: ...50 50 ratio of liquid dish soap and water Total solution required is approximately 2 3 ounces 70 90 ml Put leak test solution in a spray bottle Ensure the control knob is in the O OFF position Connect...

Страница 9: ...st never be stored where temperatures can reach over 125 F Place dust cap on cylinder valve outlet whenever the cylinder is not in use Only install the type of dust cap on the cylinder valve outlet th...

Страница 10: ...S AND SAFEGUARDS ON THIS PAGE MUST BE FOLLOWED TO PREVENT FIRE DAMAGE AND OR INJURY WARNING In the connection process make sure the regulator assembly inlet connector mates with the cylinder valve out...

Страница 11: ...rol knob counterclockwise from off position past the ignite position to the high position You may need to repeat several times to ignite the burner If ignition does not occur in 5 seconds turn the con...

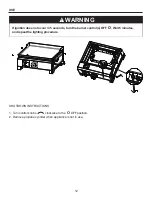
Страница 12: ...rn control knobs clockwise to the O OFF position 2 Remove propane cylinder when appliance is not in use If ignition does not occur in 5 seconds turn the burner control s OFF O Wait 5 minutes and repea...

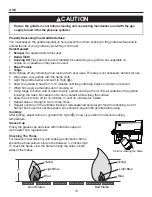
Страница 13: ...d oil is recommended for seasoning your griddle but vegetable oil canola oil or sesame oil may also be used Paper Towels Tongs Note Scrape off any remaining food residue from prior uses This step is n...

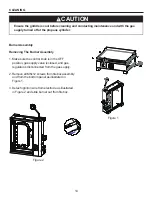
Страница 14: ...om the gas supply 2 Remove all M6x12 screws from firebox assembly and from the bottom panel as illustrated in Figure 1 3 Detach ignition wire from electrode as illustrated in Figure 2 and slide burner...

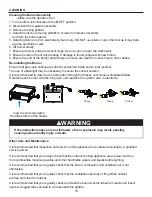
Страница 15: ...rebox vent holes as illustrated below Reattach each burner with the hinge pin and reattach the ignition wire to electrode WARNING If the instructions above are not followed a fire or explosion may res...

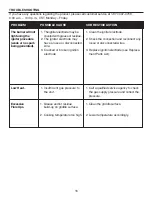
Страница 16: ...grease or residue 2 The igniter electrode may have a loose or disconnected wire 3 Cracked or broken ignition electrode 1 Insufficient gas pressure to the unit 1 Grease and or residue build up on grid...

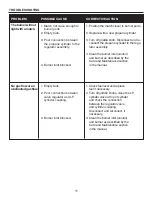
Страница 17: ...h closer to burner ports 2 Replace with a new propane cylinder 3 Turn off griddle knob Disconnect and re connect the propane cylinder to the regu lator assembly 4 Clean the burner inlet venturi and bu...

Страница 18: ...ht etc will be the responsibility of the consumer All warranty claims apply only to the original purchaser and require a proof of purchase verifying purchase date Do not return parts without first obt...

Страница 19: ...19 REPLACEMENT PARTS LIST 3 2 1 4 5 7 6 8 9 11 10...

Страница 20: ...bly 70 02 741 3 Burner Sparker 70 02 742 4 Firebox Assembly 70 02 743 5 Leg 70 02 744 6 Valve assembly 70 02 745 7 Regulator assembly 70 02 746 8 Control Panel Stainless Steel DGL260SNP DGL260SNP D 70...

Страница 21: ...e _____________________________ Date d achat ______________________ Questions probl mes pi ces manquantes Avant de retourner l article au d taillant appelez notre service la client le au 1 877 447 476...

Страница 22: ...rmez l alimentation en propane 5 Les liquides chauff s restent une temp rature pouvant causer des br lures longtemps apr s la cuisson Ne touchez jamais l appareil de cuisson avant que les liquides n a...

Страница 23: ...a r N UTILISEZ PAS cet appareil dans un b timent un garage ou tout autre espace ferm ou sous des constructions Le d gagement minimal entre l appareil et tout mat riau combustible sur les c t s l avant...

Страница 24: ...proc der au nettoyage et l entretien habituels de l appareil La plancha est con ue pour tre utilis e uniquement avec une bouteille de propane jetable de 1 lb 16 4 oz munie d un raccordement no 600 app...

Страница 25: ...25 CONTENU DE L EMBALLAGE PI CE DESCRIPTION QUANTIT A Chambre de combustion 1 B R cup rateur de graisse 1 C Bouton 1 D Pied 2 E R gulateur 1 E D A B C...

Страница 26: ...Retirez d abord les quatre vis M6 x 12 mm pr assembl es de la chambre de combustion A puis fixez le pied D la chambre de combustion A l aide des vis retir es 2 Assemblez le bouton C et le r cup rateu...

Страница 27: ...EMBLAGE 3 Assemblez le r gulateur E REMARQUE Serrez fermement la main SEULEMENT NE SERREZ PAS trop 4 Fixez la bouteille de propane au r gulateur en serrant la main 3 4 E Ne retirez jamais la bouteille...

Страница 28: ...it gale de savon vaisselle liquide et d eau pour effectuer l essai d tanch it La quantit totale de solution requise est d environ 70 90 ml 2 ou 3 oz Versez la solution dans un flacon pulv risateur Ass...

Страница 29: ...e doit jamais tre entrepos e dans un lieu o la temp rature peut atteindre plus de 51 5 C 125 F Placez un capuchon antipoussi re sur la sortie de vanne de la bouteille quand celle ci n est pas utilis e...

Страница 30: ...DOIVENT TRE SUIVIES POUR VITER UN INCENDIE DES D G TS ET DES BLESSURES Lors du raccordement de la bouteille de propane assurez vous que le raccord d admission du r gulateur est correctement connect la...

Страница 31: ...osition de haute intensit Vous devrez peut tre r p ter cette tape plusieurs fois pour allumer le br leur S il ne s allume pas en 5 secondes mettez le bouton de commande en position d arr t O attendez...

Страница 32: ...appareil n est pas utilis Si l allumage ne se produit pas en 5 secondes mettez le bouton de commande en posi tion d arr t O Attendez cinq minutes et recommencez la proc dure d allumage AVERTISSEMENT A...

Страница 33: ...t Pinces Remarque Retirez tous les r sidus d aliments provenant d utilisations ant rieures Cette tape n est pas n cessaire avant la premi re utilisation Essuyez votre plancha avec le chiffon humide Al...

Страница 34: ...n 2 Retirez toutes les vis M6 x 12 mm de la chambre de combustion et du panneau inf rieur comme illustr la figure 1 3 D tachez le fil d allumage de l lectrode comme illustr la figure 2 et faites gliss...

Страница 35: ...rrect Incorrect Correct AVERTISSEMENT Nettoyer le br leur Assurez vous que la plancha est froide 1 Tournez le bouton de commande dans le sens horaire jusqu la position d arr t O 2 D connectez le r gul...

Страница 36: ...de l allumeur peut avoir un fil l che ou mal raccord 3 L lectrode d allumage est fissur e ou bris e 1 La pression d alimentation de gaz de l appareil est in suffisante 1 Il y a une accumulation de gra...

Страница 37: ...nouvelle bouteille 3 Tournez le bouton de la plancha en po sition d arr t D connectez la bouteille de propane du r gulateur et reconnec tez la 4 Nettoyez l orifice du br leur venturi et le br leur en...

Страница 38: ...du consommateur Toutes les r clamations sous garantie s appliquent uniquement l acheteur initial du produit et n cessitent une preuve d achat qui indique la date d achat Ne retournez aucune pi ce san...

Страница 39: ...39 LISTE DES PI CES DE RECHANGE 3 2 1 4 5 7 6 8 9 11 10...

Страница 40: ...70 02 741 3 Allumeur du br leur 70 02 742 4 Chambre de combustion 70 02 743 5 Pied 70 02 744 6 Vanne 70 02 745 7 R gulateur 70 02 746 8 Panneau de contr le Acier inoxydable DGL260SNP DGL260SNP D 70 02...

Страница 41: ..._____________ Fecha de compra ______________________ Preguntas problemas piezas faltantes Antes de volver a la tienda llame a nuestro De partamento de Servicio al Cliente al 1 877 447 4768 de 8 00 a m...

Страница 42: ...el suministro de gas 5 Los l quidos calentados permanecen a temperaturas muy calientes mucho tiempo despu s del proceso de cocci n Nunca toque este aparato de cocina hasta que los l qui dos se hayan...

Страница 43: ...ad en un edificio garaje o cualquier otra rea cerrada o debajo de una construcci n Se requiere una distancia m nima de 10 pies 3048 mm a materiales combustibles desde el frente los lados y atr s Es mu...

Страница 44: ...ezclado del quema dor mediante inspecci n visual Consulte la secci n de mantenimiento Deje que la parrilla y sus componentes se enfr en por completo antes de realizar limpiezas o mantenimientos de rut...

Страница 45: ...45 CONTENIDO DEL EMBALAJE PIEZA DESCRIPCI N CANTIDAD A Conjunto de la c mara de combusti n 1 B Recipiente para la grasa 1 C Perilla 1 D Pata 2 E Conjunto del regulador 1 E D A B C...

Страница 46: ...cuatro tornillos M6x12 preensamblados del conjunto de la c mara de combusti n A luego fije la pata D al conjunto de la c mara de combusti n A utilizando los tornillos extra dos 2 Ensamble la perilla...

Страница 47: ...47 INSTRUCCIONES DE ENSAMBLAJE 3 Ensamble el conjunto del regulador E NOTA Apriete con firmeza SOLO a mano NO apriete de m s 4 Apriete a mano el cilindro de gas propano al conjunto del regulador 3 4 E...

Страница 48: ...avavajillas l quido y agua en partes iguales Se requiere aproximadamente un total de 2 a 3 onzas 70 90 ml Coloque la soluci n para detecci n de fugas en una botella con atomizador Verifique que la per...

Страница 49: ...canzar m s de 125 F Coloque un tap n antipolvo sobre la salida de la v lvula del cilindro siempre que este no est en uso En la salida de la v lvula del cilindro solamente instale el tipo de tap n anti...

Страница 50: ...IVAS DE ESTA P GINA PARA EVITAR INCENDIOS DA OS Y O LESIONES Durante el proceso de conexi n aseg rese de que El conector de la entrada del conjunto del regulador se acople con la salida de la v lvula...

Страница 51: ...gado pasando por la posici n de encendido hasta la posici n de llama m xima Es posible que este proceso deba repetirse varias veces para encender el quemador Si este no se enciende en 5 segundos ponga...

Страница 52: ...a la posici n de apagado O 2 Cierre completamente el cilindro de propano cuando no est usando el electrodom stico Si el encendido no se produce en 5 segundos ponga en posici n de apagado O los control...

Страница 53: ...de cocci n Se recomienda aceite de semillas de lino para curar la parrilla pero el aceite vegetal aceite de canola o aceite de s samo Toallas de papel Pinzas Nota Quite los residuos de alimentos de us...

Страница 54: ...el suministro de gas 2 Quite todos los tornillos M6x12 del conjunto de la c mara de combusti n y del panel inferior como se muestra en la figura 1 3 Separe el cable de encendido del electrodo como se...

Страница 55: ...ta a trav s de los orificios de ventilaci n de la c mara de combusti n tal como se ilustra a continuaci n Vuelva a conectar cada quemador con el pasador de la bisagra y vuelva a conectar el cable de e...

Страница 56: ...a tener un cable suelto o desconectado 3 Electrodo de encendido roto o da ado 1 Limpie el electrodo de encendido 2 Revise la conexi n y vuelva a conectar los cables sueltos o desconectados 3 Reemplac...

Страница 57: ...mador Venturi y el quemador como se indica en la secci n de Cuidado y mantenimiento del manual No hay flujo de gas o este se encuentra obstruido 1 El cilindro est vac o 2 Conexi n deficiente entre el...

Страница 58: ...c ser n responsabilidad del consumidor Todos los reclamos bajo la garant a solo se aplican al comprador original y requieren una prueba de la compra que verifique la fecha de compra No devuelva piezas...

Страница 59: ...59 LISTA DE PIEZAS DE REPUESTO 3 2 1 4 5 7 6 8 9 11 10...

Страница 60: ...2 741 3 Generador de chispas del quemador 70 02 742 4 Conjunto de la c mara de combusti n 70 02 743 5 Pata 70 02 744 6 Conjunto de la v lvula 70 02 745 7 Conjunto del regulador 70 02 746 8 Panel de co...

Страница 61: ...61...
Отзывы: