background image

6

Adding Font Styles

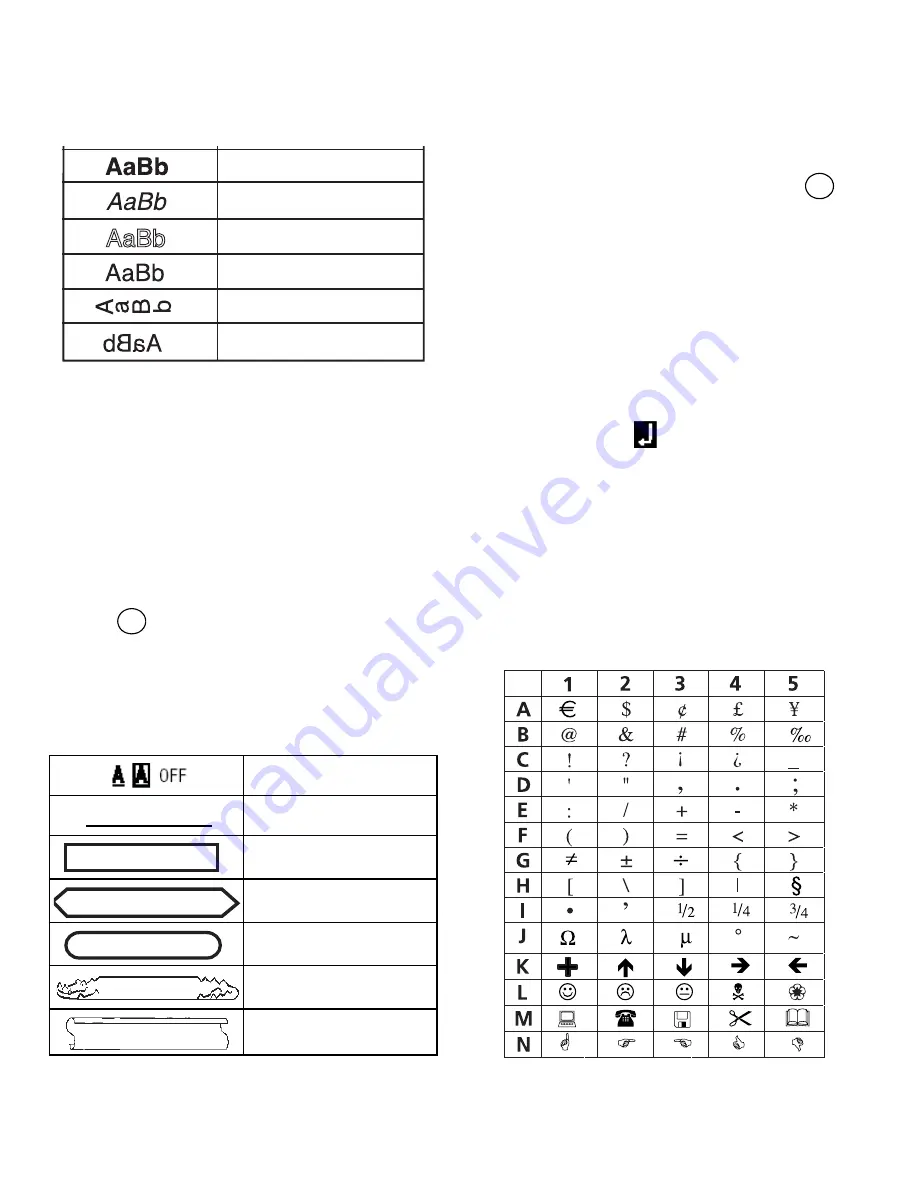
You can choose from six different font styles:

Figure 7  

When you select a style, that style applies to all 
characters. Styles can be used with alphanumeric 
characters and symbols. See 

Using Symbols and 

Special Characters

 on page 6 for more 

information on printing symbols.

To set the font style

1. Press the 

W

 key.

2. Use the arrow keys to select a style and then 

press .

Adding Box and Underline Styles

You can further highlight your text by choosing a 
box or underline style. 

Figure 8  

A label can be underlined or enclosed in a box, but 
not both together.

To add a box style

1. Press the 

>

 key.

2. Select underline or a box style and press 

.

On multi-line labels, both lines are underlined. 
However, all the lines are enclosed in a box style. 

Creating Multiple-Line Labels

You can print a maximum of two lines on 
9 mm (3/8") and 12 mm (1/2") labels. 

To create a multiple-line label

1. Type the text for the first line, and press 

7

. A 

new line character 

 is displayed at the end of 

the first line, but will not print on the label.

2. Type the text for the second line.

Using Symbols and 

Special Characters

Symbols and other special characters can be 
added to your labels.

Figure 9  

Normal

Underline

Square Box

Pointed Box

Rounded Box

Crocodile Box

Scroll Box

Bold

Italic

Outline
Shadow
Vertical

Mirror

ok

DYMO

DYMO

DYMO

DYMO

DYMO

DYMO

ok

Содержание LabelPoint 150

Страница 1: ...er two minutes of inactivity To insert the batteries 1 Remove the battery compartment cover See Figure 2 Figure 2 2 Insert the batteries following the polarity markings and 3 Replace the battery compartment cover Remove the batteries if the labelmaker will not be used for a long period of time Inserting the Tape Cassette Your labelmaker comes with one tape cassette Visit www dymo com for informati...

Страница 2: ...on of the feature and function keys on your labelmaker Refer to Figure 1 The following sections describe each feature in detail Power The Abutton turns the power on and off After two minutes of no activity the power is switched off automatically The last label created is remembered and displayed when the power is turned back on The previously selected style settings are also restored You can also ...

Страница 3: ...can review and edit your label using the left and right arrow keys Using 8with the left or right arrows moves the cursor to the beginning or end of the label text You can navigate through menu selections using the up and down arrow keys and then press to make a selection Cancel The key allows you to exit from a menu without making a selection or to cancel an action Return Key The 7key inserts a ne...

Страница 4: ...gether To add a box style 1 Press the key 2 Select underline or a box style and press On multi line labels both lines are underlined However all the lines are enclosed in a box style Creating Multiple Line Labels You can print a maximum of two lines on 9 mm 3 8 and 12 mm 1 2 labels To create a multiple line label 1 Type the text for the first line and press 7 A new line character is displayed at t...

Страница 5: ...ve selected Printing Options You can print multiple copies of a label at one time print fixed length labels review label text and format and adjust the printing contrast Printing Multiple Copies You can print up to 16 copies of a label at one time When printing multiple copies a dotted cut line is printed between each label To print multiple copies of the label 1 Press 2 Select Set Copies and pres...

Страница 6: ...e up to three commonly used label formats Storing Label Text The labelmaker automatically keeps the last three labels printed in a text buffer In addition you can store up to three specific labels you use frequently To store the current label text 1 Press 8 2 Select SAVE and then LABEL The first of the memory fields is displayed 3 Use the arrow keys to move through the fields You can store new tex...

Страница 7: ...ervice while requiring very little maintenance Clean your labelmaker from time to time to keep it working properly Clean the cutter blade each time you replace the tape cassette To clean the cutter blade 1 Remove the tape cassette 2 Press and hold down the cutter lever to expose the cutter blade 3 Use a cotton ball and alcohol to clean both sides of the blade 4 Release the cutter lever You can als...

Страница 8: ... Message Solution No display Ensure the labelmaker is turned on Replace discharged batteries Poor Print Quality Replace discharged batteries or attach power adapter Ensure tape cassette is installed properly Clean the print head Replace the tape cassette Poor Cutter Performance Clean the cutter blade See Caring for Your Labelmaker Printing No action required Message disappears when printing is fin...

Страница 9: ...8 11 ENV 50204 EU Immunity EN 55024 addendums A1 A2 Electromagnetic Compatibility EMC Information Technology equipment Immunity Characteristics Emissions EN 61000 6 3 Electromagnetic Compatibility EMC Part 6 Generic Standards Section 3 Emission standard for residential commercial and light industrial environments Esselte is an ISO 14001 registered company Plastic components of this printer have be...

Страница 10: ...12 ...

Отзывы: