- 3 -
Interior Connections
1. Open the unit by removing the four (two per side) Phillips head screws to remove the cover.
2. Push the end of the cable through the control wire feed
through on the rear of the unit.
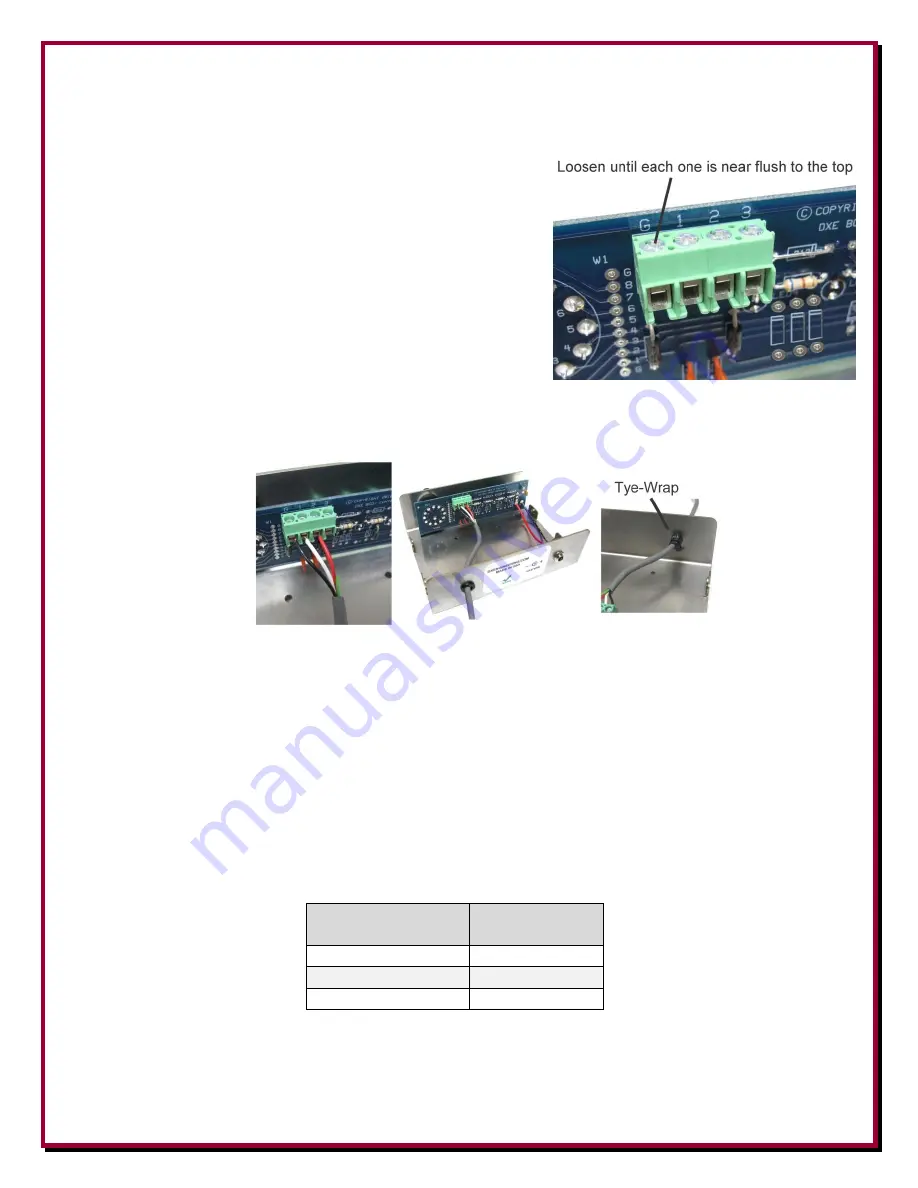
3. Three wire connections for the wire are made on the
green header (G-1-2). Loosen each terminal screw until it
is near flush with the top of the connector block as shown
to the right.
4. Strip approximately 1/4" insulation from the three
conductor wire ends.
5. Connect each wire to a terminal (G-1-2) by sliding the wire completely into the wire connection
hole. Using a small flat blade screwdriver, tighten the associated screw until the wire is firmly
gripped in place as shown below.
Take caution to ensure just the wire is clamped in place, not the wire's insulation which would cause an open
or intermittent connection. Do not over tighten the screw so much that the wire is cut instead of being firmly
gripped. Use the included Ty-Wrap on the inside of the unit to hold the cable from pulling outward as shown
above.
Control lines normally use good quality CAT5e cable (3 twisted pairs of 24 AWG wire) for runs up to 1000
feet. Typical DX Engineering control lines requirements are +12 VDC at 25 milliamps. Depending on the
number of control lines needed (usually 3) you can double up the twisted pairs of CAT5e cable, or use
control wire that is at least 22 AWG, allowing runs up to 1500 feet. If you use a cable with more conductors,
it is a good idea to tie the unused conductors to ground. For longer runs of control cable, use a line loss
calculator to ensure you supply the proper control levels needed.
Approximate BCD Control Line Lengths.
Minimum Copper
Wire Gage (AWG)
Length
24
1,000 feet
22
1,500 feet
20
2,000 feet
When connecting the cable to the DX Engineering Dual Vertical Array system, ensure your cable is wired
the same way at the other end to avoid un-necessary troubleshooting (G-1-2). Use the chart on the next page
to record which color wire is connected to each terminal connection.


