


Home Screen
The home screen displays up to two parameters during normal operation. The
parameters displayed on the home screen can be changed by the “DSP” setting in
the setup menu.
Set Point
When in the home display, a single press of either the UP or DOWN button will display
the current temperature set point value. Additional presses of the UP or DOWN buttons
will increase or decrease the set point by 1 degree per button depression. Holding the
UP or DOWN button will continuously change the set point value until the button is
released. The set point display will timeout and return to the home screen after 5
seconds of inactivity. At this point the new set point value is stored in non-volatile
memory. The range of the set point value can be configured with “SOH” and “SOL”
values in the setup menu. A display is not required to change the set point value.
Override
When on the home screen or when changing the set point, the override button (middle
button) can be pressed. When the override button is pressed, a snow flake symbol is
displayed momentarily to indicate the button was pressed.
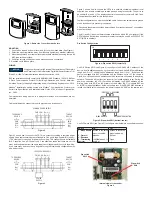
Accessing Parameter Setup Menu
In order to access the parameter menu, press and hold the UP and DOWN buttons
for 3 seconds. Once in the parameter menu, pressing the UP or DOWN buttons will
cycle through the parameters. To change any of the parameters, press both the up
and down arrow buttons simultaneously. The word SET will display in the lower right
hand corner of the display. The UP or DOWN buttons can be used to change the value
of the parameter. Press both the UP and DOWN buttons simultaneously to store the
values. In order to go back to the home screen, press and hold the DOWN button for
3 seconds.
Home Screen Configuration (DSP)
This value controls what information is displayed on the home screen. See table below
for possible values.
Units Selection (UNI)
This value controls the units that data is displayed in.
Set Point Low Limit Temperature (SOL)
This value sets a lower limit on the current set point value. The set point low limit value
is numerical setting that supports continuous change (increment/decrement) by press
and holding of either UP or DOWN button. If the new set point low limit temperature is
higher than the current set point temperature, then the set point temperature will be set
to the new set point low limit temperature.
Set Point High Limit Temperature (SOH)
This value sets an upper limit on the current set point value. The set point high limit
value is numerical setting that supports continuous change (increment/decrement)
by press and holding of either UP or DOWN button. If the new set point high limit
temperature is lower than the current set point temperature, then the set point
temperature will be set to the new set point high limit temperature.
Typical Barometric Pressure (BAR)
This value sets the typical barometric pressure for the location where the device
is mounted. The factory setting is for standard pressure at sea level. Adjusting the
barometric pressure gives a more accurate measurement, especially at higher
elevations.
CO
2
Calibration Process (CAL)
This value initiates a calibration sequence of the carbon dioxide sensor to a known gas
value. Read the calibration instructions before using this feature.
Relative Humidity Offset (OFH)
This value allows the relative humidity to be adjusted by a fixed amount to match
another calibrated measurement. The display shows the current relative humidity
value plus any previous offset value.
Temperature Offset (OFT)
This value allows the temperature to be adjusted by a fixed amount to match another
calibrated measurement. The display shows the current temperature value plus any
previous offset value.
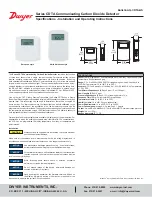
PRIMARY VALUE
PRIMARY TEXT
SECONDARY TEXT
SECONDARY
VALUE
OVERRIDE BUTTON
PRESSED INDICATOR
Figure 7: Display layout
Side view of transmitter
Figure 8
Remote display
port
Up
Override
Down
Setting Value Primary Value Primary Text Secondary Value Secondary Text
“CH”
“CT”
“HT”
“TS”
“S”
“T”
“H”
“C”
CO
2
Concentration
CO
2
Concentration
Relative
Humidity
Temperature
Set Point
Temperature
Relative
Humidity
CO
2
Concentration
“PPM”
“PPM”
“%”
“°C” or “°F”
“°C” or “°F”
“°C” or “°F”
“%”
“PPM”
Relative Humidity
Temperature
Temperature
Set Point
“%”
“°C” or “°F”
“°C” or “°F”
“°C” or “°F”
Setting Value Description
“US”
“SI”
US Customary Units (°F, in Hg)
International System Units (°C, hPa)
Default Value Minimum Value Maximum Value
Increment
20°C (68°F)
0°C (32°F)
Set Point High Limit 1°
Default Value Minimum Value
Maximum Value Increment
35°C (95°F)
Set Point Low Limit 50°C (122°F)
1°
Default Value Minimum Value
Maximum Value Increment
1013 hPa
(29.9 in Hg)
677 hPa
(20.0 in Hg
1016 hPa
(30.0 in Hg
1 hPa
(0.1 in Hg)
Default Value Minimum Value
Maximum Value Increment
0%
-30%
30%
0.1%
Default Value Minimum Value
Maximum Value Increment
0%
-30%
30%
0.1%


