


OSD -
DISPLAY SETUP > CAMERA ID
32
5
1
2
4
3
>
>
>
>
DISPLAY SETUP
- - - - - - - - - - - - - - - - - - - - - - - - - - -
ADDRESS
CAMERA ID
PTZ INFORMATION
ACTION TITLE
PRESET LABEL
ALARM I/O
DATE/TIME
<
PRIVACY ZONE
>
BACK
EXIT
ON
BOT
ON
ON
ON
ON
ON
DISPLAY SETUP
- - - - - - - - - - - - - - - - - - - - - - - - - - -
ADDRESS
CAMERA ID
PTZ INFORMATION
ACTION TITLE
PRESET LABEL
ALARM I/O
DATE/TIME
<
PRIVACY ZONE
>
BACK
EXIT
ON
BOT
ON
ON
ON
ON
ON
Press
Near/Enter
Key
Press
Near/Enter
Key
Press
Near/Enter
Key
Joystick
Right
DISPLAY SETUP
This menu defines what is displayed on the OSD of the
main screen. If an item is se as AUTO, the item is
displayed only when it is changed.
ADDRESS
CAMERA ID
Select the camera ID location. Refer to “OSD Display of Main Screen.”
PTZ INFORMATION
ACTION TITLE
PRESET LABEL
ALARM I/O
DATE/TIME
<PRIVACY ZONE>
Starts Privacy Zone Mask Setup Menu.
ON / OFF
BOT / TOP / OFF
ON / OFF / AUTO
ON / OFF / AUTO
ON / OFF / AUTO
ON / OFF / AUTO
ON / OFF
1
DISPLAY SETUP
- - - - - - - - - - - - - - - - - - - - - - - - - - -
ADDRESS
CAMERA ID
PTZ INFORMATION
ACTION TITLE
PRESET LABEL
ALARM I/O
DATE/TIME
<
PRIVACY ZONE
>
BACK
EXIT
ON
BOT
ON
ON
ON
ON
ON
CAMERA ID
- - - - - - - - - - - - - - - - - - - - - - - - - - -
- - - - - - - - - - - - - - - - - - - - - - - - - - -
OK
CANCEL
1
2 3 4 5 6 7 8 9 0
A B C D E F G H I J
K L M N O P Q R S T
U V W X Y Z
a b c d
e f g h i j k l m n
o p q r s t u v w x
y z < > - /
:
.
CAMERA ID
- - - - - - - - - - - - - - - - - - - - - - - - - - -
- - - - - - - - - - - - - - - - - - - - - - - - - - -
OK
CANCEL
CAMERA ID
- - - - - - - - - - - - - - - - - - - - - - - - - - -
- - - - - - - - - - - - - - - - - - - - - - - - - - -
OK
CANCEL
1
2 3 4 5 6 7 8 9 0
A B C D E F G H I J
K L M N O P Q R S T
U V W X Y Z
a b c d
e f g h i j k l m n
o p q r s t u v w x
y z < > - /
:
.
1
2 3 4 5 6 7 8 9 0
A B C D E F G H I J
K L M N O P Q R S T
U V W X Y Z
a b c d
e f g h i j k l m n
o p q r s t u v w x
y z < > - /
:
.
AAAAAAAAAAAAAAAAAAAAAAAA
BBBBBBBBBBBBBBBBBBBBBBBB
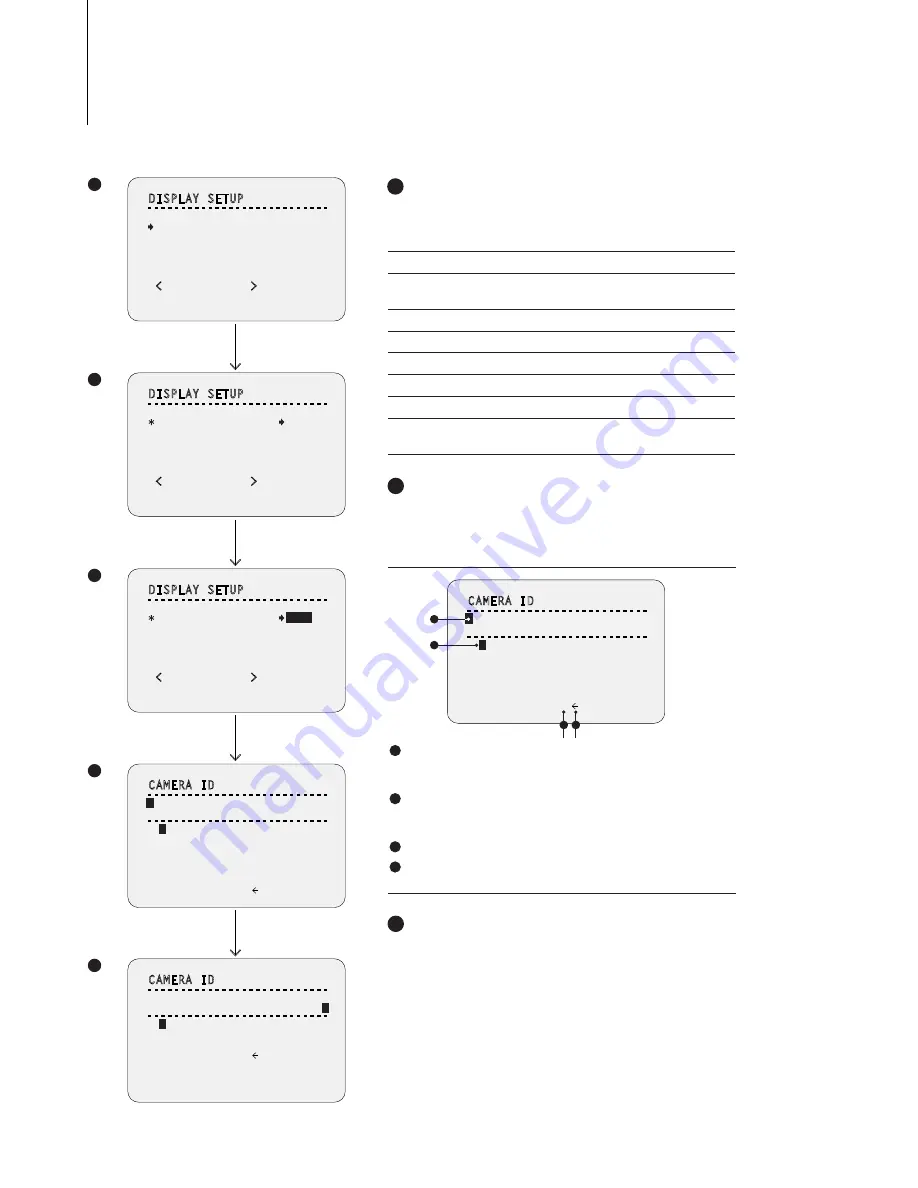
CAMERA ID - Alphabet Input
- Set the Camera ID to display on top (TOP) or bottom (BOT).
Give the Camera ID a unique name. The menu will appear
when TOP or BOT is selected.
- Maximum 48 characters, including space, are allowed.
3
CAMERA ID - Complete Editing
When you complete the camera ID editing, move the cursor to
OK and press Near key to save the completed camera ID. To
abort the current change, move the cursor to CANCEL and
press the Near key.
4
a
b
c d
Current Cursor Position:
In the CAMERA ID menu, a black box
functions as a cursor. As soon as a character is selected,
cursor moves to the next digit.
Selecting Alphabet:
Move the joystick Up/Down/Left/Right to
the appropriate character from the character set you wish to select.
To choose the character, press the Near or Enter key.
Space:
If you want to use blank, choose the space character.
Backspace:
If you want to delete a character in front, use
backspace character.
d
a
b
c