background image

5 7

WEBVIEWER*

S e t u p  >   R e c o r d  >  S t o r a g e  D e v i c e

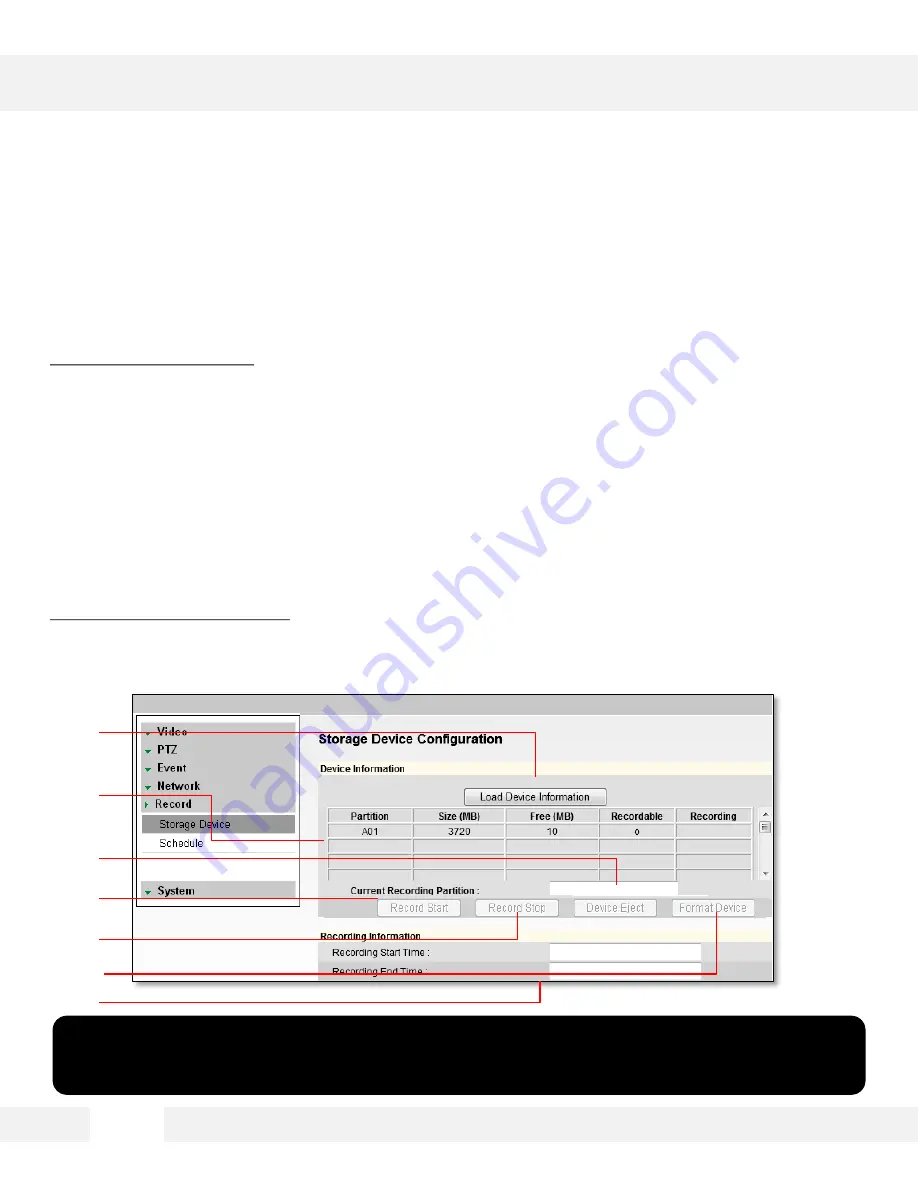
D e v i c e   I n f o r m a t i o n

1. Click the icon Load Device Information to find the SD card connected to the camera.

2. The system will display all storage devices currently connected to the camera.

3. To activate the SD card to start recording, select Record Start.

4.

To stop the SD card’s recording, select Record Stop. 

5.

To safely remove the SD card, select ‘Device Eject’.

6.

To delete all content on the SD card, select ‘Format Device’. NOTE: all data stored on the SD card 
will be erased.

R e c o r d i n g   I n f o r m a t i o n

7. This section displays the first and last recorded data available on the selected SD card. The SD 

card records video from the second stream. To modify recording quality, please see page 42.

IMPORTANT: The SD card recording function operates as an emergency recording, designed to 
record video from the camera only when there is a network loss. 
If you connect to the camera via the Web viewer or an NVR, the SD card recording will stop. 

[1]

[2]

[3]

[4]

[5]

[7]

[6]

Содержание DWC-MPTZ5X

Страница 1: ...Before installing or operating the camera please read and follow this manual carefully DWC MPTZ5X DWC MPTZ5XFM Flush Mount IP 2 1MP Pan Tilt Zoom Camera 2 0 1 4 0 8 1 5...

Страница 2: ...the temperature may rise to high levels Cleaning To remove dirt from the case moisten a soft cloth with a soft detergent solution and wipe Mounting Surface The material of the mounting surface must be...

Страница 3: ...Cameras using the IP Finder Software 24 Camera Reboot 25 MEGAPIX Camera Web Viewer 26 Accessing the Web Viewer via Internet Explorer 26 Accessing the Web Viewer via Google Chrome Mozilla Firefox and S...

Страница 4: ...0 Per Second Pan Speed Vector Drive Technology Pan Tilt Motion in Shortest Path 255 Preset Positions 4 Sequences 8 Swings 8 Tours WDR Wide Dynamic Range 3D DNR 3D Digital Noise Reduction Motion Detect...

Страница 5: ...PARTS DESCRIPTIONS MPTZ5X 5 Cover Dome Cover Dome Screws Camera Module Rubber Gasket...

Страница 6: ...PARTS DESCRIPTIONS MPTZ5XFM 6...

Страница 7: ...dio input cables 3 Alarm In Connects to peripheral devices according to camera settings 4 Alarm Out Connects to peripheral devices according to camera settings 5 Network Cable Port RJ45 Cross over net...

Страница 8: ...DIMENSIONS MPTZ5X 8 DIMENSIONS MPTZ5XFM...

Страница 9: ...INSIDE THE BOX MPTZ5X 9...

Страница 10: ...INSIDE THE BOX MPTZ5XFM 1 0...

Страница 11: ...bled Switch The MEGAPIX Camera is PoE compliant allowing transmission of power and data via a single Ethernet cable connected to a PoE injector PoE injectors eliminates the need for the different cabl...

Страница 12: ...from the bottom of the camera 2 Detach the dome cover from the camera module by loosening the three screws on the cover dome 3 Take off the protection P E Foam from the dome cover and lens 4 Assemble...

Страница 13: ...ons 3 Using the two 2 included screws mount and secure the camera to the wall or ceiling 4 Attach the camera base to the metal mount by snapping it into place using the two metal handles 5 Secure the...

Страница 14: ...mount bolts into the camera s bottom 3 Pull wires through and make all necessary connections 4 Insert the mount bolts into the template holes 5 Fix the camera to the mounting surface by tightening the...

Страница 15: ...le during shipment and should be completely removed before powering the camera 2 The mounting surface must be able to sustain five times the weight of your camera 3 Do not let the cables get caught in...

Страница 16: ...camera s flush mount to the wall or ceiling 5 Once the Flush Mount is securely mounted make cable connections and insert the camera module into the bracket Turn it clock wise to lock it in place Alig...

Страница 17: ...river The hook s head should then grab onto the ceiling s inside side Repeat for both hooks until the flush mount is secured to the ceiling 5 Once the Flush Mount is securely mounted make cable connec...

Страница 18: ...the camera s web viewer Audio OUT The cables from the audio output device should connect to audio out and GND in the cable slot Audio volume is controlled in the camera s web viewer Alarm IN The cable...

Страница 19: ...b a c k u p W h e n s e t u p p r o p e r l y t h e c a m e r a w i l l r e c o r d t o t h e l o c a l S D c a r d w h e n i t d e t e c t s i t i s n o t r e c o r d i n g t o a n y s e r v e r s a...

Страница 20: ...cal network The software can be found on the included User Manual CD Run IP Finder and install onto your PC 2 When setup is complete launch IP Finder 3 To find your MEGAPIX camera click Search button...

Страница 21: ...e r a 1 Configuration Change the device s connection type and or IP address information Please see the next page for further explanation 2 Upgrade Upgrade the device s firmware 3 Time zone Change the...

Страница 22: ...d password 3 Static IP Select Static to connect to the camera from an external network For further explanation on Static please see PAGE 24 4 Use DDNS Check this option to use DDNS service For further...

Страница 23: ...mend that you 1 setup the camera to DHCP 2 allow it to configure itself according to your network and 3 change the settings to a static IP address 1 To set your MEGAPIX camera to Static highlight the...

Страница 24: ...The system will start updating all the selected cameras in a new window 5 The system will indicate if the upgrade was successful or not for each camera 6 When all cameras have been properly upgraded p...

Страница 25: ...he camera to its factory default settings 1 Turn the camera Off unplug from PoE Switch 2 Press and hold the Reset button and turn the device On Connect PoE cable to camera 3 Hold the Reset button for...

Страница 26: ...w e b v i e w e r 1 Type the IP address of the camera on the Internet Explorer window Example http 192 168 1 123 Factory Default 2 Enter Username and Password Username admin Password admin 3 The web...

Страница 27: ...2 Enter the IP camera s IP address If the first stream is set to H 264 then a video will not be displayed on the GUI 3 Click the Setup button located at the top right of the page Then go to Video Stre...

Страница 28: ...ay Start Stop Panic Recording Show Hide PTZ Virtual Controller PTZ Virtual Controller Camera s Name Camera s Time Full Screen Mode Main Display Area Alarm Status Computer s Date Time Stream s Name Cam...

Страница 29: ...o r d i n g On the main monitoring page user can view the camera with the First Stream settings or the Second Stream settings Below the display screen click on the First Stream and Second Stream butt...

Страница 30: ...t o y o u r c o m p u t e r 1 Click Export Image button located on the left Save As window will appear 2 A jpg image will automatically be stored under a WNMDWViewer folder 3 The image s name will in...

Страница 31: ...the size of the screenshot or adjust the orientation of the screenshot 3 To print the information about the screenshot select View Title To add a memo for the screenshot click Page Option 4 Go to Pri...

Страница 32: ...ck on the Record button located to the left of the Web viewer 2 Setup where you want the videos to be saved 3 Setup the duration of the instant recording You can record up to 120 seconds of live video...

Страница 33: ...To Start right click anywhere on the display screen 2 Click on Start Rec The icon on the top right of the screen will change to INSTANT 3 To Stop right click anywhere on the display screen 4 Click on...

Страница 34: ...pends on its location on the wheel For example pressing the central upper button will move the camera UP To stop the camera s movement release the mouse button 2 Zoom Control Button The Zoom ratio of...

Страница 35: ...and swings Each tour can have a maximum of 20 action 9 Presets buttons the numeric buttons 1 10 allow you to send the camera to a specific preset previously setup Press the preset number to move the...

Страница 36: ...ects the image quality bandwidth and file size of saved images MJPEG the lowest Compression type will provide the highest image quality but also will cause the image size to be the largest and take up...

Страница 37: ...to the proper white balance If PRESET is selected white balance is fixed based on current lighting To activate press Push If MANUAL is selected adjust the following values Kelvin Determines the warmt...

Страница 38: ...y when Auto Exposure is set to Auto mode Shutter speed Set the camera s shutter mode to Auto or manual If manual is selected select the shutter speed Select from the available options between 1 30 and...

Страница 39: ...the camera s Field of View FoV WDR Wide Dynamic Range the Wide Dynamic Range is used when there are extremely bright and extremely dark areas in the FoV of the camera If WDR is selected select the WD...

Страница 40: ...mage upside down Digital Zoom Enable or disable the use of digital zoom in the camera s web viewer Sharpness Sets the image sharpness The higher the number the sharper the image Digital Noise Reductio...

Страница 41: ...d finally Audio Adjust settings to your preference a Audio Input Set Gain 0 5 b Audio Output Set Buffering Time Volume 0 5 c Network Transfer Select Transfer Audio regardless of video d Select Apply t...

Страница 42: ...rop down menu value between 1 and 120 Default is 120 3 Set the camera s Zoom speed Select from the drop down menu value between 1 and 8 The higher the number the faster the camera will zoom in and out...

Страница 43: ...ou would like to associate with the selected preset 3 When the camera is positioned at the desired location for the preset press the Set button to save that location to the selected preset 4 Select th...

Страница 44: ...e t b y t h e u s e r T o c o n f i g u r e t h e c a m e r a s S e q u e n c e Select the Sequence you want to setup from the drop down options Enter the Preset numbers in the corresponding Sequence...

Страница 45: ...camera s preview screen move the camera to the position you would like to set as the First Position 3 Press the First Position button to save that location 4 Repeat steps 2 and 3 to set the Swing s En...

Страница 46: ...v e a m a x i m u m o f 2 0 a c t i o n T h e M P T Z 5 X s u p p o r t s u p t o 8 T o u r s G r o u p s T o s e t u p a T o u r 1 Select the Tour Group number from the drop down menu at the top lef...

Страница 47: ...l n o t i f i c a t i o n s f o r e v e r y m o t i o n t r i g g e r e d a l a r m s s e e p a g e 4 5 1 Check the Use Motion box 2 Sensitivity Select from Low Middle or High 3 Dwell Time When a mot...

Страница 48: ...i f i c a t i o n s f o r e v e r y m o t i o n t r i g g e r e d a l a r m s s e e p a g e 4 5 1 Using the virtual joystick next to the camera s preview screen move the camera to the position you wou...

Страница 49: ...check relay number and set time to activate NO Normal Open Sensor is activated when it closes Example Door normally remains open and an alarm is triggered when the door closes NC Normal Close Sensor i...

Страница 50: ...i o n i e r e m o t e c l i e n t s o f t w a r e 1 Site Information Site Name Transmission Settings and Video Duration for the video that will be sent when motion is detected 2 Emergency Alarm Recip...

Страница 51: ...amera b Subnet Mask default is 255 255 255 0 c Gateway your router s external public IP address It is used when accessing the camera from outside the network The router will channel your data to the c...

Страница 52: ...a u t o m a t i c a l l y r e d i r e c t s t r a f f i c t o y o u r I P a d d r e s s e v e r y t i m e i t c h a n g e s 1 To use DDNS select the Use DDNS checkbox 2 Select one of the DDNS System N...

Страница 53: ...o l 1 To change the Protocol select one of the three options TCP UDP or Multicast 2 If you select Multicast enter the Multicast IP and Multicast Port 3 Reboot your system to apply the changes to your...

Страница 54: ...a 1 Select Allow All to allow anyone to connect to this camera If Allow All is selected the Allowed IP List and Blocked IP List will be ignored 2 To allow only a specific list of IP addresses to conne...

Страница 55: ...ftware and server you use Consult your NVR s manual for additional information The camera will be set to dual stream on OnVIF by default 3 Service Port will be set by default to 8032 This is the camer...

Страница 56: ...o c o l s a l l o w s o f t w a r e t o a c c e s s t h e f i r s t a n d s e c o n d s t r e a m d i r e c t l y b y a s s i g n i n g e a c h s t r e a m i t s o w n p o r t s R T P a n d R T S P a...

Страница 57: ...ce Eject 6 To delete all content on the SD card select Format Device NOTE all data stored on the SD card will be erased R e c o r d i n g I n f o r m a t i o n 7 This section displays the first and la...

Страница 58: ...fault is daily setting It only saves single day s setting wi thout changing to Multi Day Mode 2 Select the type of recording Continuous Cyan Motion Yellow Sensor Red by clicking on the corresponding b...

Страница 59: ...c h e d u l e s e t u p R e c o r d i n g C o n t r o l 6 Pre Alarm Time Save previous image of event for duration of time 7 Motion Post Alarm Time Save images after motion events for duration of time...

Страница 60: ...th recorded data will be indicated in BOLD b Hours with recorded data on them will be indicated by the pink line in the time bar 3 Select the Backup Start Time and Backup End Time 4 Select the Target...

Страница 61: ...r and get the upgrade file first Go to www Digital Watchdog com and select Support tab a Browse file and select the file and press Upgrade The system will automatically reboot FTP Upgrade a Server Add...

Страница 62: ...e i n f o r m a t i o n 1 Insert the Date and Time Select the type of Format for your time 2 To synchronize with the NTP Server select the option and type the NTP Server Address Example pool ntp org...

Страница 63: ...o n d e t e c t i o n c a m e r a r e b o o t o r u p g r a d e 1 Select Use Event Mail option Select Event Type 2 Enter SMTP Server information Example smtp gmail com 3 Enter Username and Password 4...

Страница 64: ...Administrator 2 Operator View and Edit Video and Event Settings Only 3 Viewer View Only 3 Click Add 4 To modify a user select the user from the User List and click Modify 5 To remove a user select the...

Страница 65: ...other cameras by using the import export buttons on this page To Export the settings from the current camera Press the export button The system will generate a bin file with all the cameras settings...

Страница 66: ...ct the type of report you want to view System Event or System Event 2 Select View 3 The system will generate a report up to 140 000 bits of data For events to record make sure the camera is set to rec...

Страница 67: ...IONAL DNR Digital Noise Reduction Off Level1 Level2 Level3 Auto Gain Control Max 41dB BLC Back Light Compensation Off On WDR Wide Dynamic Range Low Middle High Day and Night Auto Day Color Night B W S...

Страница 68: ...s Vista Windows 7 MAC OS Supported Browser Internet Explorer Google Chrome Mozilla Firefox Safari Video Management Software DW Spectrum ENVIRONMENTAL Operating Temperature 10 C 50 C 14 F 122 F Operati...

Страница 69: ...roper internet outlet and operating properly Make sure the PoE Switch is connected to a router modem and the ports that have devices connected to them have a green LED on If Yes is the computer on the...

Страница 70: ...d be connected on the same router Contact your network administrator if you have more than one network available If Yes try pinging the MEGAPIX camera s IP address as it appears on the IP finder From...

Страница 71: ...on the browser you use If Yes make sure nothing is blocking the MPA20M camera s lens Are you trying to view the camera s video from a different browser than Internet Explorer ex Google Chrome Mozilla...

Страница 72: ...55 255 255 0 The MEGAPIX camera can also connect to the web viewer using a static IP address This will allow you to set your own IP address manually Setup the Network Protocol on your PC 1 Go to Netwo...

Страница 73: ...pt or other proof of the date of the original purchase is required before warranty service is rendered This warranty only covers failures due to defects in materials and workmanship which arise during...

Страница 74: ...clusion or limitation of incidental or consequential damages or limitations on how long an implied warranty lasts so the above exclusions or limitations may not apply to you This warranty gives you sp...

Страница 75: ...7 5...

Страница 76: ...itos California USA 90703 PH 866 446 3595 FAX 813 888 9262 www Digital Watchdog com technicalsupport dwcc tv Technical Support PH USA Canada 1 866 446 3595 International 1 813 888 9555 French Canadian...

Отзывы: