5-5
2
1
3
5
4
Maintenance
I
A
y
Unscrew the screws that fix the hard disk to the disk carrier.
y
Exchange the broken disk with a new one and assemble it in the
disk carrier with the screws.
After that the hard disk is replaced and the disk carrier with the new disk
has to be reassembled in the system.
Step 3: Reassembling the Hard Disk
After replacing the hard disk, the disk carrier with the new disk has to
be reassembled in the system. For this perform the following:
y
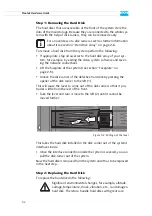
Slide the disk carrier back into its shaft at the front of the disk array.
y
Push it completely back into the shaft by applying pressure to the
disk carrier directly (i.e. do not use the lever to push the carrier).
Move it until you feel the resistance of the hard disk interface inside
the system and until the lever retracts by itself from the pushing.
y
Then simply close the lever until it snaps back in place which as a
result will slide the carrier completely back in.
Once the faceplate of the DVS system is back in place, the replacement
of the hard disk is finished. After several minutes the replaced hard disk
will be automatically recognized by the system. Then the rebuild of the
data will be initiated on its own. Once the system has finished the re-
build, the Pronto3 will be fully operational again.
It is best to use the same brand and type of hard disk again.
Otherwise a loss of performance might occur.
It is important that you do not use the lever to insert the
disk carrier. Apply an even pressure only to the carrier di-
rectly until the lever moves back by itself.
The disk carrier of the replaced disk should be level with the
others at the front of the system’s disk array.
A rebuild takes several hours. It is strongly recommended to
avoid accesses to the hard disk array during this time, other-
wise it may take considerably longer.
Содержание Pronto3
Страница 1: ...Pronto3 Hardware Guide Version 1 0 Digital Disk Recorder Pronto3 Hardware Guide ...
Страница 2: ......
Страница 6: ......
Страница 8: ......
Страница 36: ...2 18 Pronto3 Hardware Guide ...
Страница 38: ...3 2 Pronto3 Hardware Guide ...
Страница 65: ...A 13 2 1 3 4 5 Appendix I A Figure 3 Figure 4 Figure 5 a b c Box A Box B Box B Box B Box B Box B ...
Страница 68: ...A 16 Pronto3 Hardware Guide ...
Страница 72: ...I 4 Pronto3 Hardware Guide VTR 1 1 warranty 1 7 XLR connectors audio 2 13 ...

