background image

-5-

5.0  OPERATING THE UNIT

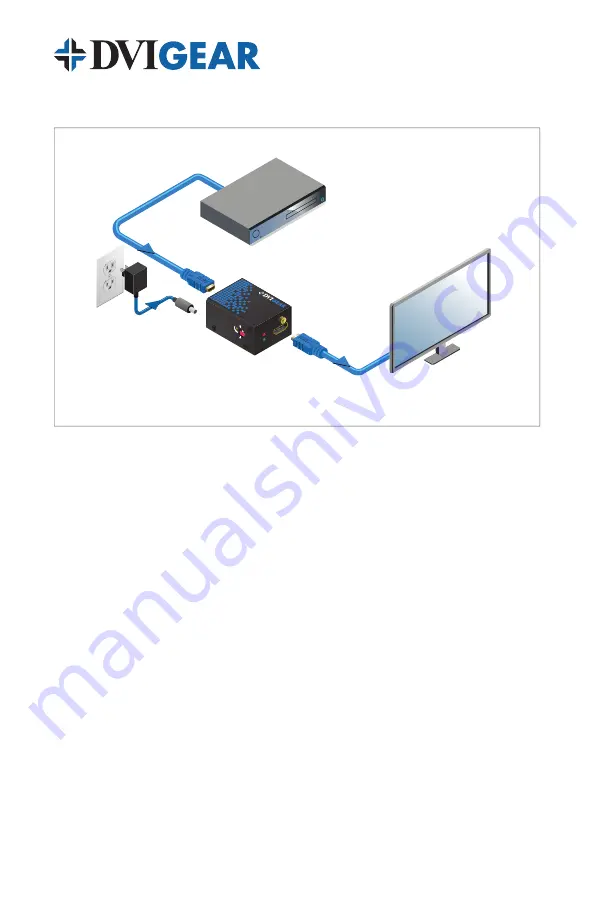
1. Turn OFF the HDMI source and the HDMI display device.

2. Connect a high quality HDMI (long) cable between the output of the HDMI

source and the “INPUT” port of the ACE™ unit.

3. Connect a high quality HDMI (short) cable between the HDMI input on the

display device and the “OUTPUT” port of the ACE™ unit.

4. Connect the External AC Power Adapter to the ACE™ unit.  Take care to

insert the locking plug into the DC power connector on the ACE™ unit and
rotate a quarter turn clockwise so that it locks securely into position.

5. Plug the AC Power Adapter into an active AC power socket.  The red

POWER LED should be illuminated.

6. Turn ON the HDMI source and HDMI display device.  The green ACTIVE

LED should be illuminated, and there should be a stable image on the
HDMI display.  There should be no artifacts (streaks, sparkles, etc.) visible
in the displayed image.

7. On the side of the ACE™ unit there is a cable equalization switch that

can be set for AUTO (automatic) or MANUAL adjustment.  The AUTO
position is preferred and works well with most cables.  For HDMI cables
longer than 30 meters (100 ft.), the MANUAL EQ position can give better
results.  When the switch is set to the MANUAL EQ position, a 25x turn
potentiometer is activated, allowing very precise control of the amount of
cable equalization.  For best results, take care to rotate this potentiometer
adjustment slowly.  Note that at the end of its range you will feel a slight
clicking in the adjustment even though it continues to rotate.

Source Device

(e.g. Blu-ray or DVD Player)

DVIGear ACE™ unit

(e.g. DVI-7370c)

Up to 60m DVIGear

SHR™ cable

0.5m DVIGear
SHR™ cable

Display Device

(e.g. Monitor)

+5V Power Supply
for ACE™ unit

LEVEL

EQ

AUT

O

+40

 dB

0 dB

MANUAL

OUTP

UT

PO

WER

ACTIV

E

DVI-7370

HDM

I Activ

e Cab

le Exte

nder

Содержание DVI-7370c

Страница 1: ...User Guide HDMI Active Cable Extender DVI 7370c...

Страница 2: ...E PRODUCT SAFETY 1 PRODUCT LIABILITY 1 1 0 INTRODUCTION 2 2 0 SPECIFICATIONS 3 3 0 PACKAGE CONTENTS 4 4 0 CONNECTING THE HARDWARE 4 5 0 OPERATING THE UNIT 5 6 0 TROUBLESHOOTING 6 7 0 LIMITED WARRANTY...

Страница 3: ...on the ends of the connected cables as this can cause them to malfunction Take precaution to ensure that all connected cables are not forced to bend beyond their minimum bend radius Product Liability...

Страница 4: ...itchers Splitters Video Scalers Up Down Cross Converters Format Converters Analog Digital Converters as well as a wide range of long reach Digital Cables Extenders and Optical Transmission systems 1 1...

Страница 5: ...nclosure with durable black finish Dimensions H W D 1 1 x 1 7 x 2 6 28 8 mm x 42 3 mm x 64 8 mm Weight 3 5 oz 100 g Environmental Operating Temperature 32 to 122 F 0 to 50 C Storage Temperature 4 to 1...

Страница 6: ...de Note Please retain the original packing material in case you need to return the unit If you find any items are missing contact your reseller or DVIGear immediately Please have the Model Number Seri...

Страница 7: ...ld be no artifacts streaks sparkles etc visible in the displayed image 7 On the side of the ACE unit there is a cable equalization switch that can be set for AUTO automatic or MANUAL adjustment The AU...

Страница 8: ...etc 4 Turn ON the HDMI source and verify that the green ACTIVE LED is illuminated If it is not double check the source to ensure that it is outputting an active HDMI signal 5 As a final check bypass...

Страница 9: ...t prepaid to a location designated by DVIGear After repairs are complete the product will be returned freight prepaid The foregoing warranty is the sole and exclusive warranty given by DVIGear express...

Страница 10: ...w dvigear com Your Digital Connectivity Experts Toll Free 888 463 9927 Phone 770 421 6699 Fax 770 234 4207 DVIGear Inc 1059 Triad Court Suite 8 Marietta Georgia 30062 2258 DVI 7370c UG 04 November 201...

Отзывы: