background image

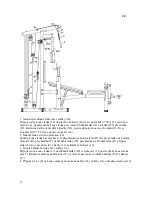
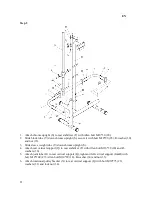
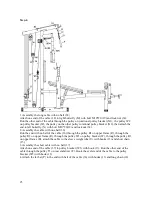
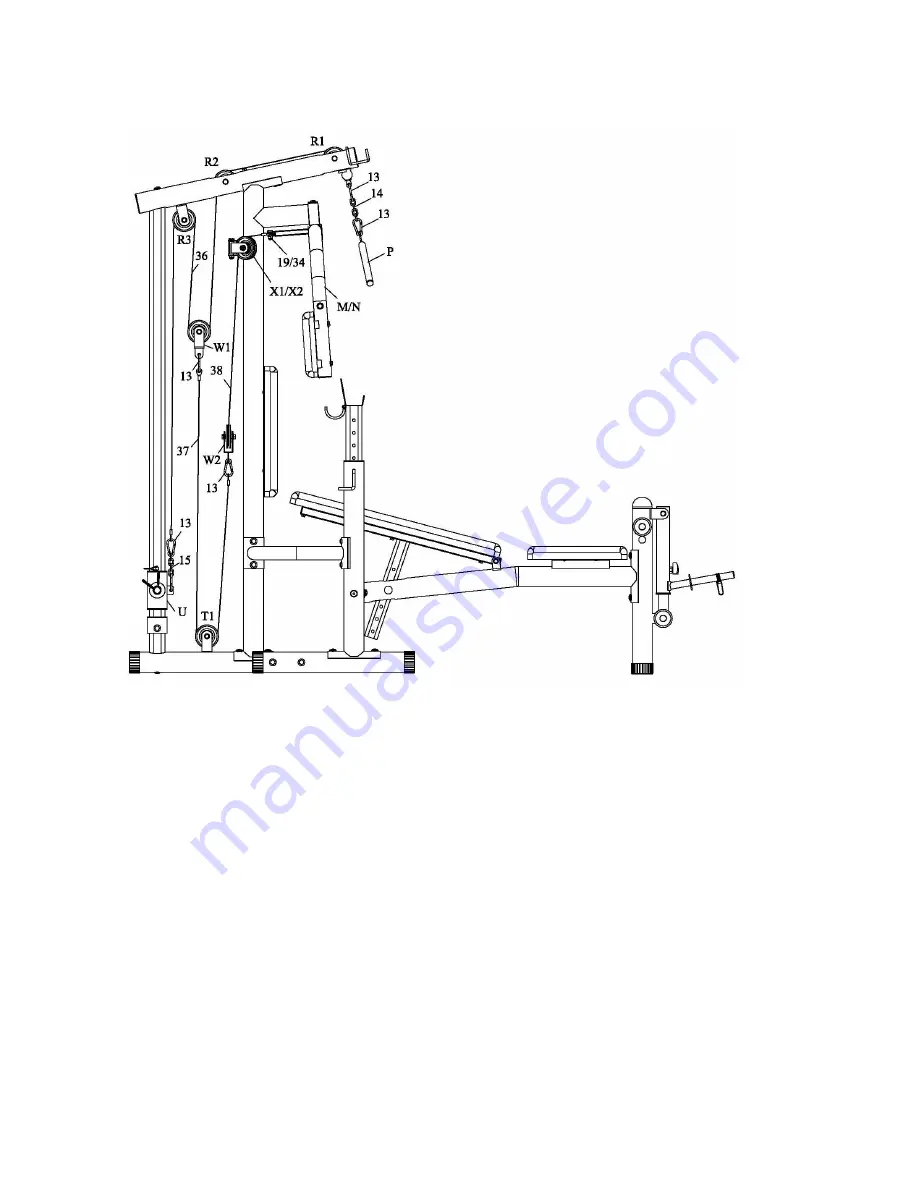
Step 6

1. Assembly the long cable with no ball (38)

Attach one end of the cable (38) to right butterfly (M) with bolt M10*20 (19) and lock nut (34). 

Run the other end of the cable through the pulley on rotational pulley bracket (X1),  the pulley W2 

on pulley bracket (W), the pulley on the other pulley rotational pulley bracket (X2), then attach the 

end to left butterfly (N) with bolt M10*20(19) and lock nut (34).

2. Assembly the cable with one ball (36)

Run the end with no ball of the cable (36) through the pulley R1 on upper frame (R), through the 

pulley R2 on upper frame (R), through the pulley W1 on pulley bracket (W), through the pulley R3 

on upper frame (R), attach the cable to the sleeve weight tube (U) with hooks (13) and short chain 

(15).

3. Assembly the short cable with no ball (37)

Attach one end of the cable (37) to pulley bracket (W1) with hook (13). Run the other end of the 

cable through the pulley T1 on rear stabilizer (T), Hook the eyelet end of the cable to the pulley 

bracket (W2) with hook (13).

4. Attach the lat bar (P) to the end with ball of the cable (36) with hooks (13) and long chain (14).

25

Содержание Kron 4822

Страница 1: ...N vod na pou itie Multifunk n ve a DUVLAN Kron k d 4822 N vod k pou it Multifunk n v DUVLAN Kron k d 4822 User manual Home Gym DUVLAN Kron code 4822 1 CZ EN SK...

Страница 2: ...a kody sp soben nespr vnou manipul ciou so zariaden m V pr pade reklam cie n s kontaktujte Z ru n doba za na plyn d tumom predaja uschovajte preto doklad o k pe Z kazn cky servis Aby sme V m mohli o n...

Страница 3: ...ning s Va im lek rom Povie V m ktor tr ning je pre V s vhodn Nespr vny tr ning a precenenie Va ich schopnost m e po kodi Va e zdravie Pokia po as tr ningu poc tite nevo nos boles na hrudi alebo sa V m...

Страница 4: ...toru I so es hrannou skrutou M10 30 20 a R podlo kou 30 3 Vlo enie horizont lnej podpory K do rota nej r rky J Vlo te horizont lnu podporu K do otvoru na pravej zvislej podpory G zabezpe te so es hran...

Страница 5: ...U po chr movom st piku S 4 Pripevnite zadn vertik lnu podporu Q k zadn mu stabiliz toru T so es hrannou skrutkou M10 30 20 a R podlo kou 30 5 Pripojte spojovaciu ty O k zadnej vertik lnej podpore Q a...

Страница 6: ...orn mu r mu R so kr tkou eleznou r rkou AE skrutkou M10 90 25 podlo kou 31 a maticou 35 2 Pripojte prav butterfly M a av butterfly N k zadnej zvislej podpore Q s es hrannou skrutkou M10 20 18 a ve kou...

Страница 7: ...h k Z a av bezpe nostn h k AA na nastavovaciu podpru z va L pomocou poistnou maticou 33 3 Pripojte hlavn r m D na rota n ty J so es hrannou skrutkou M10 30 20 a R podlo kou 30 4 Pripojte podporu zdvi...

Страница 8: ...k hlavn mu r mu D s dlhou eleznou r rkou AD pomocou skrutiek M10 200 28 podlo iek 31 a poistnej matice 34 Pripojte nastavite n chrbtov opierku F k hlavn mu r mu D s kol kom 9 4 Pripojte bezpe nostn po...

Страница 9: ...ou zar kou 36 Spustite koniec lanka bez zara ky 36 cez kladku na hornom r me R1 R cez kladku na hornom r me R2 R cez kladku W1 na dr iaku kladky W cez kladku na R3 horn r m R pripojte lanko k ty i so...

Страница 10: ...an sti a kody zp soben nespr vnou manipulac se za zen m V p pad reklamace n s kontaktujte Z ru n doba za n b et datem prodeje Uschovejte proto doklad o koupi Z kaznick servis Abychom V m mohli co nejl...

Страница 11: ...V m kter tr nink je pro V s vhodn Nespr vn tr nink a p ecen n Va ich schopnost m e po kodit Va e zdrav Pokud b hem tr ninku poc t te nevolnost bolest na hrudi nebo se V m bude patn d chat okam it uko...

Страница 12: ...liz toru I se estihrannou zkrutn M10 30 20 a R podlo kou 30 3 Vlo en horizont ln podporu K do rota n trubky J Vlo te horizont ln podporu K do otvoru na prav svisl podpory G zabezpe te se estihrannou r...

Страница 13: ...y e z va U po chromov m sloupku S 4 P ipevn te zadn vertik ln podporu Q k zadn mu stabiliz toru T se estihrannou roubem M10 30 20 a R podlo kou 30 5 P ipojte spojovac ty O k zadn vertik ln podpo e Q j...

Страница 14: ...horn mu r mu R s kr tkou eleznou trubkou AE roubem M10 90 25 podlo kou 31 a matic 35 2 P ipojte prav butterfly M a lev butterfly N k zadn svisl podpo e Q s estihrannou roubem M10 20 18 a velkou podlo...

Страница 15: ...Z a lev bezpe nostn h k AA na nastavovac podpruje z va L pomoc pojistnou matic 33 3 P ipojte hlavn r m D na rota n ty J se estihrannou roubem M10 30 20 a R podlo kou 30 4 P ipojte podporu zdvihu nohou...

Страница 16: ...dporu E k hlavn mu r mu D s dlouhou eleznou trubkou AD pomoc roub M10 200 28 podlo ek 31 a pojistn matice 34 P ipojte nastavitelnou z dovou op rku F k hlavn mu r mu D s kol kem 9 4 P ipojte bezpe nost...

Страница 17: ...u zar kou 36 Spus te konec lanka bez zar ky 36 p es kladku na horn m r mu R1 R p es kladku na horn m r mu R2 R p es kladku W1 na dr ku kladky W p es kladku na R3 horn r m R p ipojte lanko k ty i se z...

Страница 18: ...ed from warranty are wearing parts and damages caused by misuse of the product In the case of claim please contact us The warranty period starts at the date the product was purchased please carefully...

Страница 19: ...ing is suitable for you Improper training and revaluation of your abilities can damage your health If you experience nausea during training chest pain or you will be hard to breathe stop exercising im...

Страница 20: ...side stabilizer I with Allen bolt M10 30 20 and R washers 30 3 Insert horizontal support K into rotational tube J Insert horizontal support K into hole on right vertical support G secure with Allen bo...

Страница 21: ...ht tube U down chrome upright S 4 Attach rear vertical support Q to rear stabilizer T with Allen bolt M10 30 20 and R washers 30 5 Attach joint tube O to rear vertical support Q right and left vertica...

Страница 22: ...o upper frame R with short iron tube AE bolt M10 90 25 washer 31 and nut 35 2 Attach right butterfly M and left butterfly N to rear vertical support Q with Allen bolt M10 20 18 and big washer 32 3 Att...

Страница 23: ...Attach right safety hook Z and left safety hook AA to adjustment weight support L with lock nut 33 3 Attach main frame D to rotational tube J with Allen bolt M10 30 20 and R washer 30 4 Attach leg li...

Страница 24: ...then attach backrest support E to main frame D with long iron tube AD bolt M10 200 28 washers 31 and lock nut 34 Attach adjustable backrest support F to main frame D with pin 9 4 Attach seat pad 1 to...

Страница 25: ...Run the end with no ball of the cable 36 through the pulley R1 on upper frame R through the pulley R2 on upper frame R through the pulley W1 on pulley bracket W through the pulley R3 on upper frame R...

Страница 26: ...IONAL TUBE 1 K Horizont lna podpora Horizont lna podpora HORIZONTAL SUPPORT 1 L Nastavite n podpora z va Nastavite n podpor z va ADJUSTMENT WEIGHT SUPPORT 2 M Prav Prav RIGHT BUTTERFLY 1 N av Lev LEFT...

Страница 27: ...LIP 3 9 Kol k Kol k PIN 2 10 Spolo n krytka Spolo n krytka JOINT CAP 2 11 Gumov z brana Gumov z brana RUBBER STOPPER 1 12 Trojuholn kov gomb k Trojuholn kov gomb k TRIANGLE KNOB 1 13 H k H k HOOK 6 14...

Страница 28: ...dlo ka R podlo ka R WASHER 8 4 43 Okr hla koncov krytka Okr hla koncov krytka ROUND END CAP 76 2 44 Loptov krytka Loptov krytka BALL HEAD CAP 76 1 45 Okr hla krytka Okr hla krytka ROUND CAP 76 6 46 Ob...

Страница 29: ...Sch matick poh ad Sch matick pohled Schematic view 29...

Отзывы: