background image

38

Ricarica

Suggerimenti

Utilizzare il cavo per collegare l’apparecchio alla presa di corrente.

Il LED ON / OFF sarà rosso durante la carica.

Questo dispositivo impiega circa 8 ore per ricaricarsi completamente.

Dopo la ricarica, scollegare l’apparecchio dalla presa di corrente.

Non utilizzare il prodotto sugli indumenti indossati, poiché ciò potrebbe 

causare lesioni.

Prestare particolare attenzione durante l’utilizzo dell’apparecchio sulle seguenti

parti degli indumenti:

attorno a bottoni o cerniere

parti sporgenti

cuciture

punti di sutura

elementi incollati al tessuto

parti o materiale delicati

Prima di utilizzare il dispositivo, testarlo su un’area non visibile del capo.

Far scorrere il dispositivo con delicatezza sul capo.

Per rimuovere pelucchi più grandi, fare scorrere il dispositivo verticalmente e

orizzontalmente.

Per tessuti pregiati o delicati, piegare il capo in due e passare il dispositivo con

delicatezza su una superficie piatta come un asse da stiro.

Содержание FS16USB

Страница 1: ...FS16USB LINT REMOVER ...

Страница 2: ...2 English Manual Manuel d utilisation en français Gebrauchsanleitung auf Deutsch Manual de instrucciones en español Manuale D istruzioni In Italiano Instrukcja obsługi Polski 3 11 19 27 35 43 Contents ...

Страница 3: ...3 English Manual ...

Страница 4: ... appliance is for indoor use only It is not intended for outdoor use In order to prevent fire or electric shock when using electric appliances particularly in the presence of children follow basic safety rules Do not clean the appliance using corrosive cleaning agents Protect the appliance from the ingress of water or other liquids The appliance is not a toy Take care not to damage the lint holder...

Страница 5: ...uct Specification Nominal Voltage 5V 3W Battery 2 x Ni MH 600mAh Charging time approx 8 hours Operating time at full charge approx 50 minutes Model Name Rated Frequency Rated Power Battery FS16 USB 5V 3W 2x Ni MH 600mAh ...

Страница 6: ...cause doing so poses an injury risk Pay particular attention when shaving the following parts of garments around buttons and zippers protruding parts seams stitches items glued to cloth delicate parts Before using the appliance try it on an area of the garment that is barely visible Slide the appliance along the pattern on the garment For stubborn pills slide the appliance along the pattern vertic...

Страница 7: ...ing Remove the plastic cover Turn the appliance on by pressing the on off switch Afterwards the on off switch will light up in green Place the garment on a flat surface and smooth the creases Slide the appliance over the surface of the material After finishing turn off the appliance by pressing the on off switch ON OFF ...

Страница 8: ... as well as the internal blades Cleaning the container Detach the lint container cover Remove the blades to thoroughly clean the container Replace the blades Cleaning the blades Replace the lint container cover and secure it on the appliance Empty the container using the supplied brush ...

Страница 9: ...ng the blades and gently pull upwards Clean the blades and the blade cover with the supplied brush Remove the metal blade cover Replace the metal blade cover then attach the lint container cover Carefully replace the blades on the base and push them in gently ...

Страница 10: ...rposes 4 It does not cover wear and tear malicious damage misuse neglect inexpert repairs or consumable parts 5 Shine Mart Ltd has no responsibilities for accidental or consequential loss or damage 6 Shine Mart Ltd are not liable to carry out any type of servicing work under the guarantee 7 Valid in the UK only This product is fitted with CE 1363 plug and fuse Imported by Shine Mart Ltd RM3 8SB In...

Страница 11: ...11 Manuel d utilisation en français ...

Страница 12: ...e uniquement N utilisez pas cet appareil pour un autre usage que celui pour lequel il est destiné Cet appareil est prévu pour être utilisé à l intérieur uniquement N utilisez pas ce produit à l extérieur où il pourrait être sujet aux intempéries Ne nettoyez pas l appareil en utilisant des détergents Protégez l appareil et évitez tout contact avec l eau Cet appareil n est pas un jouet Veuillez vous...

Страница 13: ...produit Voltage nominal 5V 3W Batterie intégrée 2 X Ni MH 600 mAh Temps de recharge environ 8 heures Durée de fonctionnement une fois l appareil rechargé environ 50 minutes Modèle Fréquence Puissance Batterie FS16USB 5V 3W 2 x Ni MH 600 mAh ...

Страница 14: ...isé sur des vêtements mis à plat Soyez particulièrement vigilant lorsque vous utilisez l appareil autour Des boutons et fermetures éclairs Les éléments décoratifs Les cols Les coutures Les éléments collés au vêtement Les parties ou matières délicates Avant d utilisez l appareil utilisez le sur un élément peu visible afin de vérifier les résultats Glissez l appareil en suivant la coupe du vêtement ...

Страница 15: ...en sécurité Utilisation Retirez le couvercle Appuyez sur l interrupteur ON OFF un indicateur lumineux vert s allumera Placez l appareil sur une surface plate et aplatissez le tissu s il est chiffonné Faites glisser l appareil sur les tissus puis éteignez l appareil en appuyant de nouveau sur l interrupteur une fois l opération finie ON OFF ...

Страница 16: ...s lames Nettoyage du réservoir Détachez le cerceau du réservoir Retirez les lames pour vider le réservoir soigneusement Replacez les lames après les avoir nettoyés Replacez la grille puis verrouillez le cerceau du réservoir Videz le réservoir en utilisant la brosse fournie ...

Страница 17: ...cement Nettoyez les lames et la grille avec la brosse fournie Nettoyage des lames Retirez le cerceau du couvercle puis la grille Replacez la grille puis verrouillez là Replacez attentivement les lames sur la tête en les poussant légèrement sur l axe central ...

Страница 18: ...es déchets ménagers et doivent être séparés pour procéder au traitement et recyclage des composants Afin de recycler ce produit veuillez déposer tous les composants marqués WEEE au site de recyclage le plus proche où ce produit sera repris gratuitement Ce geste a pour but d aider la préservation des ressources précieuses et prévient les potentiels effets négatifs que ces composants ou tout autre c...

Страница 19: ...19 Gebrauchsanleitung auf Deutsch ...

Страница 20: ... nur für den vorgesehenen Zweck Das Gerät ist nur für den Gebrauch in Innenräumen vorgesehen Es ist nicht für den Außenbereich bestimmt Um Feuer oder Stromschlag bei der Benutzung von elektrischen Geräten zu vermeiden insbesondere in Anwesenheit von Kindern befolgen Sie die grundlegenden Sicherheitsanweisungen Reinigen Sie das Gerät nicht mit ätzenden Reinigungsmitteln Schützen Sie das Gerät vor d...

Страница 21: ... Produktspezifikationen Eingangsspannung 5V 3W Batterie 2 x Ni MH 600mAh Ladezeit ca 8 Stunden Betriebszeit bei voller Ladung ca 50 Minuten Produktname Nennfrequenz Nennleistung Batterie FS16 USB 5V 3W 2x Ni MH 600mAh ...

Страница 22: ...tellt Achten Sie besonders beim Rasieren der folgenden Teile Ihrer Kleidungsstücke Knöpfe und Reißverschlüsse vorstehende Teile Nähte Stiche Gegenstände die auf Stoff geklebt sind empfindliche Teile Bevor Sie das Gerät benutzen versuchen Sie es an einer Stelle des Kleidungsstücks die kaum sichtbar ist Bewegen Sie das Gerät in Richtung des Musters auf dem Kleidungsstück Bei hartnäckigen Fusseln sch...

Страница 23: ...Kunststoffabdeckung Schalten Sie das Gerät ein indem Sie den Ein Ausschalter drücken Danach leuchtet der Ein Ausschalter grün auf Legen Sie das Kleidungsstück auf eine ebene Fläche und glätten Sie die Falten Schieben Sie das Gerät über die Oberfläche des Materials Schalten Sie das Gerät nach dem Beenden durch Drücken des Ein Ausschalters aus EIN AUS ...

Страница 24: ...e inneren Klingen Reinigung des Behälters Nehmen Sie die Abdeckung des Flusenbehälters ab Entfernen Sie die Klingen um den Behälter gründlich zu reinigen Befestigen Sie die Klingen zurück Befestigen Sie die Abdeckung des Flusenrasiers zurück auf das Gerät Leeren Sie den Behälter mit dem mitgelieferten Pinsel ...

Страница 25: ...Sie die Klingen und die Klingenabdeckung mit der mitgelieferten Bürste Reinigung der Klingen Entfernen Sie die Metallklingenabdeckung Setzen Sie die Metallklingenabdeckung wieder ein und befestigen Sie dann die Abdeckung des Flusenbehälters Befestigen Sie die Klingen vorsichtig an der Basis und drücken Sie diese hinein ...

Страница 26: ...schädigung Missbrauch Vernachlässigung und unsachgemäße Reparaturen sind von der Gewährleistung ausgeschlossen 5 Shine Mart Ltd übernimmt keine Verantwortung für zufällige oder Folgeschäden 6 Shine Mart Ltd ist nicht für Wartungsarbeiten zuständig Diese fallen nicht unter die Gewährleistung 7 Gültig in der EU Dieses Produkt ist mit fitted CE geprüfte Typ F Euro Stecker BS Stecker ausgestattet Von ...

Страница 27: ...27 Manual de instrucciones en español ...

Страница 28: ...rato en el exterior Siga las instrucciones básicas de seguridad para prevenir posibles descargas eléctricas o fuego durante el uso de aparatos eléctricos especialmente en presencia de niños No utilice detergentes corrosivos para la limpieza del aparato No deje que el agua u otros líquidos entren en el interior del aparato Este producto no es un juguete El depósito de polvo debe ser desmontado cuid...

Страница 29: ...nes técnicas Voltaje nominal 5V 3W Batería 2 x Ni MH 600 mAh Tiempo de carga 8 horas aprox Tiempo de operación con carga máxima 50 minutos aprox Modelo Ratio de frecuencia Ratio de potencia Batería FS16 USB 5V 3W 2x Ni MH 600 mAh ...

Страница 30: ... que esto podría causarle heridas Preste especial atención al afeitar las siguientes partes de las prendas de vestir alrededor de botones y cremalleras partes salientes costuras hilos elementos pegados a la tela partes delicadas Antes de utilizar el quitapelusas pruébelo sobre un área no visible de la prenda Deslice el quitapelusas sobre la prenda Para retirar bolas de mayor tamaño deslice el apar...

Страница 31: ...ubierta de plástico Encienda el quitapelusas presionando el interruptor ON OFF Cuando esté encendido el piloto mostrará una luz verde Coloque la prenda sobre una superficie plana y alise las arrugas Deslice el aparato sobre la superficie de tela Una vez haya finalizado apague la unidad presionando de nuevo el interruptor ON OFF ON OFF ...

Страница 32: ... así como la cuchilla interna Limpieza del depósito de pelusas Retire la cubiera del quitapelusas Desmonte las cuchillas para poder limpiar el depósito en profundidad Limpie las cuchillas y vuelva a colocarlas Coloque la cubierta sobre el quitapelusas y gírela para cerrarla Vacíe el depósito con ayuda del cepillo incluido ...

Страница 33: ... Limpie las cuchillas y la cubierta metálica con el cepillo Limpieza de las cuchillas Retire la cubierta metálica Vuelva a colocar la cubierta metálica y cierre la cubierta del depósito de pelusas Vuelva a colocar las cuchillas en la base con cuidado y presione suavemente ...

Страница 34: ...ndebido negligencias reparaciones inexpertas o partes consumibles 5 Shine Mart Ltd no se hace responsable de cualquier daño consecuente accidentes o pérdidas 6 Shine Mart Ltd no se hace responsable de cualquier tipo de reparación durante el periodo de garantía 7 Válido únicamente dentro de la UE Este producto está equipado con enchufe fusible Europeo Importado por Shine Mart Ltd RM3 8SB Informació...

Страница 35: ...35 Manuale D istruzioni In Italiano ...

Страница 36: ...critti in questo manuale Non utilizzare il prodotto all esterno Seguire le istruzioni di sicurezza per evitare possibile scariche elettriche o incidentidurante l utilizzo dell apparecchio eletrico specialmente in presenza di bambini Non utilizzare detergenti corrosivi per pulire l apparecchio Evitare il contatto con acqua Questo prodotto non è un giocattolo Il contenitore della polvere deve essere...

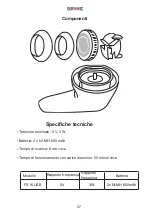
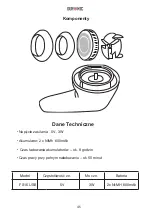
Страница 37: ...iche Tensione nominale 5 V 3 W Batteria 2 x Ni MH 600 mAh Tempo di ricarica 8 ore circa Tempo di funzionamento con carico massimo 50 minuti circa Modello Rapporto frequenza Rapporto frequenza Batteria FS16 USB 5V 3W 2x Ni MH 600mAh ...

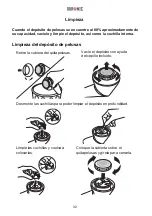
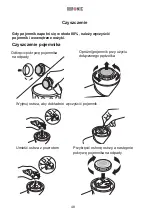
Страница 38: ...re attenzione durante l utilizzo dell apparecchio sulle seguenti parti degli indumenti attorno a bottoni o cerniere parti sporgenti cuciture punti di sutura elementi incollati al tessuto parti o materiale delicati Prima di utilizzare il dispositivo testarlo su un area non visibile del capo Far scorrere il dispositivo con delicatezza sul capo Per rimuovere pelucchi più grandi fare scorrere il dispo...

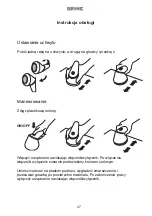
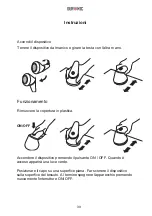
Страница 39: ...mento Rimuovere la copertura in plastica Accendere il dispositivo premendo il pulsante ON OFF Quando è acceso apparirà una luce verde Posizionare il capo su una superfice piana Far scorrere il dispositivo sulla superfice del tessuto Al termine spegnere l apparecchio premendo nuovamente l interruttore ON OFF ON OFF ...

Страница 40: ...e il serbatoio e le lame interne Pulizia del contenitore Rimuovere la copertura del dispositivo Smontare le lame per poter pulire il serbatoio in profondità Pulire le lame e sostituirle Posizionare il coperchio sul pennino e ruotare per chiuderlo Svuotare il serbatoio con l aiuto del pennello incluso ...

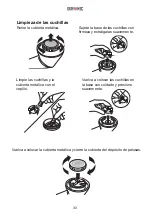
Страница 41: ...catamente Pulire le ame e il coperchio metallico con la spazzola Pulizia delle lame Rimuovere la copertura metallica Sostituire il coperchio di metallo e chiudere il coperchio del dispositivo Sostituire attentamente le lame nella base e premere delicatamente ...

Страница 42: ...odotto deve essere restituito al rivenditore con la prova d acquisto originale 2 Il prodotto deve essere installato e usato seguendo le istruzioni contenute nel manuale 3 Il prodotto va utilizzato solo per scopi domestici Non è da utilizzarsi per uso commerciale 4 La garanzia non copre usura danni volontari abuso negligenza riparazioni inesperte o consumo dei materiali 5 Shine Mart Ltd non è respo...

Страница 43: ...Instrukcja obsługi Polski 43 ...

Страница 44: ...do innych celów niezgodnych z jego przeznaczeniem Urządzenie zawsze musi być używane wewnątrz pomieszczeń Nie jest ono przeznaczone do użytku zewnętrznego Aby uniknąć ryzyka pożaru lub porażenia prądem podczas korzystania z urządzeń elektrycznych zwłaszcza w obecności dzieci należy przestrzegać podstawowych zasad bezpieczeństwa Nie czyścić przy użyciu żrących środków czyszczących Chronić przed dos...

Страница 45: ... Techniczne Napięcie zasilania 5V 3W Akumulator 2 x NiMh 600mAh Czas ładowania akumulatorów ok 8 godzin Czas pracy przy pełnym naładowaniu ok 50 minut Model Częstotliwość zn Moc zn Bateria FS16 USB 5V 3W 2x Ni MH 600mAh ...

Страница 46: ...anie znajduje się na ciele grozi to okaleczeniem ciała Szczególną uwagę należy zachować przy goleniu następujących części ubrań wokół guzików i zamków błyskawicznych części wystających łączeń szwów przedmiotów przyklejonych do tkaniny części delikatnych Przed użyciem wypróbować w mało widocznym miejscu na ubraniu Przesuwać urządzenie zgodnie ze wzorem na ubraniu W przypadku opornych kłaczków przes...

Страница 47: ... plastikową osłonę ON OFF Włączyć urządzenie naciskając włącznik wyłącznik Po włączeniu włącznik wyłącznik zostanie podświetlony kolorem zielonym Umieścić odzież na płaskim podłożu wygładzić zmarszczenia i przesuwać golarką po powierzchni materiału Po zakończeniu pracy wyłączyć urządzenie naciskając włącznik wyłącznik ...

Страница 48: ...emnik i wewnętrzne nożyki Czyszczenie pojemnika Odkręcić pokrywę pojemnika na odpady Wyjmuj ostrza aby dokładnie wyczyścić pojemnik Umieść ostrza z powrotem Przykręcić osłonę ostrzy a następnie pokrywę pojemnika na odpady Opróżnij pojemnik przy użyciu dołączonego pędzelka ...

Страница 49: ...ociągnij do góry Wyczyścić ostrza oraz osłonę ostrza przy użyciu dołączonego pędzelka Czyszczenie ostrzy Odkręć metalową pokrywę ostrzy Przykręcić metalową osłonę ostrzy a następnie przykręcić pokrywę pojemnika na odpady Nałożyć ostrożnie ostrza na trzpień i delikatnie dociśnij ...

Страница 50: ...ia niewłaściwego użycia zaniedbania niewłaściwych napraw lub części eksploatacyjnych 5 Shine Mart Ltd nie ponosi odpowiedzialności za przypadkowe albo celowe zgubienie produktu lub jego uszkodzenie 6 Firma Shine Mart Ltd nie jest zobowiązana do przeprowadzania jakichkolwiek prac serwisowych w ramach gwarancji 7 Obowiązuje na obszarze Unii Europejskiej Ten produkt jest wyposażony we wbudowaną wtycz...

Страница 51: ......
Отзывы: