background image

14

OFFSET INSTALLATION (CONT’D) 

OFFSET/WALL SUPPORT (URES)

When a chimney is offset while 

traversing a wall, the Offset/Wall 

Support can provide necessary 

support. The maximum height of

chimney that can be supported is  

shown within the Maximum Height/

Loadbearing Capacity chart on page 3.

INSTALLATION INSTRUCTIONS

Install the support as follows (Figure 15):

Step 1. Assemble the support collar to fit your 

chimney diameter.

Step 2. Slip the support down over the chimney 

to a proper location. 

Step 3. Tighten the collar around the chimney. 

Step 4. Attach the support brackets to the wall 

using (8) 3" nails or (8) Nº10 x 1-1/4" wood 

screws.

NOTE:

 Be sure that the support attaches to a solid 

wall and not merely to dry wall or siding.

Step 5. Continue installing the chimney according 

to these installation instructions.

5

1

2

3

4

8

7

6

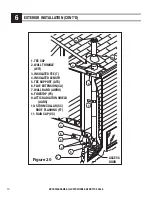
1. INSULATED ELBOW

2. INSULATED WALL

  RADIATION SHIELD

3. INSULATED LENGTH

4. OFFSET/WALL SUP-

PORT

5. FIRESTOP

6. ATTIC RADIATION 

SHIELD

7. ADJUSTABLE ROOF

 FLASHING

8. RAIN CAP

5

Figure 15

NOTE: DIAGRAMS & ILLUSTRATIONS ARE NOT TO SCALE.

Содержание DTP

Страница 1: ...NOTES 4 5 INTERIOR STRAIGHT INSTALLATION SINGLE FLOOR 6 7 INTERIOR STRAIGHT INSTALLATION MULTIPLE FLOOR 8 9 INTERIOR INSTALLATION WITH CATHEDRAL CEILING 10 11 OFFSET INSTALLATION 12 14 EXTERIOR INSTALLATION 15 17 SPECIALIZED COMPONENTS 19 WARRANTY 21 WARNING A MAJOR CAUSE OF CHIMNEY RELATED FIRES IS FAILURE TO MAINTAIN REQUIRED CLEARANCES AIR SPACES TO COM BUSTIBLE MATERIALS IT IS OF UTMOST IMPORT...

Страница 2: ... fire officials about restric tions installation inspections and permits that may be required in your area Replacement Parts If a component of your chimney system is damaged it must be replaced by an identical one from DuraVent NOTE DIAGRAMS ILLUSTRATIONS ARE NOT TO SCALE WOOD AND COAL STOVES If you are planning to install a wood stove we rec ommend that you 1 Choose a stove that bears the label o...

Страница 3: ...3 Have your chimney cleaned by a qualified chimney sweep If you want to clean your chimney yourself clean your chimney using plastic wood or stainless steel brushes Do not use a brush that will scratch the stainless steel interior of your chimney 4 Do not expect chemical chimney cleaners to keep your chimney clean Their use does not negate the necessity of periodically inspecting and cleaning your...

Страница 4: ...ere established by the support Unless directed otherwise in these instruction do not fill this area with insulation GENERAL INSTALLATION NOTES 1 NOTE DIAGRAMS ILLUSTRATIONS ARE NOT TO SCALE 10 Portions of the chimney which may extend through accessible spaces shall be enclosed in all cases to avoid personal contact with the chimney anddamagetothechimney Exceptforinstallation in single and two stor...

Страница 5: ...FS ENCLOSURE 2 MIN 7 1 2 MIN BASE TEE 18 MINIMUM 18 MINIMUM CLEARANCE CAN BE REDUCED IF A CERTIFIED LISTED CHIMNEY CONNECTOR IS USED CLEARANCES CAN BE LESS THAN 2 WHERE ESTABLISHED BY THE SUPPORT Figure 2 GENERAL INSTALLATION NOTES CONT D 1 NOTE DIAGRAMS ILLUSTRATIONS ARE NOT TO SCALE 7 5 MIN ...

Страница 6: ... 6 12 1 8 x 12 1 8 14 x 14 7 13 1 8 x 13 1 8 15 x 15 8 14 1 8 x 14 1 8 16 x 16 Step 3 From below push the square support into the framed opening making sure the square support extends a minimum of 3 1 2 below the finished ceiling Attach the support to the framed box using 12 3 spiral nails or 8 x 1 1 2 wood screws see Figure 3 Screw finish trim included to the ceiling Step 4 Wrap the insulation pa...

Страница 7: ...er Turn the chimney clockwise to lock it in place Continue until the required chimney height is reached You may add a self tapping screw to prevent accidental unlocking Step 8 ROOF FLASHING INSTALLATION Put the roof flashing in place Seal the joint between the roof and the flashing with roofing compound For sloping roofs place the flashing under the upper shingles and on top of the lower shingles ...

Страница 8: ... chimney length in the support Turn it clockwise to lock it in place see Fig ure 7 NOTE Make sure arrow on pipe label is pointing upward Step 5 Install a Firestop Plate FS in each floor through which the chimney passes Step 6 Stack the next chimney length on the first length Be sure that the male and female threads are not in line when putting the lengths together Turn the chimney clockwise to loc...

Страница 9: ...g compound For sloping roofs place the flashing under the upper shingles and on top of the lower shingles Nail the flashing to the roof using roofing nails Place the storm collar over the chimney and the flashing Tighten it with the bolt supplied making sure the joint is properly caulked see Figure 9 Step 9 Attach the rain cap to the top of the chim ney see page 3 Cap removal maintenance SCREWS SC...

Страница 10: ...iling NOTE The bottom portion of the support must project below the ceiling to ensure appropriate clearances to stovepipe See Table 6 Step 3 Using a level make sure the support is ver tical If the support extends above the roof cut it flush with the top of the roof Nail the support to the framed opening using 12 3 spiral nails or 8 x 1 1 2 wood screws See Figure 10 Step 4 Place first chimney lengt...

Страница 11: ...t and box exten sion Approved insulation must be listed compliant with ASTM E136 ULC S114 as Non Combustible have a melting tempera ture above 2000 F 1100 C and be water resistant with low moisture absorption Materials such as rockwool or mineral wool qualify TO CONTINUE INSTALLATION REFER TO FLASHING INSTALLATION ON PAGE 6 Figure 12 EXTENSION 8 METAL SCREWS SUPPORT SS 2 OVERLAP CAN BE REDUCED IF ...

Страница 12: ...29 3 4 38 1 4 46 3 4 RISE OFFSET Table 7 RAIN CAP VC STORM COLLAR SC ROOF SUPPORT RS FLASHING F7 4 METAL SCREWS MAX OFFSETTING CHIMNEY 6 FT WITHOUT SUPPORT ELBOW ELBOW SUPPORT SFC Figure 13 Note All dimensions are in inches NOTE DIAGRAMS ILLUSTRATIONS ARE NOT TO SCALE The maximum length of unsupported offset chimney is 6 If the offset chimney is longer than 6 then it must be supported at 6 interva...

Страница 13: ...enter the chimney and nail or screw the support to the roof or floor using 8 2 1 2 nails or 8 N 8 1 1 4 wood screws Step 4 Install the remaining chimney lengths until the required chimney height is reached Figure 14 INSTALLATION INSTRUCTIONS Install the required support and the chimney as described in the support s installation instructions When you reach the height at which the elbow will be inst...

Страница 14: ...p 2 Slip the support down over the chimney to a proper location Step 3 Tighten the collar around the chimney Step 4 Attach the support brackets to the wall using 8 3 nails or 8 Nº10 x 1 1 4 wood screws NOTE Be sure that the support attaches to a solid wall and not merely to dry wall or siding Step 5 Continue installing the chimney according to these installation instructions 5 1 2 3 4 8 7 6 1 INSU...

Страница 15: ...SC and URES canbe installed either below or above the insulated tee 4 IMPORTANT To ensure minimum clearances to stovepipe the insulated pipe length passing through the wall must project beyond the inside wall by a minimum of 5 The maximum projection length is 24 See Figure 16 5 Thedistancebetweenthestovepipeandaparallel combustible wall or ceiling must not be less than 18 The distance between the ...

Страница 16: ...sed to hang the tee support This will ensure a strong attachment to the exterior wall Table 8 NOTE The cavity surrounding the outer radiation shield and the wood frame must be filled with insulation see Figure 19 Step 5 Attach the clean out cap to the support or directly to tee bottom depending on configu ration see Figures 16 The cap is in the box with the insulated tee Step 6 The minimum length ...

Страница 17: ...height is reached NOTE In exterior installations the chimney must be stabilized at 8 foot intervals A wall band AWBU or Offset Support URES can be used for this purpose TO CONTINUE INSTALLATION SEE ROOF FLASHING INSTALLATION on page 7 STORM COLLAR FLASHING 2 FRAMED OPENING DIMENSION Figure 17 WALL SUPPORT Figure 19 mall the n shield in e filled with ed with ION CONT D WALL STUD LARGE WALL THIMBLE ...

Страница 18: ... 1 ACCESS DOOR 1 TEE CAP 2 WALL THIMBLE WTI 3 INSULATED TEE T 4 INSULATED LENGTH 5 TEE SUPPORT ATS 6 FLUE EXTENSION CA 7 WALL BAND AWBU 8 FIRESTOP FS 9 ATTIC RADIATION SHIELD AARS 10 STORM COLLAR SC ROOF FLASHING F7 11 RAIN CAP VC Figure 20 EXTERIOR INSTALLATION CONT D 6 ...

Страница 19: ...n FACTORY BUILT FIREPLACES For chimneys installed on factory built fireplaces follow the installation instructions accompanying the fireplace These are used only with wood burning fireplaces which have been certified for use with DTP ANGLED INSULATED RADIATION SHIELD WRSI30 Ithasbeendesignedforusewhenachimneypasses through a wall at an angle See Table 9 AP Figure 21 B C E WRSI30 A D Figure 22 7 Ø ...

Страница 20: ...20 NOTE DIAGRAMS ILLUSTRATIONS ARE NOT TO SCALE ...

Страница 21: ...taining such materials must not be burned in the appliance or fireplace In case of a chimney fire the chimney must be inspected and approved by a certified Chimney Sweep before reuse After each annual inspection maintenance and cleaning the certified Chimney Sweep must fill out and date the appropriate section of the warranty card provided with the chimney liner LIMITATIONS ON INTERNET SALES Notwi...

Страница 22: ...hen ordering repair parts always give the following information 1 The model number of the vent system 2 The part number 3 The description of the part 4 The quantity required 5 The installation date of the chimney system If you encounter any problems or have any questions concerning the installation or application of this sys tem please contact your dealer DuraVent 877 Cotting Court Vacaville CA 95...

Отзывы: