background image

IB-CD203(AD)-WM-E-012503

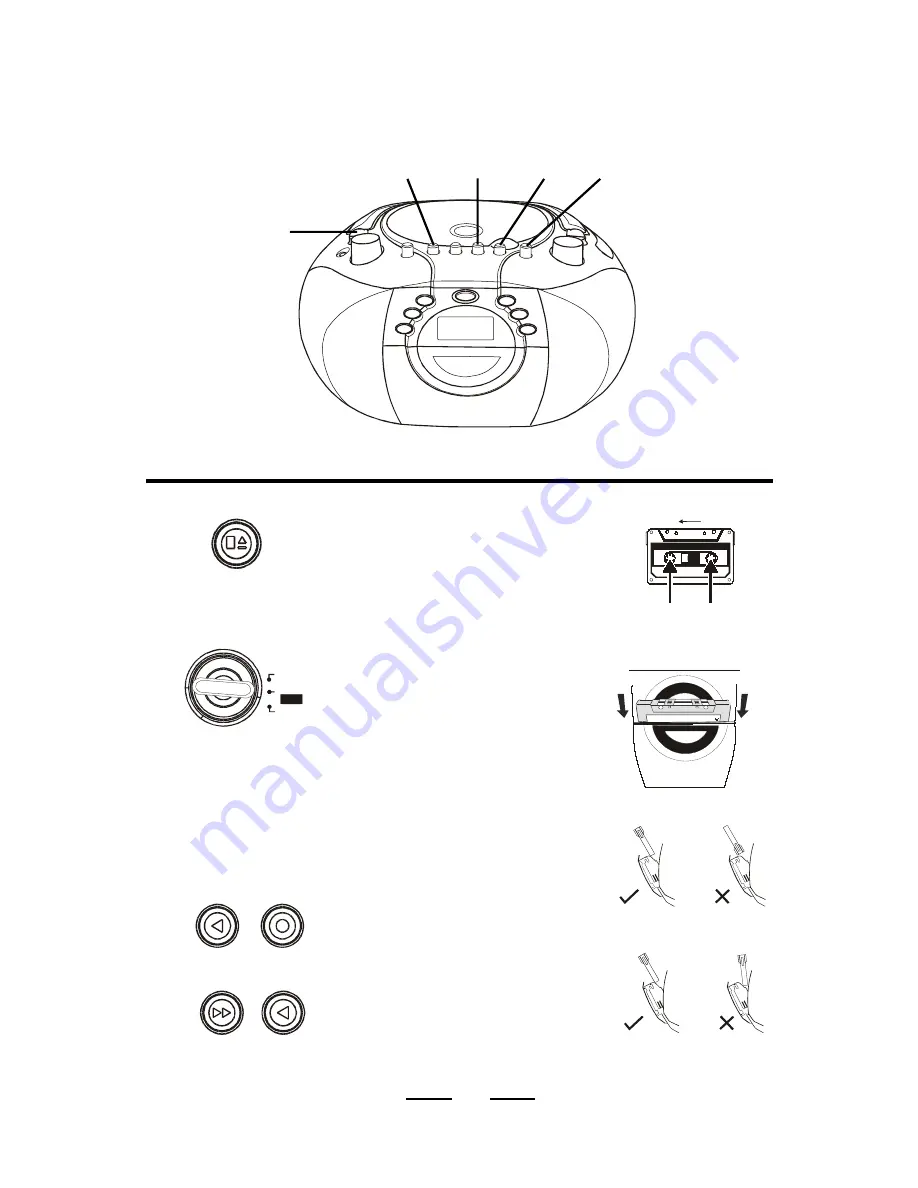
RECORDING ON A TAPE

1

2

To hear what you recorded, rotate

the FUNCTION switch to TAPE

position, then press REWIND and

PLAY.

12

FULL

REEL

EMPTY

REEL

TAPE PLAY DIRECTION

A

OK

NO

OK

NO

Press the STOP/EJECT button to

open the tape compartment and

insert a blank tape. Select the

program source (AM, FM, CD, or

built-in microphone) you want to

record.

To record from the CD player.

Rotate the FUNCTION switch to

CD position, and insert a CD, then

follow the CD playing steps to play.
To record from a radio. Rotate

the FUNCTION switch to RADIO

position, and tune into the station

that you want.
To record from the built-in

microphone, rotate the FUNCTION

switch to the TAPE position, and

speak in front of the set.

Press the RECORD button to start

recording. (The PLAY button is

depressed automatically.)

4

3

Connect the supplied AC power cord or batteries (refer to page 4).

STOP/EJECT

button

REWIND

button

PLAY

button

RECORD

button

FUNCTION

switch

INSERT TAPE THIS WAY

FULL REEL ON RIGHT

OFF

RADIO

TAPE

CD

EJECT

STOP

PLAY

RECORD

REWIND

PLAY

Содержание CD-203

Страница 1: ...RECEIVES AM FM STEREO BROADCASTS RECORDS FROM CD RADIO OR BUILT IN MICROPHONE FM STEREO AND POWER LED INDICATORS 2 WAY POWER AC DC USES 8 SIZE C BATTERIES not included COMPACT DISC PLAYER WITH AM FM STEREO CASSETTE RECORDER MODEL CD 203 OPERATING INSTRUCTIONS PLEASE READ CAREFULLY BEFORE USE ...

Страница 2: ...from the apparatus 11 Only use attachments accessories specified by the manufacturer 12 Unplug this apparatus during lightning storms or when unused for long periods of time 13 Refer all servicing to qualified service personnel Servicing is required when the apparatus has been damaged in any way such as power supply cord or plug is damaged liquid has been spilled or objects have fallen into the ap...

Страница 3: ...e the appliance beyond that described in the operating instructions All other servicing should be referred to qualified service personnel CAUTION Use of controls or adjustments or performance of procedures other than those specified herein may result in hazardous radiation exposure This compact disc player is classified as CLASS 1 LASER PRODUCT as stated on the bottom of the set Do not apply oil o...

Страница 4: ...eries may result in battery eletrolyte leakage or explosion 9 Remove the batteries from this product if the product will not be used for a long period of time several months or more since during the period the batteries could leak damaging the product 10 Discard weak or dead batteries as soon as possible since they are more likely to leak in the product Batteries should be replaced depending on th...

Страница 5: ...batteries because it uses less power than the CD player TIP 1 Connecting the AC power Insert the AC plug located at the battery compartment into 120V 60Hz standard household outlet 2 Using the player on batteries Insert 8 size C batteries not supplied into the battery compartment To use the player on batteries disconnect the AC power cord from the player BATTERY DOOR on the bottom of the set CHOOS...

Страница 6: ... CD DOOR to open it and place a CD in the CD compartment The label side of the CD should face upward Close the CD DOOR by pushing it down The display will show the total tracks of that CD Press the CD PLAY PAUSE button The PLAY PROG lamp will be steady on the player plays all the tracks once FUNCTION switch PLAY PAUSE button CD DOOR TIP will show in the display if there is no CD disc in the CD com...

Страница 7: ...his type of player Track number USE THESE BUTTONS FOR ADDITIONAL OPERATIONS The track number current playing will flash during pause Press again to resume play after pause FORWARD BACKWARD Rotate the FUNCTION switch to TAPE position the AC power lamp goes off VOLUME control FUNCTION switch Open the CD DOOR by lifting here TIP To resume play press the PLAY PAUSE button again the track number will s...

Страница 8: ...t the track by pressing or and then press 3 Press the REPEAT button Press the REPEAT button once the REPEAT lamp will be steady on Press the REPEAT button twice the REPEAT lamp will flash all the tracks all songs During programmed play press the REPEAT button twice both the REPEAT and PLAY PROG lamps will flash R E P E A T P LA Y P R O G To cancel Repeat Play Press the REPEAT button until the REPE...

Страница 9: ...OP mode 2 The programmed memory will be lost if the STOP button is pressed or the AC plug is shut off or the CD door is opened 1 Rotate the FUNCTION switch to CD position Make sure the CD is stopped 2 Press the PROGRAM button The letters P0 will show and the PLAY PROG lamp will flash 3 Press or to select the tracks you want to program in the order you want 4 Press the PROGRAM button to confirm The...

Страница 10: ...ng an FM Stereo broadcast 9 LISTENING TO THE RADIO Connect the supplied AC power cord or batteries refer to page 4 Rotate the FUNCTION switch to RADIO position the POWER lamp will be on Rotate the BAND switch to the proper band position AM FM or FM STEREO that you want FUNCTION switch BAND switch FM ST lamp TUNING knob OFF RADIO TAPE CD TUNING DN UP POWER FM ST ...

Страница 11: ... will automatically start playing the previously tuned station 10 USE THESE BUTTONS FOR ADDITIONAL OPERATIONS VOLUME control Rotate the FUNCTION switch to TAPE position To improve broadcast reception Change position of the antenna for FM or FM Stereo Move the set itself for AM If the FM broadcast is noisy rotate the BAND switch from FM Stereo to FM TIP FUNCTION switch VOLUME control ...

Страница 12: ...nsert and press PLAY AUTO STOP INSERT TAPE THIS WAY FULL REEL ON RIGHT 11 FULL REEL EMPTY REEL TAPE PLAY DIRECTION A OK NO OK NO Connect the supplied AC power cord or batteries refer to page 4 Press the STOP EJECT button to open the tape compartment and insert a recorded tape then close the door Press the PLAY button the player turns on and starts playing FUNCTION switch STOP EJECT button PLAY but...

Страница 13: ... to CD position and insert a CD then follow the CD playing steps to play To record from a radio Rotate the FUNCTION switch to RADIO position and tune into the station that you want To record from the built in microphone rotate the FUNCTION switch to the TAPE position and speak in front of the set Press the RECORD button to start recording The PLAY button is depressed automatically 4 3 Connect the ...

Страница 14: ...d the power lamp is turned off USE THESE BUTTONS FOR ADDITIONAL OPERATIONS VOLUME control Stop playback or recording STOP EJECT button FAST FORWARD or REWIND button Fast forward or rewind the tape PAUSE button Press again to resume play or recording after pause STOP EJECT button Pause playback or recording Eject the cassette STOP EJECT REWIND PLAY Connect the supplied AC power cord or batteries re...

Страница 15: ...t be subjected to the direct rays of the sun Since a strong magnet is used for the speakers keep personal credit cards using magnetic coding or springwound watches away from the player to prevent possible damage from the magnets On Safety As the laser beam used in the CD player section may be harmful to the eyes do not attempt to disassemble the cabinet Refer servicing to qualified personnel only ...

Страница 16: ...side A Tab for side B 15 PRECAUTIONS continued Notes on CDs Before playing clean the CD with a cleaning cloth Wipe the CD from the center out Do not use solvents such as benzene thinner commercially available cleaners or anti static spray intended for vinyl LPs Do not expose the CD to direct sunlight or heat sources such as hot air ducts nor leave it in a car parked in direct sunlight as there can...

Страница 17: ...tivity or even erase the recording 2 Do not store tape for any length of time in a hot moist or dusty place NOTE In order to see and clean the tape head you may have to press PLAY first MAINTENANCE Cleaning the Lens If the lens becomes dirty it may cause a skipping of sound during CD operation Clean with a commercially available lens cleaner and blower Cleaning the Tape Head Wipe the tape head the...

Страница 18: ... less power than the CD player Tape jamming or tangling Use only better quality tapes Do not use a cassette with more than 90 minutes Make sure there are no loose layers of tape visible before inserting the cassette 17 The tape does not erase completely Clean the heads pinch roller and capstan Insert the AC plug into a wall outlet securely Make sure the batteries are installed correctly and they a...

Страница 19: ...Hz 12 Watts DC 12V 8 size C batteries not included Alkaline batteries are recommended Width 12 1 2 Depth 9 1 8 Height 6 3 8 Weight 4 4 lbs without batteries Radio Section Frequency range FM 88 108 MHz 530 1700 kHz Tape Recorder Section Frequency response Standard normal bias cassette tape 70Hz 10kHz CD Section Laser wavelength 760 800 NM Tracking method 3 spot error detection 3 86 mm lens Frequenc...

Отзывы: