background image

82

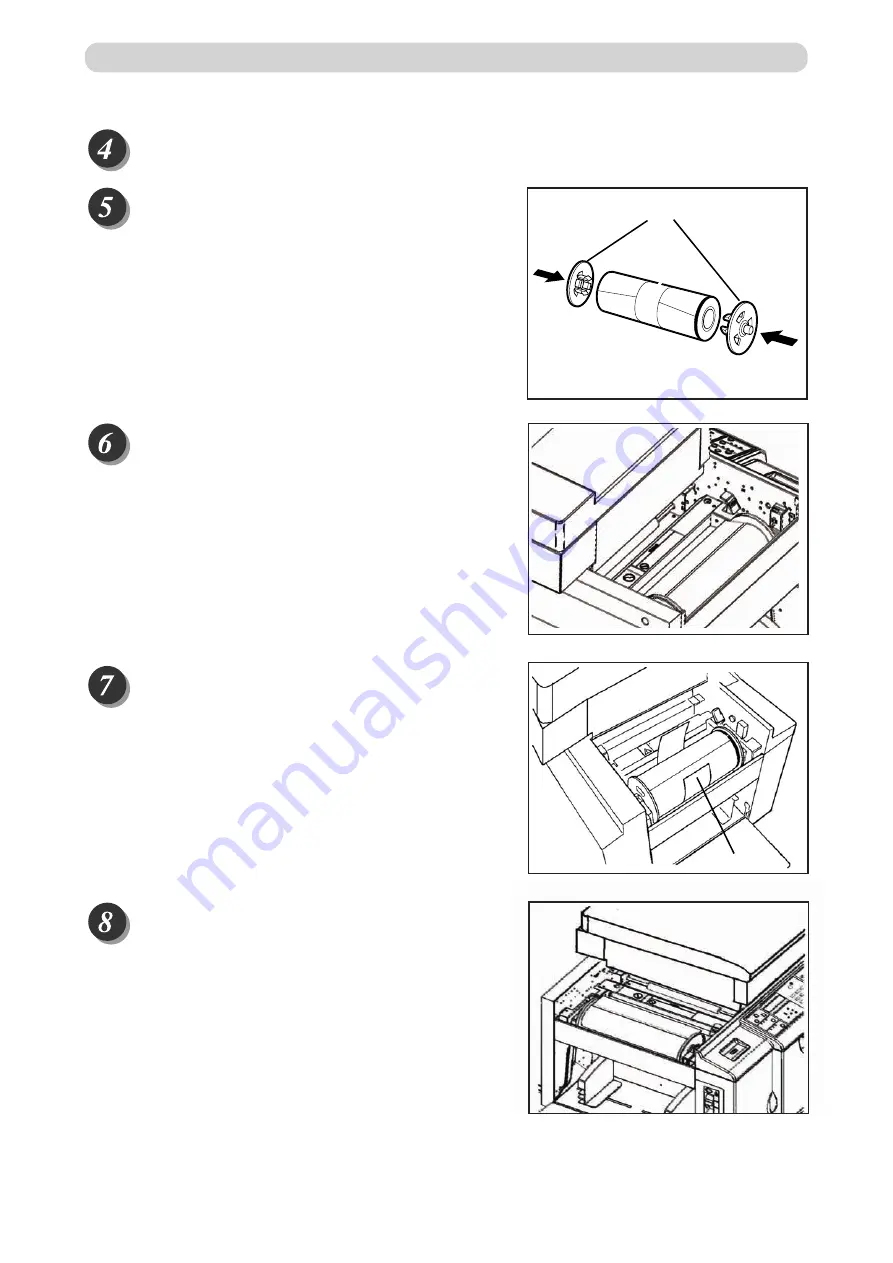
Replacing the Master Roll

Take out a new master roll from the bag.

Set the master roll in the direction as shown in
the illustration at right.

master holder

Insert the master roll into the machine

the control panel.

Peel off the seal.

Pull out the master and insert the front

head of the master until it contacts the roller.

SEAL

so that the ID mark line on the roll is facing

Содержание DP - M400

Страница 1: ...INSTRUCTION MANUAL DUPRINTER DP M400 410 420 Be sure to read this manual prior to use Please leave this manual at the site of use for easy reference ...

Страница 2: ...tre éliminé comme des ordures ménagères Recyclez le dans les sites adaptés qui vous seront indiqués par les autorités locales ou renseignez vous auprès de votre fournisseur En veillant à ce que ce produit soit éliminé correctement avec un traitement une collecte et un recyclage adaptés vous contribuez à éviter son action nocive potentielle sur l environnement et la santé humaine Fr Smaltimento di ...

Страница 3: ...rency and bonds etc that are valid in foreign country cannot be duplicated Unused postage stamps and postcards cannot be duplicated without governmental consent Government issued papers pertaining to stamps liquor and sales tax laws cannot be duplicated 2 Printed matters that need caution Private issued securities stocks bills and checks etc passes and tickets needs caution in duplicating unless a...

Страница 4: ...or sometimes a prohibited action Theinstruction itself is indicated by pictorialsymbols drawn in white on thedisc In the example shown here the instruction is Remove the plug from the outlet Precautions for use WARNING If the machine is used after foreign matter metal fragments water or liquid has entered the machine this may result in fire or electric shock Turn the mainunit s powerswitch OFF and...

Страница 5: ... is imperfect and electrical leakage occurs fire or electric shock could result WARNING Do not use a source voltage other than that specified Do not connect two or more loads to a single outlet Doing so may result in fire or electric shock Do not remove or insert the power plug with wet hands Doing so may result in electric shock Do not damage break or modify the power cord Do not place heavy obje...

Страница 6: ...ls over this could result in personal injury CAUTION Before moving the machine remove the power plug from the outlet If the cord is damaged this may result in fire or electric shock Do not place the machine in an unstable position such as on an unsteady support or sloping area If the machine is dropped or falls over this could result in personal injury Do not place the machine in a place subject t...

Страница 7: ... objects into the master feed area U5 T3110 WARNING or it will damage electric parts inside When a master sheet is caught in the master feed area remove carefully Please refer to manual for the correct procedure 2 Do NOT remove this cover There is moving cutting machinery insibe that could injure you J3 T3200 WARNING 3 WARNING Do NOT put hands inside machine while it is operating Hands could get c...

Страница 8: ...talling the machine in the direct sunlight or heat such as near a stove Ink may deteriorate and may cause bad prints while the machine may indicate errors due to overheating caused by sunlight Also avoid hot cold or humid areas since paper may absorb moisture causing paper jams or wrinkles Notes on Safety Please Read and Observe ...

Страница 9: ...7 Maintenance ...

Страница 10: ...contact our service person Clean the exterior in the followingprocedures 1 Use soft cloth with water or mild detergent 2 Wipe the exterior 3 Wipe off the liquid withdry soft cloth Gently wipeoff the dust on the glass with dry soft cloth Gently wipe off the dust on the LCD panel with dry soft cloth Never use wet cloth It may cause damage WARNING Never use alcohol or solvent cleaner It may tarnish o...

Страница 11: ...5 DP M420 A3 B4 A4 B5 86 B4 A4 B5 A5 81 A3 A4 B4 B5 70 Notes on Safety Please Read and Observe Conventions Used in This Manual Each page of descriptions in this manual of how to operate the DP M400 410 420 is set up as follows Pictorial Symbols and Other Notations Used in This Manual Introduces instructions for correct operation of the machine If these instructions are ignored the machine may not ...

Страница 12: ...ting Paper Feed Pressure 35 Loading Documents 36 Positioning the Document 36 Loading Document on Document Glass Plate 37 Loading Document in ADF Available only when ADF installed 38 Enlargement and Reduction 39 Enlarging Reducing from Standard Size Document to Standard Size Paper 39 94 Reduction 40 1 Step Enlargement and Reduction 42 Selecting Printing Paper Size 44 Text Photograph Text and Photog...

Страница 13: ...Only With Interface Kit Installed 76 Chapter 5 Replacing Consumables Replacing the Ink Pack 78 Replacing the Master Roll 81 Replacing the Master Ejection Core 84 Replacing the Drum Unit 86 Removing the Drum Unit 86 Installing the Drum Unit 88 Chapter 6 Troubleshooting Countermeasures to Troubles 92 Power Does Not Turn ON 92 Mastermaking Printing is Not Possible 92 Error Messages 93 Supplying or Ch...

Страница 14: ...12 2 1 Contents Chapter 7 Specifications and Maintenance Specifications 110 Appendix Index Quick Operation Guide 116 114 ...

Страница 15: ...a P 40 This function slightly reduces the size of a document when printing to the same standard paper size as the docu ment A4 Document A4 Printout 94 Function Quick Reference 1 Step Enlargement and Reduction a P 42 This function enlarges or reduces a document in 1 steps between 50 and 200 Document Printout The following is a quick reference to the functions of the DP M400 410 420 printer ...

Страница 16: ...GHIJKLNO PQRSTUVWXYZ ABCDEFGH ABCDEFGHIJKLNO PQRSTUVWXYZ abcdefghijklmnopqrs Text Text Photograph Photograph Book Shadow Eraser Mode a P 60 This function erases the shadows on the center or edges of book or other folded documents when printing the open spread Document Printout Printout With shadow eraser Without shadow eraser 2 images 4 images 8 images Document Multiple Printing a P 56 This functi...

Страница 17: ...5 sets 1 1 1 1 Changing Print Quantity per Document a P 67 This function changes the number of prints made from each document 2 2 2 3 2 3 3 3 3 1 Documents 1 1 3 1st document 5 copies x 2 sets 2nd document 3 copies x 4 sets 3rd document 2 copies x 5 sets 2 2 in 1 Layout Available only with ADF installed a P 58 This function prints two different documents on one page Documents Printout ...

Страница 18: ...16 ...

Страница 19: ...ease be sure to read this chapter carefully before attempting to use the printer System Setup 18 Part Names and Their Functions 19 Printer Appearance 19 Control Panel 22 LCD Panel 24 Turning Power ON OFF 25 Turning ON Printer Power 25 Turning OFF Printer Power 26 Standard Mode 26 Document Printing Paper Specification 28 Acceptable Documents 28 Acceptable Printing Paper 28 How Mastermaking and Prin...

Страница 20: ...18 System Setup The machine and its optional equipment are set up as follows ...

Страница 21: ...ure r Side guides Slide to match the width of the paper t Feed tray Load paper in this tray y Support tray Pull out when loading paper u Power switch Press to switch the power on and off i Cabinet Option Place the printer on this stand o Castor locks Lock the printer in position on the floor Always lock the castor locks when installing the printer 0 Front cover Open to replace ink pack and drum un...

Страница 22: ...rum unit Ink pack Scanner unit Lever This lever releases the ink pack holder Lever This lever is locks or unlocks the drum Master set switch When the master set switch is pushed the master is pulled in and set Master roll Thermal head escape lever Master holder ...

Страница 23: ... jams etc 4 Print tray Holds the printed paper 5 Paper stopper Slide to match the size of printed paper 6 Paper stacker guides Slide to match the size of printed paper 7 Master ejection box Open to replace the master ejection core etc 8 Master ejection box lid release lever Press to open the top of the master ejection core box Use when replacing the master ejection core etc Reference page 49 50 49...

Страница 24: ...key moves the position of the lit lamp that indicates the selected document mode Document mode The lamp of the selected mode lights r LCD panel Displays the number of printed paper Also displays an error message when an error occurs t FUNCTION SWITCH key Press to toggle between the normal mode and the function select mode LEFT SELECT key Press to select left function y u Reference page 93 39 39 47...

Страница 25: ...er of sets for sectional prints 2 Key pad Use to enter the number of prints 3 CLEAR key Press to reset the displayed number of prints to 0 Only the number of prints is cleared 4 Printing speed indicator lamp The lamp of the specified printing speed lights 5 PRINTING SPEED ADJUSTMENT keys Press to adjust the printing speed 6 PRINTING POSITION ADJUSTMENT keys Press to adjust the printing position 7 ...

Страница 26: ...Displays the number of prints to be made w Sets Displays the number of sets to be printed e Zoom ratio Displays the selected enlargement reduction ratio Reference page 33 65 0sht 1set q w e 1 0 0 LCD Panel Part Names and Their Functions ...

Страница 27: ... a wall outlet Switch the power switch to the position The power turns ON The message SET PRINT PAPER is displayed on the LCD panel The printer functions are now set in Standard Mode a page 26 When paper is loaded in the feed tray the screen shown at right is displayed Turning Power ON OFF SET PRINT PAPER 0sht 1set 1 0 0 When the screen shown at right is displayed press PRINT key then input ID and...

Страница 28: ...s first turned ON or ALL CLEAR key is pressed the functions are reset to standard mode The standard mode settings are as follows Print quantity 0 Print position Standard lit Print speed Standard lit Zoom 100 lights Document mode Standard Turning Power ON OFF MASTER SIZE DP M400 A4 DP M410 LG MASTER DARKNESS NORMAL 94 OFF Multiple EXPOSURE OFF FREE ZOOM OFF 2 IN 1 OFF DP M420 B4 ...

Страница 29: ...inter can be ID PW 1sht 1set 1 0 0 operated as normal ENTER ID AND PASSWORD Use the PRINT key to confirm By using CLEAR key to delete the all that you inputted and then input it again again Please input ID and password that are given by administrator Input ID and password By pressing CLEAR key twice to input ID and password using number keys When ID is completed the cursor moves to password area a...

Страница 30: ... already been made remove and then reload the document Always use documents of the same size If you load documents of different lengths the printer may not operate correctly Acceptable Printing Paper DP M400 DP M410 DP M420 Paper thickness Paper stacking capacity Paper size Printing area 204mm X 288mm 210mm X 347mm 250mm X 355mm The following types of paper cannot be used Paper with large file bin...

Страница 31: ...e feeder roller and paper separator unit is pressed against the drum unit by the press roller There are small holes over only the image area of the master that is attached to the drum and ink that seeps from these holes is transferred to the paper The paper is then peeled from the master by the paper stripper finger The paper is directed onto the paper ejection belt by a fan unit and discharged fr...

Страница 32: ...30 ...

Страница 33: ...Paper Feed Pressure 35 Loading Documents 36 Positioning the Document 36 Loading Document on Document Glass Plate 37 Loading Document in ADF Available only when ADF installed 38 Enlargement and Reduction 39 Enlarging Reducing from Standard Size Document to Standard Size Paper 39 94 Reduction 40 1 Step Enlargement and Reducation 42 Selecting Printing Paper Size 44 Text Photograph Text and Photograph...

Страница 34: ...cument on Document Glass Plate Open the document cover Place the document face down on the document glass plate aligned with the scale Close the document cover If you are loading the document in the optional ADF a See page 38 Loading Document in ADF Adjust the slide guide to the marks for the size of the document Place the document face up in the document tray Select the zoom ratio The zoom ratio ...

Страница 35: ...opies Use the keypad to specify the number of prints to make You can specify up to 9999 prints If you make a mistake entering the number of prints press C CLEAR key then enter the correct number Press PRINT key The count displayed on the LCD panel is decremented by one for each print made The printed pages are output to the print tray a See page 48 Print Output To stop a print run press STOP key T...

Страница 36: ...proximately 1 300 sheets in this printer Open the support tray Hold the lever and adjust the side guides to the paper size Load a stack of aligned sheets between the paper guides and press the stack lightly toward the machine You can load the feed tray with approximately 1 300 sheets of 64gsm high grade paper IMPORTANT ...

Страница 37: ...he paper feed pressure if an feeding error occurs when using thick or thin paper When no thick paper is fed Adjust the paper feed pressure adjuster lever to HIGH When two pieces of thin paper are fed Adjust the paper feed pressure adjuster lever to LOW Loading and Replacing Paper ...

Страница 38: ...ment The document can be loaded in the portrait or landscape position A4 and B5 size documents can be loaded in the portrait or landscape position Use the landscape position when enlarging or reducing from standard size documents to standard size paper such as A5 to A4 A3 and B4 documents can only be loaded in the landscape position Loading Documents IMPORTANT ...

Страница 39: ...s plate Place the document face down on the document glass plate aligned with the guide When you load a non standard size docu ment place it with the center of the document aligned with the arrow on the guide Gently close the document cover When you place a thick document such as a book on the document glass plate take care not to force the document cover as this may damage the document glass plat...

Страница 40: ...matically selected when a document is loaded in the ADF The ADF then takes priority over the document glass plate in the mastermaking process Align the document guide with the marks for the size of document to be loaded in the ADF Place the document face up in the document tray Mastermaking starts with the top document in the tray Do not attempt to remove or add to the documents in the document tr...

Страница 41: ...zoom ratios European paper sizes DP M400 A5 A4 141 A5 B5 122 B5 A4 115 U S paper sizes Reductions You can reduce a standard size document onto standard size paper using the following zoom ratios European paper sizes A4 B5 86 B4 A4 B5 A5 81 A3 A4 B4 B5 70 U S paper sizes Set the desired zoom ratio before starting the mastermaking process Press ENLARGEMENT REDUCTION key B5 B4 A5 A4 141 A4 B4 A5 B5 1...

Страница 42: ...e all settings are reset to standard mode a page 26 94 Reduction In this mode the copy is printed at 94 the size of the document When it is not possible to print the edges of the document image this mode allows you to make a minor reduciton so that the edges of the image are included Select 94 Reduction before mastermaking Enlargement and Reduction 141 141 0sht 1set European paper sizes 141 B5 B4 ...

Страница 43: ... case all settings are reset to standard mode a page 26 You can select 94 reduction even when you have selected other than 100 In this case the zoom ratio will be the zoom ratio shown on the LCD 94 Enlargement and Reduction Press SELECT key to move the arrow 3 x 94 ON OFF before ON 94 reduction is set and press SELECT key several times 100 0sht 1set 94 and the standard screen appears REFERENCE ...

Страница 44: ... Use the keypad to enter the scaling ratio Example 70 You can enter a value for the scaling ratio within the range 50 to 200 If you enter a value smaller than 50 50 will automatically be selected and displayed and if you enter a value larger than 200 200 will automatically be selected and displayed 7 FREE ZOOM 70 OFF Press actual zoom ratio 7 FREE ZOOM OFF 7 FREE ZOOM 100 OFF SELECT key to move th...

Страница 45: ...5 to 8 of Basic Printmaking page 32 Press FUNCTION SWITCH key The scaling ratio is set and press SELECT key several times You can return to 100 using the following methods Press ALL CLEAR key In this case all settings are reset to standard mode a page 26 and the standard screen appears 7 0 0sht 1set REFERENCE ...

Страница 46: ... M410 DP M400 DP M420 1 B4 Press FUNCTION SWITCH key Press SELECT key several times to show the screen at right then press FUNCTION SWITCH key again 1 B4 A4 B5 A5 1 LG LT ST Press FUNCTION SWITCH key 1 B4 The paper size is set and press SELECT key several times and the standard screen appears Selecting Printing Paper Size MASTER SIZE MASTER SIZE MASTER SIZE MASTER SIZE U S paper sizes G L LT ST MA...

Страница 47: ...45 2 1 2 Printing Using Basic Functions MEMO ...

Страница 48: ...h the document Text mode Enhances the printing of text documents Documents suited for text mode Text documents Documents that include black and white photos that have already been screen processed Text Photograph mode Enhances the printing of documents with both text and photographs Documents suited for text photograph mode Documents with both text and photographs Photo mode Enhances the printing ...

Страница 49: ... time DOCUMENT MODE SWITCH key is pressed the lit document mode indicator lamp changes as follows Text Text Photograph Photograph Text To return to Text mode use one of the following two methods Press DOCUMENT MODE SWITCH key to select Text Press ALL CLEAR key In this case all settings are reset to standard mode a page 26 Start mastermaking and printing a a a a a See steps 5 to 8 of Basic Printmak...

Страница 50: ... When you use the printer on a table install the print tray into the upper fitting Stacking capacity 900 sheets 64gsm high grade paper When you use a cabinet option install the print tray into the lower fitting Stacking capacity 1300 sheets 64gsm high grade paper Open out the paper stacker guides Print Output When the printer is used on a table When a cabinet is used ...

Страница 51: ...49 2 1 2 Printing Using Basic Functions Open out the paper stopper Adjust the paper stacker guides and paper stopper to the size of the printing paper Print Output ...

Страница 52: ... the printed pages are not trued up Adjusting jump plate Adjust the plate according to the paper size Ex Expand the guides fully when using paper with B4 or larger size Truing up printed pages When using thinner paper turn the lever up When using thicker paper turn the lever down Print Output ...

Страница 53: ...Saving Settings 52 Retrieving Settings 54 Clearing Settings 55 Multiple Printing on One Page 56 Multiple Printing on One Page 56 2 in 1 Layout Available only with ADF installed 58 Book Shadow Eraser Mode 60 Adjusting Master Darkness 62 Batch Printing 63 Batch Printing 63 Batch Printing changing print quantity per document 67 Ink save mode 70 Dividing Sections with Tape 69 ...

Страница 54: ...nel displays the settings you want to store Press FUNCTION SWITCH key Press SELECT key several times to show the screen at right Use the keypad to specify the number you want to store You can store numbers from 1 to 9 Select C to cancel The numbers already stored are displayed flashing Select a number that is not flashing 5 MEMORY MODE SELECT key several times select SAVE then press FUNCTION SWITC...

Страница 55: ...s Any previous settings stored in the memory channel will be deleted when you save new settings 1 The screen changes to the MEMORY MODE 5 MEMORY MODE screen The settings are saved and press SELECT key several times and the standard screen appears IMPORTANT ...

Страница 56: ...pad to specify the number you want to retrieve The saved number blinks Select the blinking number 5 MEMORY MODE 5 MEMORY MODE 5 MEMORY MODE RETRIEVE RETRIEVE 123456789 C Press FUNCTION SWITCH key Press SELECT key several times to show the screen at right The screen changes to the MEMORY MODE screen The saved data is retrieved and press SELECT key several times and the standard screen appears Press...

Страница 57: ...and the standard screen appears Each time SELECT key is pressed the arrow on the LCD panel moves as follows SAVE RETRIEVE CLEAR CANCEL 5 MEMORY MODE 5 MEMORY MODE CLEAR CLEAR 123456789 C Press FUNCTION SWITCH key Press SELECT key several times to show the screen at right Press FUNCTION SWITCH key Use the 5 MEMORY MODE The screen changes to the MEMORY MODE screen The saved data is cleared and press...

Страница 58: ...pies of the document on one page Copying B5 to B4 2 prints on one page 2 images 4 images 8 images Document This mode allows you to print Multiple copies of the document on one page Multiple Function a a a a a page 56 This mode prints multiple images of the document on one page 2 in 1 Layout a a a a a page 58 This mode prints two different document pages on one page IMPORTANT You can place the docu...

Страница 59: ...s FUNCTION SWITCH key The MULTI EXPOSURE selection screen appears Press SELECT key several times to select 2 UP Each time SELECT key is pressed the display of the LCD panel changes as follows 2 UP 4 UP 8 UP OFF 2 IN 1 Press FUNCTION SWITCH key 2 up Function is set and press SELECT key several times Multiple Printing on One Page 4 MULTI EXPOSURE OFF 4 MULTI EXPOSURE 2 UP the standard screen appears...

Страница 60: ... load the documents in the ADF If you are printing the documents at 100 select a printing paper that is the size of the two documents When you enlarge or reduce two documents size by side select a zoom ratio so that the documents fit exactly on one page Note the following when using 2 in 1 layout mode You must load the document in the ADF in portrait orientation You must select a paper size and zo...

Страница 61: ...Each time SELECT key is pressed the display of the LCD panel changes as follows OFF 2 UP 4 UP 8 UP 2IN1 Press FUNCTION SWITCH key 2 IN 1 Function is set and press SELECT key several times Multiple Printing on One Page 4 MULTI EXPOSURE 2IN1 the standard screen appears 4 MULTI EXPOSURE 2IN1 ...

Страница 62: ...ting mastermaking When you select No shadow erase the shadow is erased from approximately 3mm around the periphery of the document When you select Shadow erase the machine reproduces the document as follows Proceed with steps 1 to 4 of the sequence described in Basic Printmaking a a a a a page 32 Place the document on the platen glass Press FUNCTION SWITCH key Press SELECT key several times to sho...

Страница 63: ...3 U S paper sizes WLT 10x14 LG LT ST POST OFF Press FUNCTION SWITCH key Book Shadow Eraser Mode is set Press SELECT key several You can cancel Book Shadow Eraser Mode using one of the following two methods Set to OFF in the same procedure Press ALL CLEAR key In this case all settings are reset to standard mode a page 26 Start mastermaking and printing a a a a a See stepes 5 to 8 of Basic Printmaki...

Страница 64: ...ght Press FUNCTION SWITCH key The master darkness screen appears There are two ways to return the darkness to NORMAL as follows Set the darkness to NORMAL in the same procedure Press ALL CLEAR key In this case all settings are reset to standard mode a page 26 Press SELECT key several times to display the desired master darkness Each time SELECT key is pressed the display of the LCD panel changes a...

Страница 65: ...ch Printing In this mode each set comprises the specified number of prints and the machine prints the specified number of sets stopping after each set You can enter up to 15 groups of the specified number of prints x number of sets Select Batch Printing after mastermaking 1 1 1 1 1 1 1 1 Document 1st set 5 copies x 2 sets 2nd set 3 copies x 4 sets 3rd set 2 copies x 5 sets 1 1 1 1 2 2 2 3 2 3 3 3 ...

Страница 66: ...ear the number display Use the keypad to enter the number of prints Example 25 If you make a mistake start over again by press C CLEAR key and start from the beginning When you press C CLEAR key both the number of prints and the number of sets are cancelled Batch Printing 100 0sht 1set 100 25sht 1set Key pad REFERENCE ...

Страница 67: ...number of sets Example 3 sets If you make a mistake start over again by press C CLEAR key and start from the beginning When you press C CLEAR key both the number of prints and the number of sets are cancelled Press X key Repeat steps 2 to 5 Batch Printing 100 25sht 0set 100 25sht 3set Continue Page REFERENCE ...

Страница 68: ...ss PRINT key The print run starts Repeat steps 8 and 9 until all entered sets have been printed MASTER MAKING key will not work until all the sets have been printed Press STOP key then C CLEAR key to abort the print run When two or more documents are loaded in the ADF mastermaking of the following documents and printing will automatically start after the entire printing is completed Batch Printing...

Страница 69: ...de from each document You can separate the number of prints for up to 15 documents Select Batch Printing before starting mastermaking Press C CLEAR key to clear the number display Press X key sht and set begin to flash and the number setting by document mode returns Batch Printing 100 0sht 1set 100 0sht 1set Continue Page IMPORTANT ...

Страница 70: ... and the number of sets are cancelled Press X key The number of prints is set Use the keypad to enter the number of sets Example 3 sets If you make a mistake start over again by press C CLEAR key and start from the beginning When you press C CLEAR key both the number of prints and the number of sets are cancelled Batch Printing 100 25sht 1set 100 25sht 0set 100 25sht 3set Key pad REFERENCE REFEREN...

Страница 71: ... mastermaking of the next document and printing will automatically start Using the optional tape cluster you can successively perform the mastermaking and collating of prints of multiple documents Batch Printing IMPORTANT IMPORTANT REFERENCE Available only with Tape Cluster Unit Only the specified number of sets is printed with the specified number of prints taken as one set Paper tape is inserted...

Страница 72: ...N Use SELECT key to move the arrow on the LCD panel Press FUNCTION SWITCH key Ink save Function is set and press SELECT key several times 7 INK SAVE MODE ON OFF the standard screen appears 7 INK SAVE MODE 7 INK SAVE MODE There is only one way to return the darkness to NORMAL as follows Set the ink save mode to OFF in the same procedure Pressing ALL CLEAR key or turning power off REFERENCE Set the ...

Страница 73: ...e confidential safeguard function and the print speed and print position adjustments Confidential Safeguard Function 72 Total Counter Display Function 73 Print Speed Adjustment Function 74 Printing Position Adjustment Function 75 On Line Print Function Available Only With Interface Kit Installed 76 Energy save mode 76 ...

Страница 74: ...ential Safeguard function is cleared Mastermaking still functions even if the Confidential Safeguard function in ON Press STOP key while also pressing C CLEAR key The machine beeps and the Confidential Safeguard function is activated Press PRINT key or T TEST PRINT key to check that no print is made The message PLEASE MASTER MAKING is displayed on the LCD panel and the machine will not print when ...

Страница 75: ...is example the total number of prints is 444868 and the total number of masters is 245 P F the limited number of prints is displayed after the limited number of prints is 455132 and the limited number of masters is 755 P F When UID function is turned off or use manager s ID and password to turn on the printer the number of prints and masters are displayed on the LCD as right The number of masters ...

Страница 76: ...hter at high printing speeds and slightly darker at slow printing speeds You can adjust the printing speed while the machine is printing Press or keys to adjust the speed Press key to decelerate printing The printing speed indicator lamp moves to the left Press key to accelerate printing The printing speed indicator lamp moves to the right To return to the default setting about 80 pages per minute...

Страница 77: ...g position To move the printing position to the left press key The printing position indicator lamp moves to the left To move the printing position to the right press key The printing position indicator lamp moves to the right To return to the default settings use one of the following two methods Press or key repeatedly until the center printing position indicator lamp is lit Press ALL CLEAR key I...

Страница 78: ...Selecting Printing Paper Size Use the print command of the computer applications according to the manual Mastermaking and printing start automatically When mastermaking ends and printing starts you can again use the keys on the control panel Energy save mode is off the energy save mode lamp is lighting If there is no opration for prescriptive time machine will automatically be energy save Press an...

Страница 79: ...bles This chapter describes how to supply paper ink pack and other consumables Replacing the Ink Pack 78 Replacing the Master Roll 81 Replacing the Master Ejection Core 84 Replacing the Drum Unit 86 Removing the Drum Unit 86 Installing the Drum Unit 88 ...

Страница 80: ...ed on the LCD panel when the remaining ink is low Replace the ink pack using the following procedure Only use ink packs designed for this machine Open the front cover Grasp the lever and pull it toward you Lift out the empty ink pack Front cover EXCHANGE INK Ink pack IMPORTANT ...

Страница 81: ...ecessary Insert the ink pack so that the groove on the lip fits onto the U groove of the holder Push the ink pack in to the set line on the ink pack Press the back of the holder in with the palm of your hand Continue Page Replacing the Ink Pack U groove of holder Ink pack Ink pack Ink pack Set line Set line IMPORTANT ...

Страница 82: ...80 Close the front cover Replacing the Ink Pack Front cover ...

Страница 83: ...he scanner unit Do not touch the heat generator of thermal head Doing so may cause damages leading to a malfunction of mastermaking Continue Page ROLL MASTER END Scanner unit master holder Lift out the master roll then remove the master holder from the master roll Pull out the master you while pushing the thermal head escape lever Turn off the power pull out the master Master roll IMPORTANT IMPORT...

Страница 84: ...ll in the direction as shown in the illustration at right master holder Insert the master roll into the machine the control panel Peel off the seal Pull out the master and insert the front head of the master until it contacts the roller SEAL so that the ID mark line on the roll is facing ...

Страница 85: ... you remove the trimmed piece of the master THERMAL HEAD ESCAPE LEVER MASTER SET SWITCH IMPORTANT IMPORTANT If the master does not go in correctly turn power off and pull master back If the master is wrinkled push down the thermal head escape lever 2 or 3 times The cutter operates and stops after the master is cut Remove the cut piece left inside the machine Slide the scanner unit and return it to...

Страница 86: ...re using the following procedure Use only a master ejection core designed for use in this machine Press the master ejection box release lever to open the master ejection box Open the master ejection box until it stops Open the cover while pressing and holding the master ejection box lid release lever master ejection box lid release lever EXCHANGE EJECT ROLL IMPORTANT ...

Страница 87: ...d it Ink adheres to the master ejection core Take care to prevent ink from getting onto your clothing Insert a new master ejection core Gently close the master ejection box cover pressing it until it locks Close the master ejection box pressing it until it locks Replacing the Master Ejection Core IMPORTANT ...

Страница 88: ...he JOG switch Do not put your hands or fingers inside the machine while it is operating Your hands may be pulled in or nipped Open the front cover toward you Lift the drum securing lever toward you and holding it there then pull out the drum handle straight toward you until it stops Removing the Drum Unit Drum securing lever Drum handle Front cover JOG switch ...

Страница 89: ...he handle on the far end of the drum and lift the front end of the drum slightly to pull the drum toward you Do not touch the drum surface Ink may transfer to your clothes Hold the drum level and place it on a flat solid surface Replacing the Drum Unit IMPORTANT ...

Страница 90: ...he drum guide roller onto the rail in the machine Release the handle at the far end of the drum and press the drum in about 10cm while lifting up the front end slightly Hold the drum level and press it in gently until it comes to a stop Lift the drum securing lever toward you while pressing the drum in ...

Страница 91: ...89 5 2 1 Replacing Consumables Replacing the Drum Unit Lever Front cover Lower the lever Close the front cover ...

Страница 92: ...90 ...

Страница 93: ...stermaking Printing is Not Possible 92 Error Messages 93 Supplying or Changing Paper While Printing 96 If Paper Runs Out During Printing 96 Adding Paper While Printing 96 Changing Paper Selection While Printing 98 Paper Jams 100 When PAPER LEFT JAM is Displayed Feed Tray 100 When PAPER RIGHT JAM is Displayed Print Tray 101 When MASTER EJECT MISS is Displayed 104 When MASTER SET MISS is Displayed 1...

Страница 94: ...rt the power plug securely Turn the power switch ON Please contact your service person NO YES NO YES Mastermaking Printing is Not Possible If mastermaking printing is not possible check the following IS THERE A MESSAGE DISPLAYED ON ERROR DISPLAY PANEL See Error Messages on page 93 Please contact your service person YES NO Countermeasures to Troubles ...

Страница 95: ...ls see page 81 Replacing the Master Roll The master ejection core is full Replace the core with a new one a For details see page 84 Replacing the Master Ejection Core There is no drum Install a drum in the machine a For details see page 86 Replacing the Drum Unit The front cover is open Close the front cover Message Countermeasure SET PRINT PAPER EXCHANGE INK ROLL MASTER END EXCHANGE EJECT ROLL DR...

Страница 96: ...details see page 104 When MAST EJECT ERROR is Displayed There is an error during master setting Open the top cover and remove the master that is left in the master feeder a For details see page 107 When MASTER SET MISS is Displayed The document is jammed on the ADF Remove the jammed document in accordance with the ADF instruction manual Message Countermeasure PAPER LEFT JAM PAPER RIGHT JAM MASTER ...

Страница 97: ...e Wait until it is completed There is no document Set a document The printer is not ready Wait a while with the power turned ON If this message does not disappear after several minutes turn the power OFF and contact servicepersons The master is not set correctly Set the master again Turn the power OFF once and turn the power ON again in several seconds If the same display appears make a memo of th...

Страница 98: ...wered automatically Load paper a a a a a See page 34 Loading and Replacing Paper Press PRINT key Printing resumes Adding Paper While Printing Press STOP key Printing stops Press the feed tray descend switch continuously Release the switch when the feed tray reasches the proper height The feed tray will stop SET PRINT PAPER Feed tray descend switch ...

Страница 99: ... roller ring pull it out and align it with the stack Align the stack to be added and place it on top of the existing stack Press the stack lightly toward the machine Press PRINT key The feed tray will rise automatically and printing will resume When you press STOP key printing stops IMPORTANT REFERENCE ...

Страница 100: ...Release the switch when the paper tray is at the proper height The feed tray will stop If the sheet is still in the feed roller ring pull it out and align it with the stack Remove paper from the feed tray The feed tray will automatically descend Supplying or Changing Paper While Printing Feed tray descend switch IMPORTANT ...

Страница 101: ...99 6 Troubleshooting Supplying or Changing Paper While Printing When the feed tray comes to a stop reset the paper size Press PRINT key The feed tray will rise automatically and printing will resume 2 ...

Страница 102: ...er the feed tray slightly The feed tray is lowered for the time that the switch is pressed Pull out the jammed paper as shown in the diagram Press the JOG switch until the drum comes to a stop with a beep WARNING Do not touch the drum or rollers when you operate the jog switch Do not put hands inside machine while it is operating Hands could get caught up or crushed Feed tray descend switch PAPER ...

Страница 103: ...played on the LCD panel Follow the procedure below to remove the jammed paper Press the master ejection box release lever to open the master ejection box Open the master ejection box until it stops Remove the jammed paper Press the JOG switch to eject the partially printed paper Paper Jams PAPER RIGHT JAM JOG switch Continue Page ...

Страница 104: ...lease lever to open the master ejection box Open the master ejection box until it stops Press the JOG switch to find the edge of the paper then stop the drum at the position shown in the diagram WARNING Do not touch the drum or rollers when you operate the JOG switch Do not put your hands inside the machine while it is operating Your hands may be pulled in or nipped Paper Jams Paper edge ...

Страница 105: ...side while pressing the JOG switch to peel the paper off Make sure that the peeled paper does not stick to your clothing Hold the JOG switch down until the drum comes to a stop with a beep Close the master ejection box pressing it until it locks Make another master Paper Jams JOG switch JOG switch IMPORTANT ...

Страница 106: ...ter ejection box Open the master ejection box until it stops Press the JOG switch to find the edge of the paper then stop the drum at the position shown in the diagram WARNING Do not touch the drum or rollers when you operate the JOG switch Do not put your hands inside the machine while it is operating Your hands may be pulled in or nipped When MASTER EJECT MISS is Displayed MASTER EJECT MISS ...

Страница 107: ... the lever Pull the front end of the master toward you and press the JOG switch intermittently Hold the switch down until the master peels off Discard the old master making sure that it does not touch your clothing Hold the JOG switch down until the drum comes to a stop with a beep Close the master ejection box pressing it until it locks When MASTER EJECT MISS is Displayed JOG switch Continue Page...

Страница 108: ...106 Press STOP key The message is deleted Make another master When MASTER EJECT MISS is Displayed ...

Страница 109: ...edure below Slide the scanner unit Remove the master left in the master feeder MASTER SET MISS Scanner unit When PLATE EJECTION ERROR is Displayed When MASTER SET MISS is Displayed Continue Page Reset the master and take away the cutted master For details see page 81 83 Scanner unit Slide the scanner unit and return it to the origi nal position ...

Страница 110: ... is Displayed Check that the error message is deleted Make a new master and start printing The message PLS MASTER MAKING is displayed on the LCD panel when PRINT key is pressed without mastermaking being carried out IMPORTANT ...

Страница 111: ...7 Specifications and Maintenance Chapter 7 Specifications and Maintenance This chapter lists the machine specifications and describes maintenance etc Specifications 110 ...

Страница 112: ...er weight is limited Paper thickness 45gsm to 210gsm 40kg to 180kg Printing speed 130 pages per minute 60 to 130 pages per minute 3 step adjustment Print enlargement reduction European size Same size 100 Fixed zoom ratios 70 81 86 115 122 and 141 Print with border 94 Zoom 50 to 200 U S size Same size 100 Fixed zoom ratios 64 74 77 121 129 and 141 Print with border 94 Zoom 50 to 200 Printing positi...

Страница 113: ...c power off kit power is turned off by time specified AC 100 240V 10 78 79 80 In use 1270mm W x 615mm D x 666mm H In storage 695mm W x 615mm D x 666mm H When ADF is installed In use 1270mm W x 615mm D x 805mm H In storage 695mm W x 615mm D x 805mm H 1 6 0 8A 160W 50 60Hz UPC 01 U6 S0001 ADF 16 S5 ADF DRC41 DRC415 DRC42 DRC425 DRC42L Online USB interface kit I F board in main unit USB interface USB...

Страница 114: ...112 ...

Страница 115: ...Appendix Appendix This section contains an index and quick reference diagrams for basic operations Index 114 Quick Operation Guide 116 ...

Страница 116: ...Feed tray descend switch 19 96 Feed pressure adjuster lever 19 35 front cover 19 78 86 How Mastermaking and Printing is Performed 29 If Paper Runs Out During Printing 96 ink pack 20 78 Installing the Drum Unit 88 Installing Print Tray 49 JOG switch 21 86 100 101 103 105 Key pad 23 Lateral Placement 36 LCD panel 22 24 Loading and Replacing Paper 34 Loading Documents 36 Maintenance 13 master 84 107 ...

Страница 117: ...nction 73 PRINTING POSITION ADJUSTMENT keys 23 73 Printing position indicator lamp 23 73 PRINTING SPEED ADJUSTMENT keys 23 72 Printing speed indicator lamp 23 72 Quick Operation Guide 118 Reductions 39 Removing the Drum Unit 86 Replacing the Drum Unit 86 Replacing the Ink Pack 78 Replacing the Master Ejection Core 84 Replacing the Master Roll 81 Saving Settings 52 Selecting Printing Paper Size 44 ...

Страница 118: ...16 Quick Operation Guide Mastermaking Open the supplemental paper tray Hold the lever and adjust the side guides to the paper size Place a stack of aligned sheets in the feed tray Install the print tray ...

Страница 119: ...other test print press T TEST PRINT key Print Enter the number of prints on the key pad To change the number of prints press C CLEAR key and enter the desired number of prints Press PRINT key To stop the machine midway during operation press STOP key Raise the paper stacker guides and paper stopper and adjust them to the size of the printing paper Turning the power ON Mastermaking Set the document...

Страница 120: ...118 MEMO ...

Страница 121: ...119 2 1 Appendix MEMO ...

Страница 122: ...120 MEMO ...

Страница 123: ...www duplo com TEL 81 42 775 3602 FAX 81 42 775 3606 E mail info duplo com U6 Y1112 2010 10 4 1 6 Oyama Chuo ku Sagamihara shi Kanagawa 252 5280 Japan ...

Отзывы: