background image

74

Dividing Sections with Tape 


Available only with Tape Cluster Device

Only the specified number of sets is printed with the specified number of prints taken as one set. Paper tape is
inserted when printing of each set is completed.
You can enter up to 15 groups of number of prints x number of sets.

IMPORTANT
• The optional tape cluster is required for dividing sections with tape.
• You can select “Sectional Printing” after platemaking.
• When the optional tape cluster is installed, you cannot stop printing after each section.

Tip
• The length of the paper tape separating groups is longer than the paper tape separating sets.

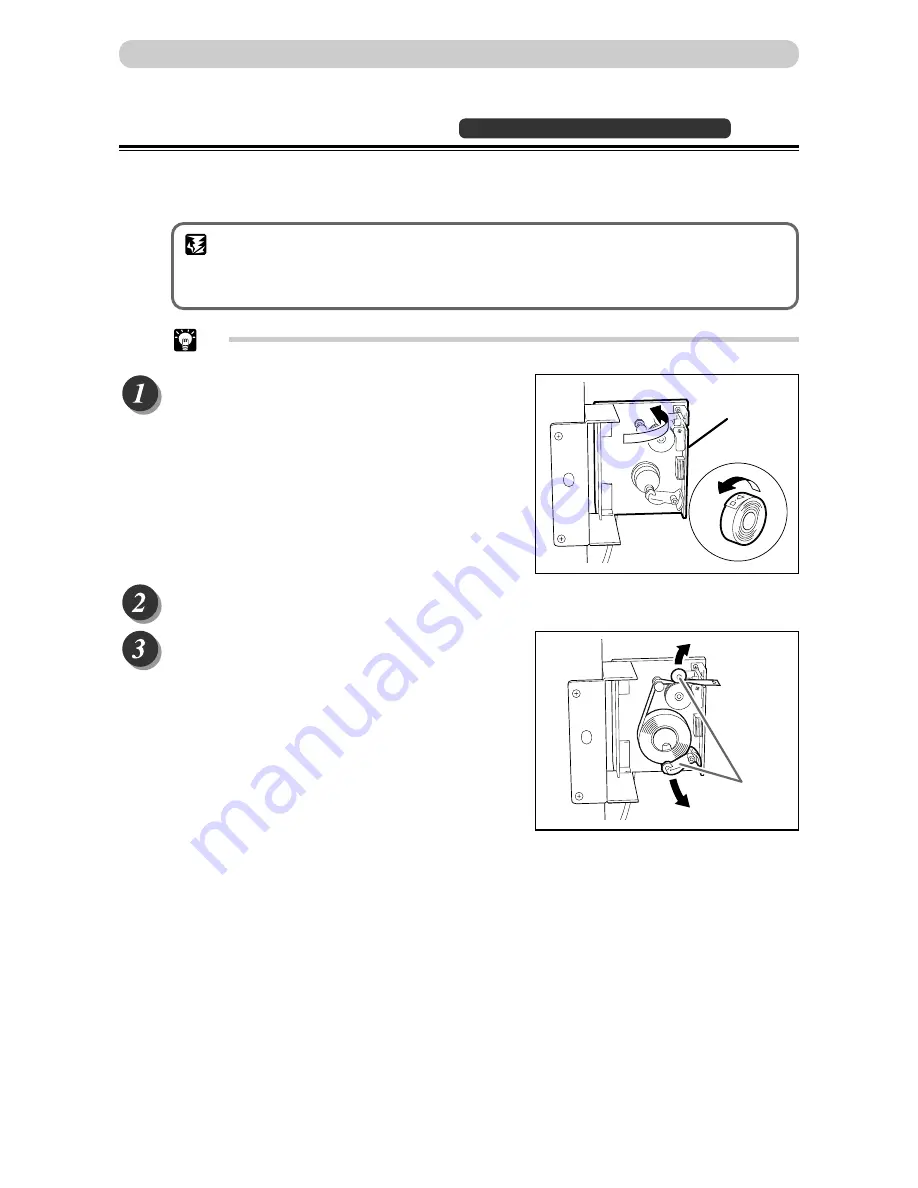
Open the tape cluster cover.

Insert the tape while checking for the direction of the tape roll.

Insert the tape while lifting the two levers up.

Cover

Levers

Sectional Printing

Содержание DP-22L

Страница 1: ...e retrieved whenever needed Instruction Manual DP 22S 22L 24S Ver 1 Correct operation and periodic maintenance are essential for ensuring safe use of this machine Thoroughly read this manual before us...

Страница 2: ...anual before using this machine After using this manual be sure to keep it in a place to handy reference Introduction PLEASE NOTE In the interest of upgrading our products specifications and other dat...

Страница 3: ...tandard paper size to another larger or smaller standard paper size 94 Reduction a P 40 This function slightly reduces the size of a document when printing to the same standard paper size as the docu...

Страница 4: ...uvwxyz ABCDEFGHIJKLNO PQRSTUVWXYZ ABCDEFGH ABCDEFGHIJKLNO PQRSTUVWXYZ abcdefghijklmnopqrs Text Text Photograph Photograph Book Shadow Eraser Mode a P 63 This function erases the shadows on the center...

Страница 5: ...5 sets 1 1 1 1 Changing Print Quantity per Document a P 71 This function changes the number of prints made from each document 2 2 2 3 2 3 3 3 3 1 Documents 1 1 3 1st document 5 copies x 2 sets 2nd do...

Страница 6: ...ument Printing Paper Specification 28 Acceptable Documents 28 Acceptable Printing Paper 28 How Platemaking and Printing is Performed 29 Platemaking 29 Printing 29 Chapter 2 Printing Using Basic Functi...

Страница 7: ...tion Adjustment Function 81 On Line Print Function Available Only With Interface Kit Installed 82 Chapter 5 Replacing Consumables Replacing the Ink Pack 84 Replacing the Master Roll 87 Replacing the M...

Страница 8: ...7 2 1 Contents Chapter 7 Specifications and Maintenance Specifications 118 Appendix Index 122 Quick Operation Guide 124...

Страница 9: ...side the circle In the example shown here the prohibited act is disassembly A black disc indicates an instruction or sometimes a prohibited action The instruction itself is indicated by pictorial symb...

Страница 10: ...bend the power cord Doing so may result in fire or electric shock Do not insert or drop metal flammable material or other matter through the ventilation holes into the machine interior Doing so may r...

Страница 11: ...ord Tugging the cord may damage it expose conductors or cause disconnections etc resulting in fire or electric shock Do not place the machine in an unstable position such as on an unsteady support or...

Страница 12: ...Safety Please Read and Observe Warning Sticker Keep the WARNING stickers clean at all times If stickers become damaged or come off replace them with new ones No Parts No Name Q ty q L1 T3060 Warning S...

Страница 13: ...alling the machine in the direct sunlight or heat such as near a stove Ink may deteriorate and may cause bad prints while the machine may indicate errors due to overheating caused by sunlight Also avo...

Страница 14: ...d breakdowns Before cleaning turn the power switch OFF and then remove the power plug from the outlet To clean the reader glass use a dry soft cloth and lightly wipe off any dirt WARNING Before cleani...

Страница 15: ...postcards cannot be duplicated without government consent Government issued papers pertaining to stamps liquor and sales tax laws cannot be duplicated 2 Printed Matter that Require Caution Printed is...

Страница 16: ...e starting the platemaking process Press ENLARGEMENT key or RE DUCTION key Notes on Safety Please Read and Observe Conventions Used in This Manual Each page of descriptions in this manual of how to op...

Страница 17: ......

Страница 18: ...his chapter carefully before attempting to use the printer System Setup 18 Part Names and Their Functions 19 Printer Appearance 19 Control Panel 22 LCD Panel 24 Turning Power ON OFF 25 Turning ON Prin...

Страница 19: ...p as follows Personal computer Key card counter Duplo Direct Print System Documents prepared on a personal computer can be printed on this machine PC interface kit is required to connect this machine...

Страница 20: ...Side guides Slide to match the width of the paper t Feed tray Load paper in this tray y Support tray Pull out when using large paper sizes u Power switch Press to switch the power on and off i Cabinet...

Страница 21: ...rum unit Ink pack Scanner unit Lever This lever releases the ink pack holder Master set lever When the master set lever is pushed the master is pulled in and set Lever This lever is locks or unlocks t...

Страница 22: ...jams etc 4 Print tray Holds the printed paper 5 Paper stopper Slide to match the size of printed paper 6 Paper stacker guides Slide to match the size of printed paper 7 Master ejection box Open to rep...

Страница 23: ...and photograph mode Each press of this key moves the position of the lit lamp that indicates the selected document mode Document mode indicator lamps The lamp of the selected mode lights r LCD panel D...

Страница 24: ...Standard Mode settings Press and hold for at least 0 5 seconds 1 X key Press to enter the number of prints and number of sets for sectional prints 2 Key pad Use to enter the number of prints 3 CLEAR k...

Страница 25: ...24 No Name Function q Print count Displays the number of prints to be made w Sets Displays the number of sets to be printed Reference page 33 69 0sht 1set q w LCD Panel Part Names and Their Functions...

Страница 26: ...le to the printer and a wall outlet Switch the power switch to the position The power turns ON The message SET PRINT PAPER is displayed on the LCD panel The printer functions are now set in Standard M...

Страница 27: ...irst turned ON or ALL CLEAR key is pressed the functions are reset to standard mode The standard mode settings are as follows Print quantity 0 Print position Standard lit Print speed Standard lit Zoom...

Страница 28: ...Key Card Counter for details Inserting a key card When you turn on the power the icon shown at right is displayed if no key card has been inserted in the key card counter Insert a key card in the key...

Страница 29: ...ways use documents of the same size If you load documents of different lengths the printer may not operate correctly Acceptable Printing Paper DP 22S DP 22L DP 24S Paper thickness Paper stacking capac...

Страница 30: ...eeder roller and paper separator unit is pressed against the drum unit by the press roller There are small holes over only the image area of the master that is attached to the drum and ink that seeps...

Страница 31: ...30...

Страница 32: ...aper Feed Pressure 35 Loading Documents 36 Positioning the Document 36 Loading Document on Document Glass Plate 37 Loading Document in ADF Available only when ADF installed 38 Enlargement and Reductio...

Страница 33: ...cument on Document Glass Plate Open the document cover Place the document face down on the document glass plate aligned with the scale Close the document cover If you are loading the document in the o...

Страница 34: ...o specify the number of prints to make Tips You can specify up to 9999 prints If you make a mistake entering the number of prints press C CLEAR key then enter the correct number Press PRINT key The fe...

Страница 35: ...roximately 1 300 sheets in this printer Open the support tray Hold the lever and adjust the side guides to the paper size Load a stack of aligned sheets between the paper guides and press the stack li...

Страница 36: ...e paper feed pressure if an feeding error occurs when using thick or thin paper When no thick paper is fed Adjust the paper feed pressure adjuster lever to HIGH When two pieces of thin paper are fed A...

Страница 37: ...Document The document can be loaded in the portrait or landscape position IMPORTANT A4 and B5 size documents can be loaded in the portrait or landscape position Use the landscape position when enlargi...

Страница 38: ...ass plate Place the document face down on the document glass plate aligned with the guide IMPORTANT When you load a non standard size docu ment place it with the center of the document aligned with th...

Страница 39: ...DF mode is automatically selected when a document is loaded in the ADF The ADF then takes priority over the document glass plate in the platemaking process Align the document guide with the marks for...

Страница 40: ...arging or reducing a standard size document onto standard size printing paper Enlargements You can enlarge a standard size document onto standard size paper using the following zoom ratios European pa...

Страница 41: ...g two methods Press 1 1 100 key The 100 indicator lamp lights Press ALL CLEAR key In this case all settings are reset to standard mode apage 26 94 Reduction In this mode the copy is printed at 94 the...

Страница 42: ...number display screen returns and blinks Tip You can cancel 94 reduction using one of the following two methods Set to OFF in the same procedure Press ALL CLEAR key In this case all settings are rese...

Страница 43: ...WITCH key several times to show the screen at right Press SELECT key several times to display actual zoom ratio Each time SELECT key is pressed the display of the LCD panel changes as follows OFF actu...

Страница 44: ...argement and Reduction 1 4 7 C 2 5 8 0 3 6 9 X Press X key The scaling ratio is set and the 100 lamp goes out Tip To return to 100 press C CLEAR key Stare platemaking and printing a a a a a See steps...

Страница 45: ...e SELECT key is pressed the display of the LCD panel changes as follows European paper sizes U S paper sizes FOR DP 22S FOR DP 22L A4 B5 A5 POST A4 LG LT ST MAX FOR DP 24S POST LG B4 A4 B5 A5 POST B4...

Страница 46: ...45 2 1 2 Printing Using Basic Functions Selecting Printing Paper Size 1 2 3 0sht 1set Press FUNCTION SWITCH key several times The number display screen returns...

Страница 47: ...SELECT key several times to display LG Each time SELECT key is pressed the display of the LCD panel changes as follows NORMAL LG NORMAL Press FUNCTION SWITCH key The paper size is set The speed is fi...

Страница 48: ...s adjusted to match the document Text mode Enhances the printing of text documents Documents suited for text mode Text documents Documents that include black and white photos that have already been sc...

Страница 49: ...E SWITCH key is pressed the lit document mode indicator lamp changes as follows Text Text Photograph Photograph Text Tip To return to Text mode use one of the following two methods Press DOCUMENT MODE...

Страница 50: ...ll the print tray When you use the printer on a table install the print tray into the upper fitting Stacking capacity 900 sheets 55 kg high grade paper When you use a cabinet option install the print...

Страница 51: ...50 Open out the paper stopper Adjust the paper stacker guides and paper stopper to the size of the printing paper Print Output...

Страница 52: ...when the edges of the printed pages are not trued up Adjusting jump plate Adjust the plate according to the paper size Ex Expand the guides fully when using paper with B4 or larger size Truing up prin...

Страница 53: ......

Страница 54: ...Saving Settings 54 Retrieving Settings 56 Multiple Printing on One Page 58 2 up Function 58 2 in 1 Layout Available only with ADF installed 61 Book Shadow Eraser Mode 63 Adjusting Plate Darkness 65 Se...

Страница 55: ...ed zoom ratios only Plate size 94 reduction Platemaking darkness Printing speed Text Photo Printing position Saving Settings Confirm that the LCD panel displays the settings you want to store Press FU...

Страница 56: ...e LCD panel Use the keypad to specify the number you want to store The settings are stored and the screen in step 3 returns IMPORTANT Any previous settings stored in the memory channel will be deleted...

Страница 57: ...f the LCD panel changes as follows RETRIEVE SAVE CANCEL RETRIEVE Press FUNCTION SWITCH key The screen at right appears on the LCD panel Use the keypad to specify the number you want to recall The sett...

Страница 58: ...57 3 2 1 Printing With Various Functions Press C CLEAR key The number display screen returns Saving Settings 1 4 7 C 2 5 8 0 3 6 9 X...

Страница 59: ...o different document pages on one page 2 up Function Available only with ADF installed This mode prints multiple copies of the document on one page Copying A4 to A3 2 prints on one page A3 LDG A4 LT A...

Страница 60: ...2 Press FUNCTION SWITCH key several times to show the screen at right Press SELECT key several times to display ON Each time SELECT key is pressed the display of the LCD panel changes as follows ON OF...

Страница 61: ...u can cancel 2 up Function using one of the following two methods Set to OFF in the same procedure Press ALL CLEAR key In this case all settings are reset to standard mode a page 26 Start platemaking...

Страница 62: ...ways load the documents in the ADF If you are printing the documents at 100 select a printing paper that is the size of the two documents When you enlarge or reduce two documents size by side select a...

Страница 63: ...ON SWITCH key 2 IN 1 Function is set Press FUNCTION SWITCH key several times The number display screen returns Tip You can cancel 2 IN 1 Function using one of the following two methods Set to OFF ADF...

Страница 64: ...dow Eraser Mode before starting platemaking When you select No shadow erase the shadow is erased from approximately 3mm around the periphery of the document When you select Shadow erase the machine re...

Страница 65: ...3 POST 6 SHADOW ERASER 1 2 3 Press FUNCTION SWITCH key Book Shadow Eraser Mode is set 1 2 3 0sht 1set Press FUNCTION SWITCH key several times The number display screen returns Tip You can cancel Book...

Страница 66: ...ess before making the plate If you adjust the plate darkness you must repeat the platemaking process before making prints Press FUNCTION SWITCH key several times to show the screen at right Press SELE...

Страница 67: ...ral times The number display screen returns Tip There are two ways to return the darkness to NORMAL as follows Set the darkness to NORMAL in the same procedure Press ALL CLEAR key In this case all set...

Страница 68: ...ional Printing In this mode each set comprises the specified number of prints and the machine prints the specified number of sets stopping after each set You can enter up to 15 groups of the specified...

Страница 69: ...y Use the keypad to enter the number of prints Example 25 Tip If you make a mistake start over again by press C CLEAR key and start from the beginning When you press C CLEAR key both the number of pri...

Страница 70: ...ple 3 sets Tip If you make a mistake start over again by press C CLEAR key and start from the beginning When you press C CLEAR key both the number of prints and the number of sets are cancelled Press...

Страница 71: ...ss PRINT key The print run starts Repeat steps 8 and 9 until all entered sets have been printed IMPORTANT PLATE MAKING key will not work until all the sets have been printed Press STOP key then C CLEA...

Страница 72: ...ou can separate the number of prints for up to 15 documents IMPORTANT Select Sectional Printing before starting platemaking Press C CLEAR key to clear the number display Press X key sht and set begin...

Страница 73: ...ber of sets are cancelled Press X key The number of prints is set Use the keypad to enter the number of sets Example 3 sets Tip If you make a mistake start over again by press C CLEAR key and start fr...

Страница 74: ...document for the last entered number of prints and sets at the bottom Press PLATE MAKING key Platemaking starts IMPORTANT Plate making and printing starts from the last entered print and set quantitie...

Страница 75: ...ets IMPORTANT The optional tape cluster is required for dividing sections with tape You can select Sectional Printing after platemaking When the optional tape cluster is installed you cannot stop prin...

Страница 76: ...ous Functions Leave end of tape approximately 1 cm out Close the cover Sectional Printing 1cm Tip The paper tapes are inserted so that the length of the paper tape separating sets is longer than the p...

Страница 77: ......

Страница 78: ...uch as the confidential safeguard function and the print speed and print position adjustments Confidential Safeguard Function 78 Total Counter Display Function 79 Print Speed Adjustment Function 80 Pr...

Страница 79: ...fidential Safeguard function is cleared Platemaking still functions even if the Confidential Safeguard function in ON Press STOP key while also pressing C CLEAR key The machine beeps and the Confident...

Страница 80: ...NT If the machine is printing press STOP key to stop the print run Press STOP key The total print and plate counts are displayed while you press and hold STOP key The number of prints is displayed on...

Страница 81: ...lighter at high printing speeds and slightly darker at slow printing speeds You can adjust the printing speed while the machine is printing Press or keys to adjust the speed Press key to decelerate pr...

Страница 82: ...n the printing position To move the printing position to the left press key The printing position indicator lamp moves to the left To move the printing position to the right press key The printing pos...

Страница 83: ...personal computer Please contact your service person on information regarding installation and settings Check that the top menu is displayed Set the size of the printing paper a a a a a See page 44 Se...

Страница 84: ...les This chapter describes how to supply paper ink pack and other consumables Replacing the Ink Pack 84 Replacing the Master Roll 87 Replacing the Master Ejection Core 90 Replacing the Drum Unit 92 Re...

Страница 85: ...d on the LCD panel when the remaining ink is low Replace the ink pack using the following procedure IMPORTANT Only use ink packs designed for this machine Open the front cover Grasp the lever and pull...

Страница 86: ...er than necessary Insert the ink pack so that the groove on the lip fits onto the U groove of the holder Push the ink pack in to the set line on the ink pack Press the back of the holder in with the p...

Страница 87: ...86 Close the front cover Replacing the Ink Pack Front cover...

Страница 88: ...IMPORTANT Only use a master roll designed for use in this machine Slide the scanner unit IMPORTANT Do not touch the heat generator of thermal head Doing so may cause damages leading to a malfunction o...

Страница 89: ...wn in the illustration at right Pull out the master and insert the master aligned with the loading line under the guide panel until it contacts the roller Close the master cover Push the master set le...

Страница 90: ...ORTANT If the master cannot be set correctly its leading edge will not be visible Open the master cover and set again Slide the scanner unit and return it to the origi nal position WARNING Do not remo...

Страница 91: ...aster ejection core using the following procedure IMPORTANT Use only a master ejection core designed for use in this machine Press the plate ejection box release lever to open the master ejection box...

Страница 92: ...it IMPORTANT Ink adheres to the master ejection core Take care to prevent ink from getting onto your clothing Insert a new master ejection core Gently close the master ejection box cover pressing it...

Страница 93: ...over toward you Lift the drum securing lever toward you and holding it there then pull out the drum handle straight toward you until it stops Removing the Drum Unit WARNING Avoid pressing and damaging...

Страница 94: ...e handle on the far end of the drum and lift the front end of the drum slightly to pull the drum toward you IMPORTANT Do not touch the drum surface Ink may transfer to your clothes Hold the drum level...

Страница 95: ...guide roller onto the rail in the machine Release the handle at the far end of the drum and press the drum in about 10cm while lifting up the front end slightly Hold the drum level and press it in gen...

Страница 96: ...95 5 2 1 Replacing Consumables Replacing the Drum Unit Lever Front cover Lower the lever Close the front cover...

Страница 97: ......

Страница 98: ...emaking Printing is Not Possible 98 Error Messages 99 Supplying or Changing Paper While Printing 103 If Paper Runs Out During Printing 103 Adding Paper While Printing 103 Changing Paper Selection Whil...

Страница 99: ...rt the power plug securely Turn the power switch ON Please contact your service person NO YES NO YES Platemaking Printing is Not Possible If platemaking printing is not possible check the following IS...

Страница 100: ...ails see page 87 Replacing the Master Roll The master ejection core is full Replace the core with a new one a For details see page 90 Replacing the Master Ejection Core There is no drum Install a drum...

Страница 101: ...ails see page 111 When MAST EJECT ERROR is Displayed There is an error during master setting Open the top cover and remove the master that is left in the plate feeder a For details see page 114 When M...

Страница 102: ...being made Wait until it is completed An error occurs on line Turn the power OFF once and check the connector for connec tion then make a plate on line If the same display appears turn the power OFF a...

Страница 103: ...urn the power ON again in several seconds If the same display appears make a memo of the message Exxx and contact servicepersons Error Messages SERVICE CALL Message Countermeasure This message blinks...

Страница 104: ...ay is lowered automatically Load paper a a a a a See page 34 Loading and Replacing Paper Press PRINT key Printing resumes Adding Paper While Printing Press STOP key Printing stops Press the feed tray...

Страница 105: ...roller ring pull it out and align it with the stack Align the stack to be added and place it on top of the existing stack Press the stack lightly toward the machine Press PRINT key The feed tray will...

Страница 106: ...y Release the switch when the paper tray is at the proper height The feed tray will stop IMPORTANT If the sheet is still in the feed roller ring pull it out and align it with the stack Remove paper fr...

Страница 107: ...106 Supplying or Changing Paper While Printing When the feed tray comes to a stop reset the paper size Press PRINT key The feed tray will rise automatically and printing will resume T...

Страница 108: ...tch to lower the feed tray slightly The feed tray is lowered for the time that the switch is pressed Pull out the jammed paper as shown in the diagram Press the JOG switch until the drum comes to a st...

Страница 109: ...el Follow the procedure below to remove the jammed paper Press the plate ejection box release lever to open the master ejection box Open the master ejection box until it stops Remove the jammed paper...

Страница 110: ...open the master ejection box Open the master ejection box until it stops Press the JOG switch to find the edge of the paper then stop the drum at the position shown in the diagram WARNING Do not touc...

Страница 111: ...ressing the JOG switch to peel the paper off IMPORTANT Make sure that the peeled paper does not stick to your clothing Hold the JOG switch down until the drum comes to a stop with a beep Close the mas...

Страница 112: ...ever to open the master ejection box Open the master ejection box until it stops Press the JOG switch to find the edge of the paper then stop the drum at the position shown in the diagram WARNING Do n...

Страница 113: ...lever Pull the front end of the master toward you and press the JOG switch intermittently Hold the switch down until the master peels off IMPORTANT Discard the old master making sure that it does not...

Страница 114: ...113 6 2 1 Troubleshooting Press STOP key The message is deleted Make another plate When MAST EJECT ERROR is Displayed T...

Страница 115: ...ng the procedure below Slide the scanner unit Press the master cover ralease lever The master cover will open up Remove the master left in the master feeder MASTER SET MISS Scanner unit When PLATE EJE...

Страница 116: ...roll in the direction as shown in the illustration at right Pull out the master and insert the master aligned with the loading line under the guide panel until it contacts the roller Close the master...

Страница 117: ...ruding from the inner side of the master cover IMPORTANT If the master cannot be set correctly its leading edge will not be visible Open the master cover and set again Slide the scanner unit and retur...

Страница 118: ...7 Specifications and Maintenance Chapter 7 Specifications and Maintenance This chapter lists the machine specifications and describes maintenance etc Specifications 118...

Страница 119: ...with border 94 Zoom 50 to 200 U S size Same size 100 Fixed zoom ratios 64 74 77 121 129 and 141 Print with border 94 Zoom 50 to 200 Printing position adjustment Vertical 15mm In LG mode A3 size 10mm...

Страница 120: ...ge 695mm W x 615mm D x 666mm H When ADF is installed In use 1270mm W x 615mm D x 805mm H In storage 695mm W x 615mm D x 805mm H Weight Machine 73kg Operating temperature 10 C to 30 C PC interface kit...

Страница 121: ...120...

Страница 122: ...Appendix Appendix This section contains an index and quick reference diagrams for basic operations Index 122 Quick Operation Guide 124...

Страница 123: ...inting is Performed 29 If Paper Runs Out During Printing 103 ink pack 20 84 Installing the Drum Unit 94 Installing Print Tray 49 JOG switch 21 92 107 108 110 112 Key Card 27 Key Card counter 18 27 Key...

Страница 124: ...eys 23 80 Printing speed indicator lamp 23 80 Quick Operation Guide 124 Reductions 39 Removing the Drum Unit 92 Replacing the Drum Unit 92 Replacing the Ink Pack 84 Replacing the Master Ejection Core...

Страница 125: ...4 Quick Operation Guide Platemaking Open the supplemental paper tray Hold the lever and adjust the side guides to the paper size Place a stack of aligned sheets in the feeder tray Install the print tr...

Страница 126: ...p To make another test print press T TEST PRINT key Print Enter the number of prints on the key pad Tip To change the number of prints press C CLEAR key and enter the desired number of prints Press PR...

Страница 127: ...M7 Y1250 2001 07...

Отзывы: