background image

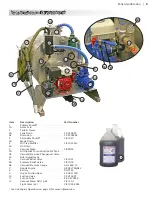
Parts Identification  | 

B

Item 

Description 

Part Number

 ............

Primary Shutoff

 ......................................

1A

 ...........

Access Lid

 .............................................

 ............

Tank & Frame

 ........................................

2A

 ...........

Tank Drain

 .............................................

TK V300FP

2B

 ............

Drain Cap

 ..............................................

TK P300CAP

 ............

Secondary Shutoff

 ..................................

CB 1047

3A

 ...........

Waste Drain

 ...........................................

 ............

Oil Trap Muffler

 .....................................

CB 102201V

4A

 ...........

Oil Drain

 ................................................

 ............

Vacuum Pump

 .......................................

CB PN33

5A

 ...........

Oil dipstick for Lubrication Oil Tank

 .......

5B

 ............

Vacuum/Pressure Changeover Valve

 ......

5C

 ...........

Oiler Adjustment

 ...................................

 ............

Vacuum Relief Valve

 ..............................

CB 1035

6A

 ...........

Pressure Relief Valve

 ..............................

CB 1048

6B

 ............

Vacuum/Pressure Gauge

 ........................

AH 2640-15

 ............

Honda Engine

 ........................................

AE GX270QAE2

 ............

Battery

 ...................................................

DU SP35

9

 ..............

Hi-Vac Suction Hose

 ...............................

FX HV41230

10

 ............

Suction Valve

 .........................................

TK V200FP

11

 ............

Suction Tube

 .........................................

KE 2-PVCX48

12

 ............

Vacuum Pump Oil (1 gal)

 .......................

CB 150-1


 ............

Sight Glass (x2)

 .....................................

CB 1093-0002

* See Gas Engine Operation on page D for more information.


Parts Breakdown: DU V450WO-9R

6B

5B

5C

6A

12

1

5

8

2

4

7

6

3

2B

1A

5A

4A

3A

9

10

11

2A

Содержание DU V450WO-9R

Страница 1: ...Vacuum Tank Unit DU V450WO 9R Owner s Manual 0814 011111 Serial Number Installation Date ...

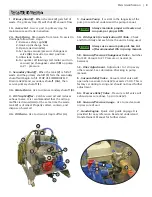
Страница 2: ...r slightly from the actual product as more improvements are made to our products Some of the pictures in this manual may differ slightly from the actual product as well Dultmeier Sales reserves the right to update designs and or change the specifications at any time without incurring any obligation to install them on units previously sold If you have any questions or suggestions about this manual ...

Страница 3: ... operate this unit without reading and understanding this manual DANGER WARNING IMPORTANT CAUTION Safety Information A General Safety To avoid the risk of serious bodily injury and property damage read safety instructions carefully before installing this system Follow all local and or national plumbing and electrical codes when installing Do Not Allow System or Components to Freeze To do so may da...

Страница 4: ... 5B Vacuum Pressure Changeover Valve 5C Oiler Adjustment 6 Vacuum Relief Valve CB 1035 6A Pressure Relief Valve CB 1048 6B Vacuum Pressure Gauge AH 2640 15 7 Honda Engine AE GX270QAE2 8 Battery DU SP35 9 Hi Vac Suction Hose FX HV41230 10 Suction Valve TK V200FP 11 Suction Tube KE 2 PVCX48 12 Vacuum Pump Oil 1 gal CB 150 1 Sight Glass x2 CB 1093 0002 See Gas Engine Operation on page D for more info...

Страница 5: ... the waste tank 2 is drained Properly collect contain and dispose of used oil 4A Oil Drain Use to drain oil trap muffler 4 5 Vacuum Pump It is vital to the longevity of the pump to read and understand the pump manual Always maintain proper oil levels and run pump at proper RPM 5A Oil dipstick for Lubrication Oil Tank Check and fill oil daily and each time the unit is being used Always use vacuum p...

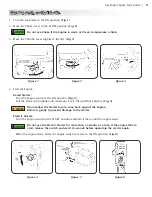
Страница 6: ...l resistance is felt then pull back briskly Fig 5 Do not allow the Starter Grip to snap back against the Engine Return it gently to prevent damage to the starter Electric Starter Turn the Engine switch to the START position and hold it there until the engine starts Do not use the Electric Starter for more than 5 seconds at a time If the engine fails to start release the switch and wait 10 seconds ...

Страница 7: ...or installation either with respect to original or replacement part or components is not covered under the manufacturer s limited warranty Neither the manufacturer nor Dultmeier warrants loss of income or consequential damages for injury or commercial loss resulting from any breach of warranty or warranties stated above The manufacturer s limited warranty as stated does not apply to component part...

Отзывы: