16
Installation and Operation of:
DUKE TSC3 Proofer Oven with Touch Screen Controls
1. Turn power on to the unit with the power switch
on the left side of the unit. Boot Screen is displayed
and automatically transitions to the Main Screen.
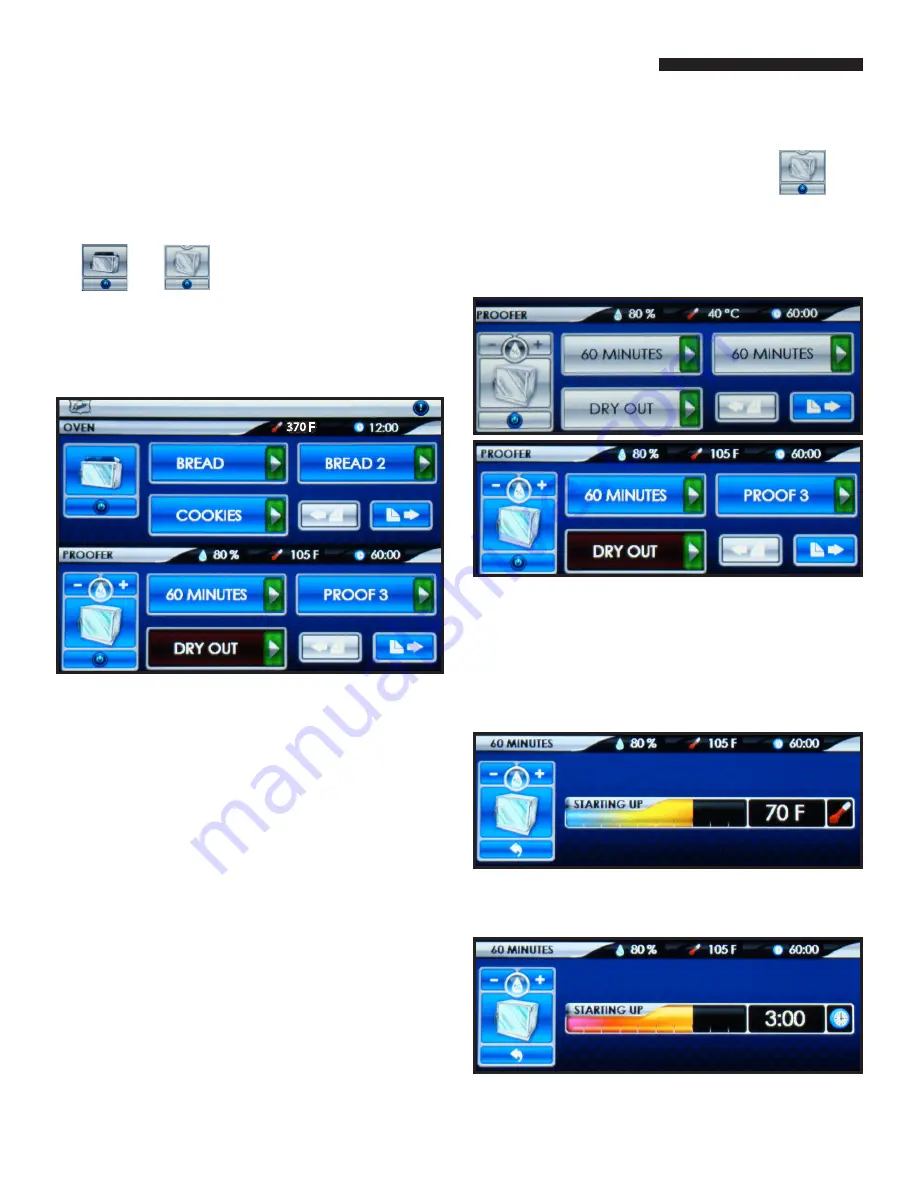
2. Turn the Oven and Proofer ON by touching the
and
buttons located at the left of
the touch screen. The Oven, Proofer and Recipe
Buttons will turn to BLUE background. The
Oven and Proofer lights will turn on and start
preheating.
3. Check to make sure that the oven and proofer
fans are running.
4. Open the oven door; the oven fan should stop.
5. Close the door; the fan should resume.
6. Allow the oven and proofer to pre-heat for at
least 30 minutes. An audible alarm will sound
(3 short chirps) when the oven and/or proofer
reach the ready state. Your Duke Proofer Oven is
now ready to operate.
If there are any problems refer to the Trouble
Shooting section of this manual.
DAILY OVEN/PROOFER START-UP
1. Turn the proofer ON by touching the
button or the desired RECIPE button. The
Proofer and Recipe Buttons will turn to BLUE
background. The Proofer lights will turn on and
proofer will start preheating.
PROOFER OPERATING INSTRUCTIONS
Figure: Proofer Main Screen
2. Proofer will preheat for 10 minutes after
reaching set point to ensure proper proofing
conditions. An audible alarm will sound (3
short chirps) when the proofer reaches the
ready state.
Figure: Proofer Starting Up Screen
(10 Minute Starting Up Timer)
Figure: Main Screen
Figure: Proofer Starting Up Screen
(If under temperature set point)
OPERATING INSTRUCTIONS - continued
370 F


