background image

USER INSTRUCTION

ENGLISH

6

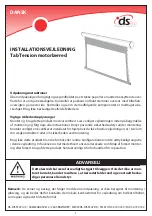
About the canvas

1. The screen must, as far as possible, be driven up into the cassette when not in use. Make sure that 

  there are no insects, dust and durt on the canvas when it is rolled up.

2. The current scroll operation must not exceed four minutes. If so, the engine goes off automati-

     cally to prevent overheating. After cooling (about 10-15 minutes) the roller function works again.

3. To ensure optimal projection effect, you should be aware of the following:

  3.1 Avoid scratching the screen

  3.2 Use a clean cloth or soft brush to clean the screen

4. The screen should not be installed in damp rooms.

5. The screen can be cleaned up with a damp cloth.

The screen is suitable for use in home theaters, cinemas, schools, clubs, entertainment, multi-

media training and meeting room etc..

The screen comes with an internal and an external wireless remote control for your choice:

RF remote control (within 100 meters) or Infrared remote control (within 50 meters).

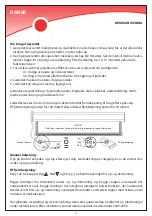
Manual operation:

Press the control unit and stop freely. The screen will stop exactly where you want it to stop, during 

ups and downs.

RF remote control operation:

Use the three buttons (Up      , Down      and Stop     ) on the remote control to operate the screen.

Both solutions have time control during ups and downs, and both will stop automatically when the 

end point is reached. Both solutions have integrated intelligent power function that automatically 

comes into force if the ups and downs operation are going on for more than four minutes. The 

canvas will stop running until the engine has cooled down again.

The sliding wall brackets and smart mounting reduces unnecessary problems and lack of space 

during installation. After installation, the screen can be used with standard 220V-240V. 

CAUTION!

Do not turn on the power before the complete installation of the screen is done

Manual controll

RF Remote control

Up
Stop
Down

Содержание MotorScreen

Страница 1: ... dele Vigtige sikkerhedsoplysninger Montér og brug dette produkt med varsomhed Læs venligst vejledningen inden påbegyndelse af montering og følg nøje alle instruktioner Benyt passende sikkerhedsudstyr under montering Kontakt venligst en kvalificeret installatør for hjælp hvis du ikke forstår vejledningen er i tvivl om din vægkonstruktion eller om sikkerheden ved montering Brug ikke dette produkt t...

Страница 2: ...edet leveres med en intern og en ekstern trådløs fjernbetjening til brug efter eget valg RF fjernbetjening inden for 100 meter eller Infrarød fjernbetjening inden for 50 meter Manuel betjening Tryk på kontrol enheden og stop efter eget valg Lærredet stopper nøjagtig hvor du ønsker det under op og nedrulning RF fjernbetjening Benyt de tre knapper Op Ned og Stop på fjernbetjeningen for op og nedruln...

Страница 3: ...ERINGSVEJLEDNING TILBEHØRSOVERSIGT Lærred 1 stk M4x12 skuer 2 stk M6x12 skruer 2 stk M5x40 skruer 4 stk Rawplugs 4 stk Kroge Ringe 2 sæt Vægbeslag 2 stk Ophængsskinne 2 stk 1 Tegningen viser vægbeslaget monteret på væggen A B 1 Monter vægbeslaget i skinnen på bagsiden af kassetten samtidig med at du indsætter låse skruen i bunden af vægbeslaget 1 Stram skruerne i bunden af vægbeslagene Det er vigt...

Страница 4: ... i korrekt position i henhold til den anbefalede afstand Fjern den fra fabrikken fastspændte skrue og skru i stedet ringene i ophængsskinnerne 2 Sørg for at de ikke kan bevæge sig 1 Ring og ophængsskinne er sikkert fastspændt F 1 Tilt kabinettet for nemmere montering Krogen må ikke placeres for tæt på væggen Der skal være ca 50 mm mellem væg og krog 1 Der skal være ca 10 mm mellem kabinet og væg E...

Страница 5: ... in the next page to assure that all components were received undamaged Do not use damaged or defective parts Important Safety Information Install and operate this product with care Please read this instruction before beginning the instal lation and carefully follow all instructions contained herein Use proper safety equipment during installation Please call a qualified installation contractor for...

Страница 6: ...external wireless remote control for your choice RF remote control within 100 meters or Infrared remote control within 50 meters Manual operation Press the control unit and stop freely The screen will stop exactly where you want it to stop during ups and downs RF remote control operation Use the three buttons Up Down and Stop on the remote control to operate the screen Both solutions have time con...

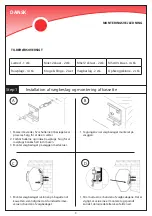
Страница 7: ...IST Screen 1 pcs M4x12 screws 2 pcs M6x12 screws 2 pcs M5x40 screws 4 pcs Rawlplugs 4 pcs Hook Rings 2 set Wall bracket 2 pcs Mounting track 2 pcs 1 Wall bracket mounted on the wall A B 1 Mount the wall bracket into the slot at the back of the cassette while inserting the screw at the bottom of the wall bracket 1 Tighten the screws in the bottom of the wall bracket It is important that the screws ...

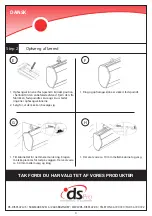
Страница 8: ...n the correct position according to the recommended distance Remove the fixed screw and replace it with the ring 2 Make sure that the mounting track can not move 1 Ring and mounting track are secured F 1 Tilt the chassis for easy installation The hook should not be placed too close to the wall There should be approx 50 mm between the wall and the hook 1 There should be approx 10 mm between the cas...

Отзывы: