background image

CH6

CH6

CH5

CH4

CH3

CH2

CH1

OUT

IN

L

R

L

R

CH5 CH4 CH3 CH2 CH1 ESC

CH6

CH6

CH5

CH4

CH3

CH2

CH1

OUT

IN

L

R

L

R

CH5 CH4 CH3 CH2 CH1 ESC

INSTALLATION /


INSTALACIÓN

ELEMENT’S DESCRIPTION / 

DESCRIPCIÓN DEL ELEMENTO

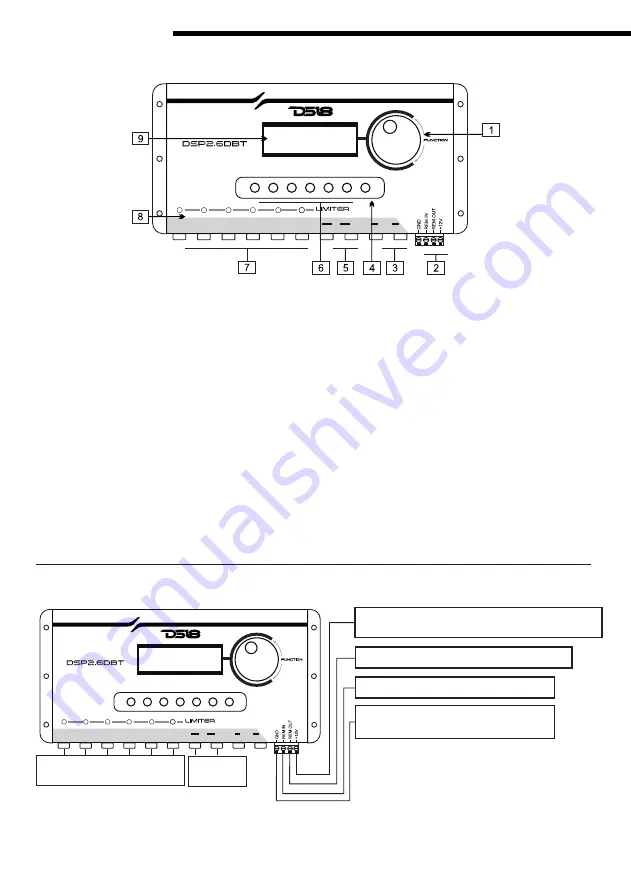
1. The rotary Encoder is responsable by select and change 

  the parameters. 

2. The power supply Input, must be connected with 12Vdc and 

  consumes around 0,35A, the REM IN signal comes from 

  player, and REM OUT sends the signal to others devices 

  (like amplifiers, mixers). 

3.  Use the output LINK to share the audio signal for linking 

  others devices. 

4.  Use the ESC button to return to previous parameters 

  or menus. 

5.  Input signal, must be connected to player or another 

  signal source. 

6.  Use the buttons to select the channel to be configurated, 

  can used in any menu. 

7.  6 Independent outputs.

8.  The leds that indicate when the limiter works. 

9.  Display shows the menus and parameters.


1.  El codificador rotatorio se encarga de seleccionar 

  y cambiar los parámetros.

2.  La entrada de la fuente de alimentación, debe 

  estar conectada a 12Vdc y consume alrededor de 

  0,35A, la señal REM IN viene del reproductor, y 

  REM OUT envía la señal a otros dispositivos 

  (como amplificadores, mezcladores).

3. Utilice la salida LINK para compartir la señal de 

  audio para vincular otros dispositivos.

4.  Utilice el botón ESC para volver a los parámetros 

  o menús anteriores.

5.  Señal de entrada, debe estar conectada al 

  reproductor u otra fuente de señal.

6.  Utilice los botones para seleccionar el canal a 

  configurar, se puede utilizar en cualquier menú.

7.  6 salidas independientes.

8.  Los leds que indican cuando funciona el limitador.

9.  La pantalla muestra los menús y parámetros.

- Wire gauge 1 mm2/18awg or bigger.

- REM IN must be connected to player's remote.

- REM OUT must be connected on amplifiers.

- Voltage Power: 10~15Vdc.

- Comsumption current: 0,35A.

- Calibre del cable 1 mm2 / 18awg o más grande.

- REM IN debe estar conectado al control remoto 

  del reproductor.

- REM OUT debe conectarse en amplificadores.

- Voltaje de potencia: 10 ~ 15Vdc.

- Corriente de consumo: 0,35A.

3

Negativo a la batería o chasis del coche.

Remote Player / 

Reproductor Remoto

Player / 

Reproductor

Negative to battery or car chasis

Amplifier (s) / 

Amplificador (es)

Remote Amplifier (s) / 

Amplificador (es) Remoto

Positive to battery (Supply voltage 10~15Vdc)

Positivo a la batería (Voltaje de alimentación 10 ~ 15Vdc)

DSP2.6DBT

Содержание DSP2.6DBT

Страница 1: ...OWNER S MANUAL MANUAL DEL USUARIO ENGLISH ESPA OL Before using this product please read the instructions carefully and keep it for reference DIGITAL SOUND PROCESSOR PROCESADOR DE SONIDO DIGITAL...

Страница 2: ...CAS 10 WARRANTY GARANT A 10 1 Congratulations you have just purchased a product with DS18 quality Through Engineers with years of experience critical testing procedures and a high tech laboratory we h...

Страница 3: ...BT Interface with Smartphone APP available for Android and iOS Entrada y salida enlazada de Audio RCA de 2 Canales Salidas de Audio RCA de 6 canales Enrutamiento de canales Ecualizador de entrada con...

Страница 4: ...al REM IN viene del reproductor y REM OUT env a la se al a otros dispositivos como amplificadores mezcladores 3 Utilice la salida LINK para compartir la se al de audio para vincular otros dispositivos...

Страница 5: ...UNCIONAL MUTE MUDO EQ DEL CANAL LIMITADOR CRUSE GANANCIA FASE RETRASO CH EQ CROSSOVER LIMITER GAIN PHASE DELAY ROUTING CHANNEL ENRUTAMIENTO DE CANALES 4 2 Volts Max 2 Voltios M ximo 6 Volts Max 28 Ban...

Страница 6: ...der Press the Encoder Gire el codificador Gire el codificador Turn the Encoder Gire el codificador Turn the Encoder Gire el codificador Presione el codificador Gire el codificador hasta obtener la gan...

Страница 7: ...me delay to align better the speakers Select the channel to be configurated Seleccione el canal a configurar Step 1 Paso 1 Step 2 Paso 2 Step 3 Paso 3 Press the ESC button to return to main menu Presi...

Страница 8: ...esione Gire el codificador hasta el nivel de ca da que desee Presione el bot n ESC para regresar al men principal Turn the Encoder until the Decay level as you wish Press the ESC button to return to m...

Страница 9: ...and press the MUTE button to change the mute status Step 1 Paso 1 Step 2 Paso 2 Step 3 Paso 3 Step 4 Paso 4 Para una salida muda seleccione el canal y presione el bot n MUTE para cambiar el estado a m...

Страница 10: ...izar todas las configuraciones del procesador de DS18 mediante tel fono inteligente o tableta facilitando la alineaci n del sistema se puede hacer desde su sistema de audio en tiempo real La aplicaci...

Страница 11: ...oltios RMS Impedance Impedancia 47k OUTPUTS SALIDAS 1 2 3 4 5 6 7 8 Type Tipo Unbalanced Desbalanceado Connection Conexi n RCA Max Level Nivel m ximo 2 Volts RMS Hasta 2 voltios RMS Impedance Impedanc...

Страница 12: ...FOR MORE INFORMATION PLEASE VISIT DS18 COM V1...

Отзывы: