background image

User Manual 

BUILT-IN GAS STOVE | 

MILÁN 90 


15 

label containing that information on the appliance. 

 
How to convert a gas source 

Adjustment of the reduced valve flow


Burners 

Flame 

Converting the  
hob from LPG 
to natural gas 

Converting the  
hob from natural gas  
Gas to LPG 

 
Regular burners 

Full flame 

Replace the burner 
Nozzle according 
To the guidelines in 
table 1 

Replace the burner  
Nozzle according 
to the guidelines in 
table 1 

Saving flame 

Loosen the adjustment 
Spindle (

see fig.7 below

 ) 

And adjust the flame 

Loosen the adjustment 
Spindle (

see fig.7 below

 ) 

And adjust the flame 


Valve adjustment 

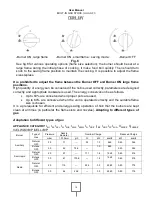
Valve adjustment should be done with the control knob set at Burner ON saving flame position. 
Remove the knob, and adjust the flame with a tiny screwdriver (see fig.7 below). 


Fig.7 
 

To check the adjusted flame: heat the burner at full open position for 10 minutes. Then turn the 
knob  into  the  saving  setting.  The  flame  should  not  extinguish  nor  move  to  the  nozzle.  If  it 
extinguish or moves to the nozzle, readjust the valves. 

 
Flame selection 

 As  the  burners  are  adjusted  correctly,  the  flame  should  be  light  blue,  and  the  inner  flame 
should be clear. The size of flame depends on the position of the related control knob. 
 

Содержание Milan 90

Страница 1: ......

Страница 2: ...User Manual BUILT IN GAS STOVE MILÁN 90 1 1 INTRODUCTION 2 2 SECURITY WARNING 3 3 HOW TO USE YOUR STOVE 4 4 HOW TO TAKE CARE OF YOUR GAS STOVE 5 5 INSTALLATION 8 6 SPECIFICATIONS TABLES 14 ...

Страница 3: ...ontact our customer service center The manufacturer shall not be responsible for any damages to persons or property caused by improper installation or misuse of your kitchen The artifact has been certified for use in countries other than those marked at the stove The manufacturer reserves the right to make any modifications to the products as may be considers necessary or useful also in the intere...

Страница 4: ...burner 2 Semi rapid burner 3 Rapid burner 4 Triple ring wok burner 5 Ignitor for Gas Burners 6 Safety Device Activates if the flame accidentally goes out spills drafts etc interrupting the delivery of gas to the burner 7 Control Knobs for Gas Burners and Electric Hot Plates ...

Страница 5: ...Out Dimensions D x W mm 840 x 480 3 HOW TO USE YOUR STOVE The position of the corresponding gas burner is indicated on each control knob Gas burners The burners are different in size and power Choose the most appropriate for the diameter of the kitchen utensils that are used The burner can be adjusted with the corresponding control knob using one of the following configurations OFF High Low ...

Страница 6: ...y essential that it be thoroughly cleaned thoroughly and in general take into account the following Glazed parts and glass top should be washed with warm water without using abrasive powders or corrosive substances that can ruin them The removable parts of the burners should be washed generally with soap and warm water be sure to remove the adhered substances Automatic ignition pin the end must be...

Страница 7: ...such as oven sprays and stain removers Fig 2 When cleaning the grill pan holder it is recommended to clean it while it is still hot To remove the grill from the plate and put it in the sink remove any food or grease residue first after the grill has cooled rinse it with water Grease the gas valves Over time gas valves can get stuck and it is difficult to turn on off For this case you must clean th...

Страница 8: ...s valves are kept open The burner cannot ignite or the flame is not uniform around the burner check to make sure that The gas holes in the burner are not clogged All moving parts of the burners are fixed correctly There is no air flow around the cooking surface The flame does not keep the burner burning with thermocouple check to make sure that Press the knob completely Keep pressing the knob for ...

Страница 9: ... refuse to use spare parts that are not from the manufacturer 5 INSTALLATION The following instructions are addressed to the qualified installer so installation and maintenance procedures can be followed in the most professional and expert manner Important Unplug the electrical connection before performing any maintenance or regular maintenance Positioning for gas hob Important this unit can be in...

Страница 10: ...at needs to intensify ventilation e g open windows or increase the power of the air intake system if present d Liquefied petroleum gases are heavier than air therefore deposit them down Rooms in which LPG tanks are installed must be equipped with outward ventilation to prevent gas leaks Therefore LPG tanks that are empty or partially filled should not be installed or stored in rooms or spaces belo...

Страница 11: ... at a height of at least 420 mm Fig 5 d The plate must be installed directly under a cabinet the latter must be at least 700 mm from the worktop as shown in Fig C e Fixing accessories hooks screws are provided to place the plate on the top of the table measuring 20 to 40 mm thick see Fig 6 ...

Страница 12: ...on This panel should be placed at least 20 mm away from the bottom of the plate Important When installing the plate in a built in oven the oven must be placed in two strips of wood In the case of a junction cabinet surface remember to leave a space of at least 45 x 560 mm from the back When installing a plate in a built in oven without forced ventilation be sure to have air inlets and outlets to p...

Страница 13: ...ection to non flexible tube copper or steel The connection to the gas source must be made in such a way that it does not create any tension point in any part of the gas plate The board is equipped with an adjustable L shaped connector and a gas supply gasket The connector must be removed and the gasket must be replaced The gas supply connector to the plate is threaded 1 2 gas cylinder Flexible ste...

Страница 14: ...so that it does not reach a temperature greater than 50 than the ambient temperature at any point Before the actual connection make sure that The fuse and the electrical system can withstand the load required by the board The power supply system is equipped with an efficient ground connection in accordance with the rules and regulations prescribed by law The plug or switch is easily accessible Imp...

Страница 15: ...P C I G30 49 47MJ Kg Replacement of burner nozzle loosen the nozzle with a dedicated wrench 7 Fit the new nozzle according to the required gas type see table 1 for reference After you have converted the gas hob to another gas type make sure you have placed a G20 G30 Burner Thermal power kW Nozzle 1 100 mm Thermal power kW Nozzle 1 100 mm Auxiliary Small A 1 0 71 1 0 52 Semi rapid Medium 1 80 97 1 ...

Страница 16: ...flame Loosen the adjustment Spindle see fig 7 below And adjust the flame Valve adjustment Valve adjustment should be done with the control knob set at Burner ON saving flame position Remove the knob and adjust the flame with a tiny screwdriver see fig 7 below Fig 7 To check the adjusted flame heat the burner at full open position for 10 minutes Then turn the knob into the saving setting The flame ...

Страница 17: ...p to 60 are conserved when proper pots are used Up to 60 are conserved when the unit is operated correctly and the suitable flame size is chosen It is a prerequisite for efficient and energy saving operation of hob that the burners are kept clean at all times in particular the flame slots and nozzles Adapting to different types of gas Adaptation to different types of gas APPLIANCE CATEGORY I2H I2E...

Страница 18: ...sification label C This gas plate is not connected to the combustion products evacuation device It will be installed and connected in accordance with current installation regulations Special attention will be given to the relevant requirements regarding ventilation D CAUTION The use of a gas plate leads to the production of heat humidity and combustion products in the room in which it is installed...

Отзывы: