Section 1 -
Assembling Vertical Standards
1.
Attach
power
winch
assembly
to one of the 3½"
(89mm)
O.D. upright tubes
and temporarily tighten near the center of the standard with hex wrench.
2.
Attach
cable
anchor
collar
onto the other 3½"
(89mm)
O.D. upright tube
and temporarily tighten near the center of the standard with hex wrench.
3.
Install one
sliding
adjustment
collar
on each upright tube. Make sure collar
is installed so guide pin is located on the narrow vertical channel.
4.
Attach
endcaps
to both ends of standards.
5.
Install
vertical
standards
in floor sleeves
(see VB_FloorSleeves_Inst for details)
.
6.
Locate the center of the
winch
assembly
47"
(1.19M)
up from the playing surface and tighten screws with hex wrench.
7.
Locate the center of the
cable
anchor
collar
47"
(1.19M)
up from the playing surface and tighten screws with hex wrench.
NOTE:
It will be necessary to move winch and cable anchor collar when using CVS volleyball system for nets heights other than Mens/Womens Volleyball.
8.
For initial set up, you will start by setting at MENS height. Position the center of the
sliding
adjustment
collar
approximately 1"
(25mm)
above the desired net
height or 8' 0-
5
/
8
"
(2.45M)
above the playing surface. Make sure guide pin is in the narrow vertical channel and tighten hand knob to secure in place. Hand knob
should tighten so that it is fully inside wider vertical channel.
Section 2 -
Attaching Net to Standards
1.
Unroll net on floor between standards.
2.
If not already in place, install ½"
(13mm)
fiberglass rods in
ends of net.
3.
String net between standards by sliding looped cable
over pulley on
sliding
adjustment
collar
.
4.
Unspool the 2"
(51mm)
nylon strap from
power
winch
.
Hook one end of the
top
net
cable
in hook on belt.
Hook opposite end of
top
net
cable
to
cable
anchor
collar
on the other standard.
NOTE:
Make sure the cable is running cleanly through sheaves.
Section 4 -
Tensioning the Net
1.
Tighten net by turning
winch
handle
clock wise. Measure
distance from playing surface to the top of net at center.
Rules allow net to be ¾"
(19mm)
higher at court sidelines.
2.
Set net height to
7' 11
5
/
8
" (2.43m).
3.
Tie a loop in one end of the
bottom
net
rope
. Loop is usually at
end with
cable
anchor
collar
for convenience. Hook rope to
cable
anchor
collar
(or power winch)
.
4.
Insert the remaining end of
bottom
net
rope
into
rope
tensioner
and clip it to the
power
winch
(or cable anchor collar).
5.
Wrap 1"
(25mm)
wide
net
tension
straps
once
around standards and tighten using buckles.
NOTE:
Winch incorporates a worm gear type
mechanism.
To loosen top cable, turn winch handle
counterclockwise.
5. Remeasure at center to ensure proper net height.
The Combination Volleyball System is
now set for regulation MENS volleyball.
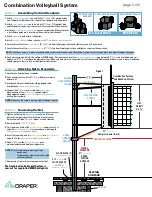
TOP NET CABLE
FLOOR PLATE (2)
(Ordered Seperately)
3 ¼”
(8.89cm)
ID
FLOOR SLEEVE
501006
(Ordered Seperately)
ENDCAP
ENDCAP
Combination Antenna
and Boundary Marker
CABLE
ANCHOR
COLLAR
SLIDING
ADJUSTMENT
COLLAR
POWER WINCH
with
Folding Handle
SLIDING
ADJUSTMENT
COLLAR
½"
(1.27cm)
fiberglass dowel rod (2)
ROPE
TENSIONER
2"
(5.08cm)
NYLON STRAP
Combination Antenna
and Boundary Marker
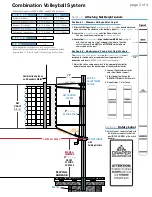
CENTER of WINCH
CENTER of COLLAR
NET TENSION
STRAPS
NET TENSION
STRAPS
BOTTOM NET ROPE
TOP NET CABLE
BOTTOM NET ROPE
MENS &
WOMENS
47”
(119.4cm)
ABOVE
PLAYING
SURFACE
NET
HEIGHT
3’ 3
3
/
8
”
(1 METER)
1’ 9”
(53.3cm)
1’ 9”
(53.3cm)
NET
HEIGHT
3’ 3
3
/
8
”
(1 METER)
MENS &
WOMENS
47”
(119.4cm)
ABOVE
PLAYING
SURFACE
PLAYING
SURFACE
PLAYING
SURFACE
ADJUSTMENT COLLAR
CABLE ANCHOR COLLAR
POWER WINCH
ASSEMBLY
As A Set: C129.029
PN: C132.050
Figure 1
page 2 of 4
Combination Volleyball System


