background image

– 8 –

FIG.

(11.1)

(11.2)

(11.3)

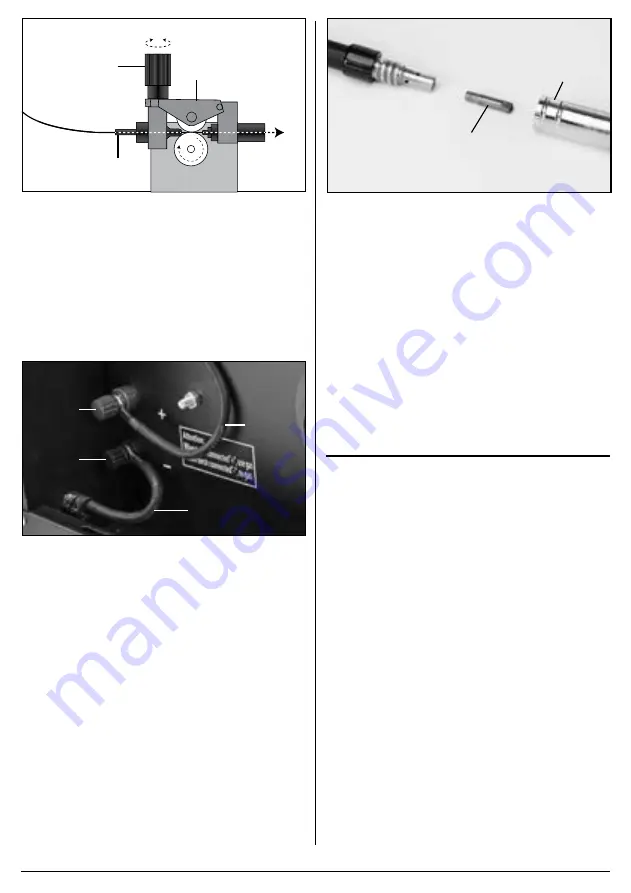
8.  GASLESS (no-gas / flux cored).
 

The polarity of the torch and earth clamp must be 

made correctly to suit the gas setup.
i.  Attach the earth clamp connector 

(10.1)

 to the 

positive terminal 

(16.1)

.

ii.  Attach the welding torch connector 

(11.1)

 to the 

negative terminal 

(16.2)

.

Note:Reverse the torch and earth clamp for gas 

welding.

FIG.

(16.1)

(10.1)

(11.1)

(16.2)

9.  Press the feed trigger on gun and observe the wire 

feed mechanism. If the wire is being fed correctly it 

will come out of the swan neck. If it jams you will 

need to remove the gas shroud 

(2.1)

 and with a 

small spanner unscrew and remove the tip 

(2.2)

Pass the tip over the wire and secure back onto the 

swan neck. Do not over tighten. Resecure the gas 

shroud and trim the wire back as required.

Note: Ensure the tip size matches the wire size prior to 

installing.

FIG.

(2.2)

(2.1)

7.5  NO GAS WELDING PRINCIPLE

For a successful weld joint, the molten metal must be 

protected from contaminating gases found in the air. 

This is achieved by using a flux cored filler wire. The flux 

is produced as the wire melts.
The flux creates a coating over the weld and once 

cooled will need to be removed by chipping it off.
If allowed to cool naturally some areas of the flux may 

ping off of the weld by themselves due to thermal 

contraction for this reason it is recommended that eye 

protection is worn.

8.  BASIC WELDING  


 OPERATION

NOTE: Although this machine is medium weight and 

portable take care. 

Note: Welding is a mix of science and art and due to the 

complex principles and vast differences in parameters 

(ie. Material type, position, condition etc.) That 

information is well beyond the scope of this manual.

Draper Tools suggest training be obtained from a third 

party or refer to a suitable reference book on the subject 

additionally; nothing can beat practice using the welder 

on scrap material to get a better understanding.

8.1  ON/OFF SWITCH - FIG. 5

The on/off switch is a rocker switch. Press the top half in 

to switch the welder ‘on’ and the bottom half in to switch 

the welder ‘off’.

Содержание 71095

Страница 1: ...roduct has been designed and contains all the necessary information to ensure its correct and safe use By following all the general safety instructions contained in this manual it will ensure both product and operator safety together with longer life of the product itself All photographs and drawings in this manual are supplied by Draper Tools to help illustrate the operation of the product Whilst...

Страница 2: ...h Caution Information that draws attention to the risk of damage to the product or surroundings 1 3 EXPLANATION OF SYMBOLS Warning Read the instruction manual Warning Wear suitable welding eye face protection Warning Wear ear defenders During grinding operations Warning Wear protective gloves Keep out of the reach of children Warning Danger of electric shock Danger of fire Danger of explosion Dang...

Страница 3: ... is present in case of an accident Never change electrodes with bare hands or damp gloves for ARC MMA welders Keep welding cables away from power cables Regularly inspect the condition of the welding earth and power cables for signs of damage Do not leave the machine unattended and remove the plug from the socket when not in use Do not use welding cables unsuitable for the amperage Ensure the eart...

Страница 4: ...ng gauntlets Wear flame retardant clothing leather wool etc Take care when adjusting or maintaining the torch that it has had time to cool sufficiently and is disconnected The arc generates ultra violet radiation can damage skin and eyes visible light can dazzle eyes and impair vision infra red heat radiation can damage skin and eyes Such radiation can be direct or reflected from surfaces such as ...

Страница 5: ...e Draper Help Line see back page Do not attempt to use the product The packaging material should be retained during the warranty period in case the product needs to be returned for repair Warning Some of the packaging materials may be harmful to children Do not leave any of these materials in reach of children If any of the packaging is to be thrown away make sure they are disposed of correctly ac...

Страница 6: ... MIG wire feed speed 9 Power cable 10 Earth clamp 11 Direct connection MIG torch 12 Front castors 13 Cover latch 14 MIG wire feed assembly 15 MIG Spool hub 16 Gas No gas polarity terminals 17 Face mask 18 Hammer brush FIG A 17 1 2 3 4 5 6 7 8 9 10 11 12 13 12 3 13 18 Note For details of our full range of accessories and consumables please visit drapertools com 14 15 16 ...

Страница 7: ... from the socket before carrying out adjustment servicing or maintenance 7 3 FITTING THE WHEELS Fit the front castor wheels using the 8 screws provided Slide axle through both axle loops 4 per wheel Fit one circlip to the groove on the axle closest to machine body each side Slide on a wheel followed by the plain washer and then another circlip repeat for other side Fit the plastic caps 7 4 INSTALL...

Страница 8: ...al must be protected from contaminating gases found in the air This is achieved by using a flux cored filler wire The flux is produced as the wire melts The flux creates a coating over the weld and once cooled will need to be removed by chipping it off If allowed to cool naturally some areas of the flux may ping off of the weld by themselves due to thermal contraction for this reason it is recomme...

Страница 9: ...DING PRINCIPLES FIGS 7 8 The MIG welding process allows two similar materials to be fused together without altering the properties of the material The electric arc created between the electrode the welding wire and the work piece produces the required heat for turning the metal into a molten state The gas creates a shield around the arc and the molten metal The area to be welded and the earth poin...

Страница 10: ...ntact tip Clean Wire feed pulley set too tight Loosen Too low clamping pressure of the wire feed pulley Increase the clamping pressure Interrupted or disruptive wire supply Damaged current nozzle Replace Burnt current nozzle Replace Dirty driving gear torch liner Clean Cut on worn driving gear Replace Electric arc turned off Poor contact between earth clamp and part to be welded Tighten the pliers...

Страница 11: ...harge This warranty period covering labour is 12 months from the date of purchase except where tools are hired out when the warranty period is 90 days from the date of purchase This warranty does not apply to any consumable parts any type of battery or normal wear and tear nor does it cover any damage caused by misuse careless or unsafe handling alterations accidents or repairs attempted or made b...

Отзывы: