OPERATION & USE
- 8 -
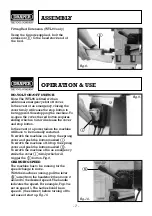
ROTATING THE HEADSTOCK
The headstock can be rotated 45, 90, 135 and
180°. Loosen handle
✷✌
and pull the release
pin
✸✌
.When pin
✸✌
is pulled out, the head
can be rotated. Once the head is rotated to the
desired angle, release the pin and it will lock
into place. Once setup, retighten handle
✷✌
.
Fig.11A & B.
Note: This operation may be necessary for
turning bowls, etc.
SLIDING THE HEADSTOCK (WTL95 only)
By loosening handle
✹✌
you can slide the
headstock along the bed. Once set in position,
lock in place using handle
✹✌
.
Fig.12.
MOVING THE TAILSTOCK
To slide the tailstock along the bed, loosen lever
✺✌
. Once set in position, lock in place by
tightening lever
✺✌
. To move live spur in and
out with the barrel, loosen locking lever
✻✌
and rotate wheel
✼✌
. Once the position is set,
lock in place using lever
✻✌
.
Fig.13.
ADJUSTING THE TOOL REST
To move the tool rest along the bed, slide it
back and forth or rotate loosen handle
❀✌
. To
angle or change the height, of the tool rest
✽✌
,
loosen handle
✿✌
. This set up with the tool rest
will provide for most of your needs. However,
should it be required for bowl turning etc, there
is an extension
❁✌
provided. This fits by
loosening handle
✿✌
. Remove the tool rest and
replace with the extension. Loosen handle
✾✌
on the extension and slide in tool rest.When
fully adjusted, make sure all of the locking
handles are secured.
Fig.14.
CHANGING THE BELT
Make sure the lathe is in speed position 1.
Switch off power supply and remove the plug.
Remove the pulley cover. Insert a disc (the size
of a two pence piece) between the two halves of
the motor pulley and between the belt runs
(
Fig.15
). Slowly rotate the drive spindle back
and forth by hand while turning the speed lever
slowly to a higher speed.When maximum
speed has been reached on the lever, the belt
can be removed easily. Fit a new belt over both
pulleys. Slowly rotate the drive spindle back
and forth by hand while turning the speed lever
slowly to the slowest speed.When speed 1 is
reached, the disc may be removed and pulley
cover replaced.
Fig.11A.
Fig.12.
Fig.11B.
✷✌
✸✌
✸✌
✷✌
✹✌
Fig.13.
✼✌
✻✌
✺✌
Fig.14.
✽✌
✿✌
❀✌
Fig.15.
✾✌
❁✌
WTL 95
WTL90


